I admit it: I'm a total geek. I love electronics, programming, 3D printing, 3D art, and vintage Apple hardware. I'm always juggling half a dozen projects. I also enjoy documenting it all: my successes, my failures, my experiences... and everything geeky along the way.
When it comes to designing PCB boards for projects, sometimes it just isn’t worth it. Take the SoundBox for example. It was just supposed to make a fart sound. Nothing fancy. A lot of time and effort went into creating the board and submitting the order, as well as ordering all the components. Those boards cost me $16.00. That’s $5.33 a pop. The cost of the components (headers, ATmega, resistors, caps, crystal, etc) brought the cost up to about $13 for a completed board. Not to mention the money spent on shipping. $13 for a board that just plays a sound? It’s arguable that that’s too much money, but the novelty of it made it justifiable. I even included two extra hookups for switches. The intent was that I’d be able to trigger 3 sounds independently; or LEDs, or sensors. Whatever the case, the extra hookups were an attempt at making the boards more versatile in the event I’d ever need them for another project.
Sometimes you see something cool online and you want to try it out. Breadboards are cool, but not so much when you want to keep that “something” permanently. Protoboards are OK, but again, it’s something you have to order and keep on hand for spur-of-the-moment projects. I suppose I should order a bunch just to keep them on hand anyway. Some protoboards can cost a good $5 each, plus shipping. That quickly adds to the cost of the project. A simple little thing, and you’re already $10 in the hole just for the board. Besides, I’ve always been a big fan of the “finished look”. Protoboards look sloppy and thrown together. I don’t like my finished projects to look like prototypes.
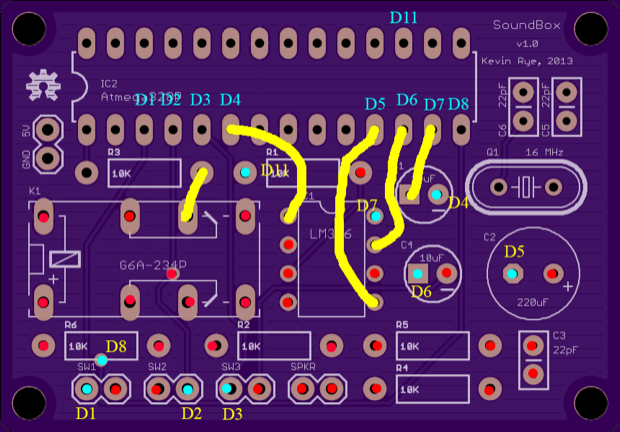
As far as those SoundBox PCBs, the bad news is that I goofed on the design. They didn’t work as they should have. The good news is that I might still be able to make use of them. So they might not be a total loss. I took the rendered image from OSH Park and marked it up in a way that I’d be able to solder some jumper wires here and there and in the end have access to some digital pins. Since I’d never install the op amp or the relay, I could use those holes as connection points.
Jumper wires and marked in yellow. Red dots are holes that are of no use without adding a ton of wires. Blue dots are places when I can access a digital pin. So if I wanted to, I could easily make up to 9 connections. Sure, there’s nothing stopping me from just soldering wires to all the pins, but that would probably make a big mess and end up looking just like a breadboard. Not to mention, they’d probably just break off. The best way to do it is to actually solder a connection to one of the existing holes, and keep the jumper count as low as possible. Push comes to shove, I might even be able to hack an ATtiny into where the LM386 was supposed to go.
Here’s a quick video I threw together illustrating that the ATmega itself functions perfectly. It’s the LM386 and the relay that’s a mess. In a pinch, I’d be able to use these boards for something.
I’ve seen plenty people throw together simple little projects and seal an entire Arduino Uno board up in a box. It could be something as simple as a 16x2 display and a temperature sensor. You can get a 16x2 LCD on eBay for $3 bucks. Temperature sensors run about a buck a piece. I think it’s a total waste to include an Arduino Uno in the final assembly. They’re supposed to be for prototyping! Who has the money to blow $30 on a new Arduino every time they want to make something? I also suspect that one would inevitably tear the thing apart as soon as they thought of a new project. You’ve done all that work on a project and now you have nothing to show for it!
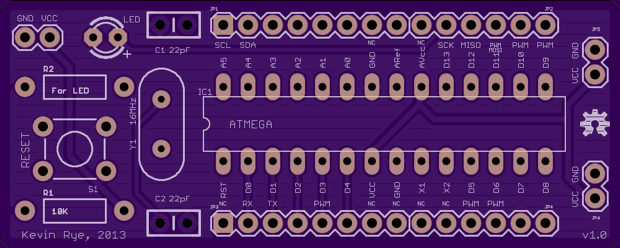
Back in January when I discovered the SoundBox PCBs were junk, I kicked around the idea of making a bare bones Arduino board in favor of dedicated PCBs for simple spur-of-the-moment projects. Firing off a quick project would then just be a matter of code. The boards would be all ready to go. I’d also save a bunch of money by ordering all the components and assembling a handful all in one shot, and not paying for shipping every time I needed a new ATmega. If I did it right, I could make a completed unit for under $10 bucks. Then I wouldn’t feel like I was wasting them if all it did was flash a few LEDs or beep.
There’s been a few times already over the past few months where I’ve thought, “That would be cool!”, but then after quickly doing the math, the prospect of spending $20-$30 to complete the project made it seem not all that worth it. Not to mention, the 3 week wait from OSH Park puts a damper on things. The SoundBox was the perfect example of that. Something that was supposed to go “beep” ended up costing a good $30 bucks to complete.
I’ve seen a few bare bones Arduino boards online before. I’m not the first one to think of it. However, I’ve seen some bare bones boards that aren’t that bare bones. I’ve seen some with full-fledged power supplies, 3.3V regulators, built-in FTDI, reset switches. Once you start adding in all these little things, the cost really starts to go up. You then begin to wonder if it’s worth it in the end. Why go through all that trouble if it ends up costing $15 to make? For that, you might as well throw in the extra $5 bucks and just buy an Arduino Nano. I think $10 bucks is the sweet spot. If you can pull it off for less than $10, then it’s worth it.
With that in mind, I started out designing a board that’s basically at ATmega with the pins broken out. Forget all the other bells and whistles. Who needs a DC jack when you can just connect a battery pack? You can always connect a DC jack later with some wires if you needed it. Do you really need a voltage regulator? Finally, add a few extra connections for Vcc and ground so that you can add things to it later. Keep the board flexible and you can use it for anything.
I’m sure the reset switch is overkill, but I have a few lying around, so it won’t hurt to include them on the board. The 3 or 4 mini-switches I have were pulled off an old CD player, so they were pretty much free.
Getting 3 boards from OSH Park only cost $12.50, or $4.17 each.
I also like the idea of being able to prototype with them. A lot of times I have multiple projects going at once. So it’ll be nice to not have to keep juggling prototypes on my breadboard.