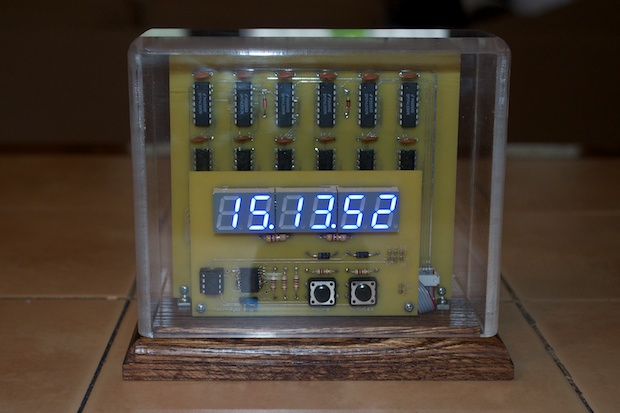
This 7490 clock has been a thorn in my side for a little over 5 years. It's never run right. It looks great, but it runs fast.
Never mind how much money I’ve spent on it. It’s not about the money any more. Now it’s about just getting a 7490 clock that runs accurately. If it doesn’t run accurately, then everything up until now... all the time and money... has been a total waste.
Prior to my most
recent redesign of the daughterboard, the 1Hz signal for setting the minutes and hours didn't make its way through the 6-pin ribbon cable and up to the 7490 chips. I guess I had too many diodes in the prior design and all the 0.7 volt drops attenuated the already ugly-looking square wave that I was getting from the cheapie crystal I was using. As far as the 7490s were concerned, it looked like Vcc instead of a square wave. The clock ran fast and the set buttons didn’t always work.
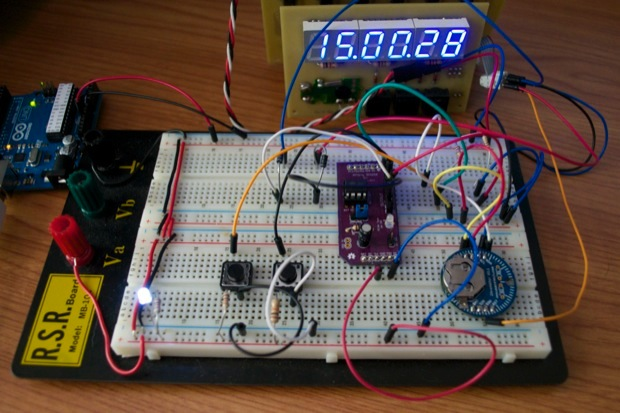
My most recent redesign of the daughterboard involved swapping out the cheapie crystal and diodes for an ATtiny85 and a DS3231 RTC. The ATtiny85 sets the DS3231 to run at 1Hz. The 1Hz signal is what subsequently gets counted by the 7490s.
In addition, the leftover pins on the ATtiny85 allowed me to run a signal directly to the hours and minutes sections, controlled by some push buttons. I simply toggle one of the digital pins high/low and that gives the 7490s something to count. Varying the delay between going high and going low speeds up or slows down the rate in which the segments increment on the display. In other words, I could get fancy with the code and easily implement fast and slow setting for both the hours and the minutes. (A feature that was absent from the initial design.)
It looked great and the set buttons worked like a charm. The design was light years ahead of the old one. I was pretty impressed with myself. If only it would keep the time! The clock runs fast. I could maybe deal with a few seconds a week or even a minute or two a month, but it’s gaining about half an hour a day. That’s about 3.5 hours a week. Unacceptable!
I don't understand why. When I breadboarded the prototype and clocked it against my iPhone’s stopwatch for 36 hours, it ran to the second.
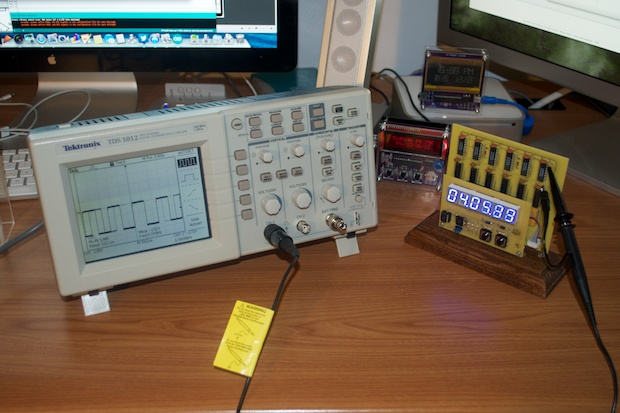
It must be a pretty good looking square wave. If there was a bunch of ripple in there, the 7490s would be counting that. Even if it was 2 Hz, the clock would be running double-quick, but it's not. I decided to hook up my
new scope and take a look at the signal just to see what it looked like.
The whole reason I picked the DS3231 was because it's supposed to be an extremely accurate RTC. It has a temperature-compensated internal crystal and it’s supposed to run like a top. I was under the impression from all the reading I had done that the accuracy is not just in time-keeping, but that it also extended to the 4 frequencies that it can output.
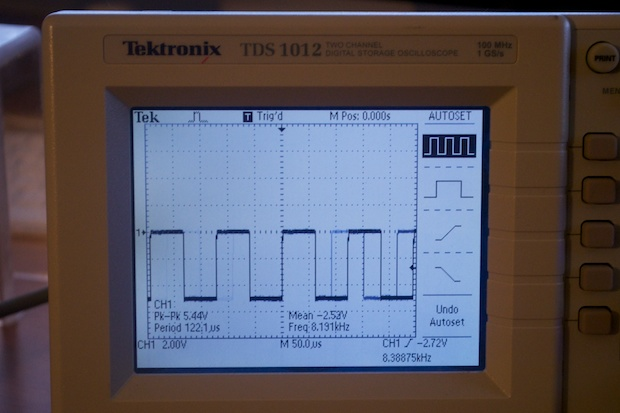
I connected my scope and monitored the frequency. Unfortunately, the scope only reads "<10 Hz". I guess it can’t go all the way down to 1Hz. However, it's a pretty good looking square wave, so it's not a ripple problem. The frequency must not be a perfect 1.000 Hz.
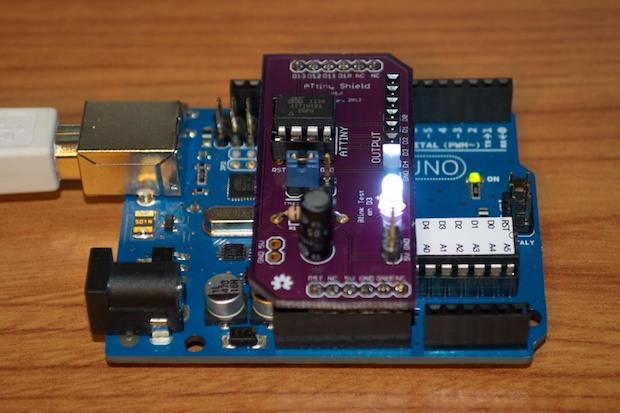
Since I can't measure the 1Hz clock with the precision that I’d like, I'll try one of the other frequencies. I broke out my
ATtiny programming shield and reprogrammed the ATtiny to tell the DS3231 to run at 8.192 KHz.
I reconnected the scope and measured the frequency. It measured it at 8.191KHz. That's pretty darn close. I wonder if that accuracy is the same at 1Hz as it is at 8.192KHz or does it get worse the lower it goes? I checked the data sheet and it’s supposed to be the same for all frequencies. The data sheet claims an accuracy of +/- 2 ppm. That equates to about +/- 1 minute a year. So why is my DS3231 clocking with an accuracy of +1 second per minute? If it's something like 1.017Hz, that's enough to have the clock gain ~1 second a minute.
I thought I’d have to shop around for a more accurate 1Hz RTC, but +/- 2 ppm seems to be as good as it gets. The whole reason I picked the DS3231 was because it was supposed to be really, really accurate.
I've seen other people do some crazy things to keep their clocks accurate. If you see after a week that your clock is 3 minutes fast, you could simply just subtract off 3 minutes every week during the wee hours and no one would be the wiser. However, when your clock is just counting pulses, that's a little harder to do. All I could do is just stop the clock all together.
If my clock was running 2 hours fast every week, I could just stop the clock for 20 minutes or so each night at 3 in the morning, and it would always be on time. But that seems like such a hack, not to mention that my clock could be off 10-20 minutes on any given day prior to an adjustment. I want the clock to work and I want it to work well without any software hacks.
I just don't know why finding a solid 1Hz clock is so difficult. I might just have to bite the bullet and go back to diving the 60 Hz line frequency from the mains down to 1 Hz with some 7490s. If this clock is going to be old school, might as well make it really old school.
Before I go ahead and (yet again) redesign the daughterboard, I have a few things that I want to try first. I consulted the data sheet again for the DS3231 and looked to see if there was anything I missed.
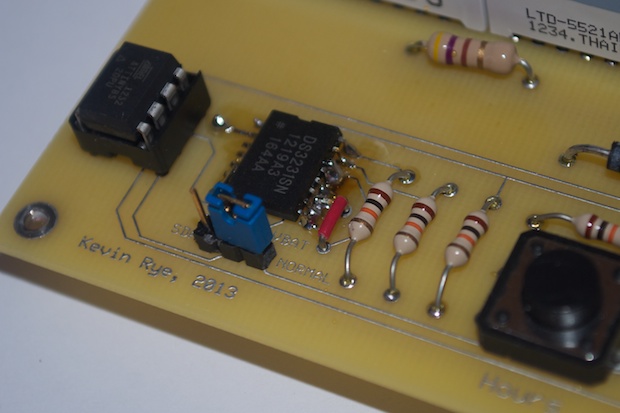
- I left pin 1 floating. That’s OK. Per the data sheet, the 32 KHz output can be left floating if not in use.
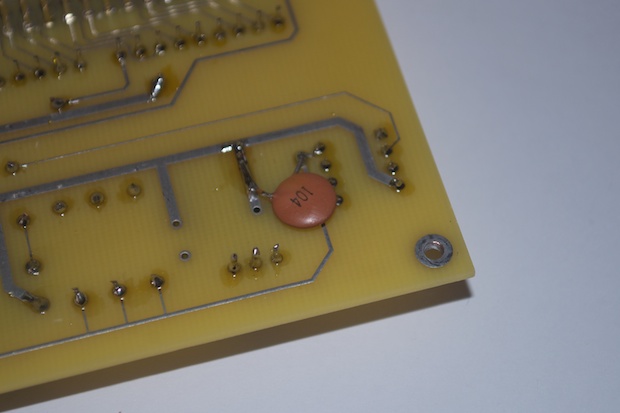
- Pin 2 is Vcc. The data sheet says the Vcc pin should be decoupled using a 0.1μF to 1.0μF capacitor. I don’t have a cap across Vcc and ground, so that’s something I can try.
- Pins 3, 15, and 16 all require a pull-up resistor. Check. Did that.
- Pin 4 is the reset pin. It can be left floating. It has an internal 50k�Ω pull-up resistor.
- Pins 5-12 do not have a connection and should be grounded. Check. Did that.
- Pin 14 can be connected to an external battery for use as a backup. The data sheet states that the pin should be grounded if not in use. Since I’m not using a battery, that’s also something I can try. I had left it floating.
So there’s a few things that I can try to see if it fixes things. I have my fingers crossed that’s it’s as simple as grounding a pin and adding a cap. I can easily add a cap to the back of the daughterboard without it looking really ugly. Originally, I wasn’t sure if I’d ever need to connect a battery so I put in a connection for it just in case. I should be able to just run a wire from that connection to ground.
If that doesn’t work, maybe I’ll try another DS3231 altogether. Maybe I have a bad chip. It’s unlikely, but you never know.
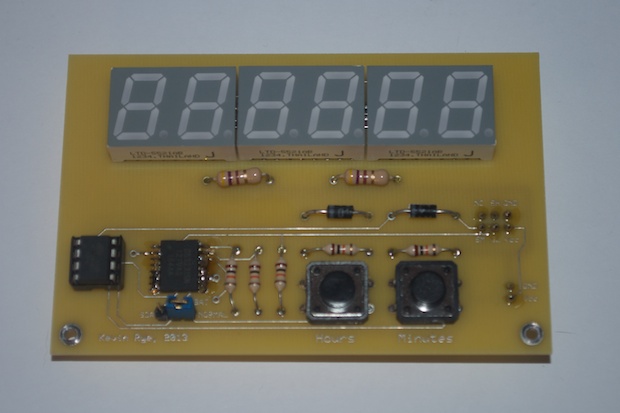
I first liberated the daughterboard from the rest of the clock.
I then soldered a 0.1μF cap between the DS3231’s Vcc pin and ground.
I then jumpered the battery input pin to ground.
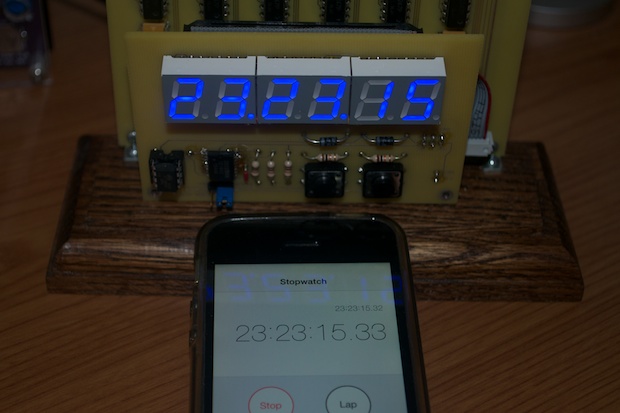
I put the clock back together and set the time to 00:00:00. I then ran it against my iPhone’s stopwatch for an hour to see if there was any improvement.

After 61 minutes and 39 seconds, it was still to-the-second! That’s awesome! Prior to the 2 fixes, it would have already been a whole minute off.
I let the clock continue to run overnight. I checked it again after almost 24 hours to see if there was any drift. It was only off by milliseconds. That’s probably because I didn’t hit “start” on the stopwatch at exactly the right time. So it’s pretty much bang-on. Yeah! I fixed it!
Finally, after 5 years (and several design mistakes), I have a fully functional, accurate 7490 clock.
See this project from start to finish: Digital Clock 3.0 Fixing the 7490 Clock Fixing the 7490 Clock, Part II Fixing the 7490 Clock. Part III Fixing the 7490 Clock. Part IV

