I admit it: I'm a total geek. I love electronics, programming, 3D printing, 3D art, and vintage Apple hardware. I'm always juggling half a dozen projects. I also enjoy documenting it all: my successes, my failures, my experiences... and everything geeky along the way.
I reached another milestone today. I figured out how to read the state of a pin and react to its state. In other words, I can tell the Arduino to “do something” based on whether or not a pin is HIGH or LOW! This is awesome. That means I can now hook up a switch to a pin and press it to set the clock.
You can’t just throw a switch in between a pin and Vcc without a pulldown resister. You’ll get 5V when you press the switch. The Arduino will read the pin as HIGH and your clock will set. However, when you let go of the switch, the pin will be left floating. It’s not HIGH or LOW. It’ll be left in a random state and you’ll find your clock randomly setting itself whenever the Arduino “thinks” the pin is HIGH. When your finger’s not on the switch, you have to make sure the pin goes LOW by grounding it. (AKA “debouncing” a switch.) You accomplish this with a pulldown resistor. 10K should do the trick.
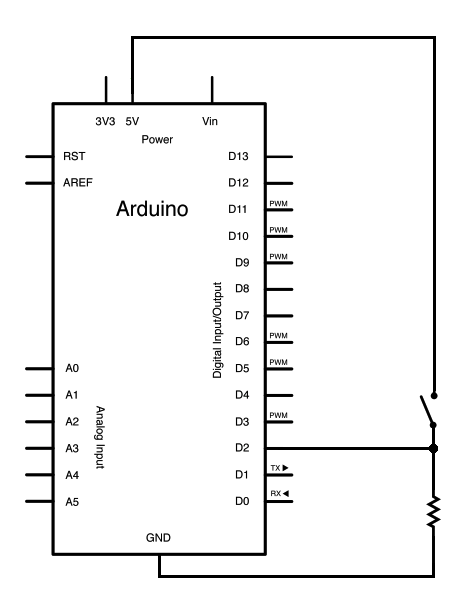
Here’s the schematic:
One side of the switch (yellow) is connected to Vcc and the other side of the switch (blue) runs between pin 2 and ground through a 10K resistor.
Now for the code. First you have some declare some variables:
int hourSet = 2:     //pushbutton connected to pin 2
int pinTwoVal = 0;     //variable to store the pin state
In void setup():
pinMode(hourSet, INPUT); //set pin 2 as an input
Then in the void loop():
pinTwoVal = digitalRead(hourSet);     //set pinTwoVal to match the state of pin 2, HIGH or LOW
if (pinTwoVal == HIGH) {     //if pin 2 is HIGH, increment the hours
	DateTime now = RTC.now();
	DateTime then(now.unixtime() + 3600); // one hour later
	RTC.adjust(newHour);
	delay(100);	//throw a small delay between reads
	//in your loop you might want to play around with the delay
}
So now when you press the button, the hours increment. Sweet!
Here’s a video of it in action:
Now I’ll just have to do the same for the other elements of the clock. I need more switches!