I admit it: I'm a total geek. I love electronics, programming, 3D printing, 3D art, and vintage Apple hardware. I'm always juggling half a dozen projects. I also enjoy documenting it all: my successes, my failures, my experiences... and everything geeky along the way.

We have a clock! | Kevin Rye.net - Main

Kevin Rye

Geek Extraordinaire. Yeh, I said it.

We have a clock!

I got the DS1307 up and running. It was pretty easy to interface it with the Arduino. You just hook the SDA and SCL pins to the Arduino’s analog 4 and 5 inputs, import the RTC library and you’re done.

arduino_clock_with RTC_1

Here’s what the clock should look like once you’ve hooked everything up:

arduino_clock_with RTC_fritzing drawing

arduino_clock_with RTC_2

A few lines of code have to go in your clock sketch to make things happy.

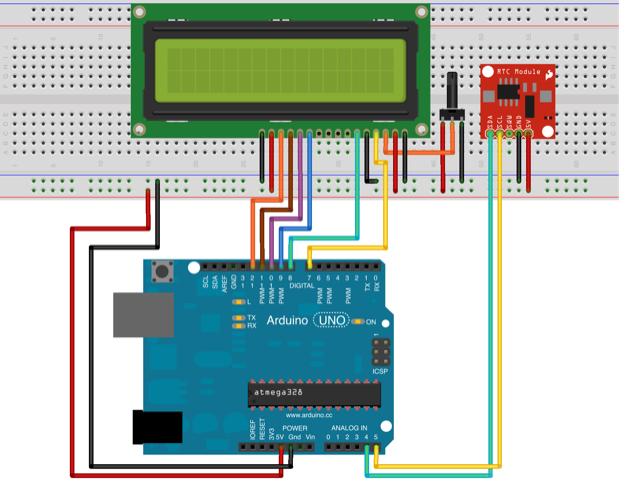
#include <LiquidCrystal.h>
#include <Wire.h>
#include "RTClib.h"

// LCD
// LCD D4 to Arduino 9
// LCD D5 to Arduino 10
// LCD D6 to Arduino 11
// LCD D7 to Arduino 12
// RS 4 to Arduino 7
// EN 6 to Arduino 8
// RH 5 to GND
// pin 3 to center pot
LiquidCrystal lcd(7, 8, 9, 10, 11, 12);

// DS1307 RTC
// SDA pin to Arduino A4
// SCL pin to Arduino A5
RTC_DS1307 RTC;

void setup() {
  Serial.begin(57600);
  Wire.begin();
  RTC.begin();

  /*
  if (! RTC.isrunning()) {
   Serial.println("RTC is NOT running!");
   // following line sets the RTC to the date & time this sketch was compiled
   //  RTC.adjust(DateTime(10/23/2012, 10:30:00));
   }
   */

  lcd.begin(16,2); // 16x2 LCD
  lcd.clear(); // blank the display
}

void loop() {
  DateTime now = RTC.now();
  lcd.clear();
  lcd.setCursor(0,0);
  if (now.day() < 10) {
    lcd.print("0");
  }

  lcd.print(now.month(), DEC);
  lcd.print("/");
  if (now.month() < 10) {
    lcd.print("0");
  }

  lcd.print(now.day(), DEC);
  lcd.print("/");
  lcd.print(now.year(), DEC);
  lcd.setCursor(0,1);
  if (now.hour() < 10) {
    lcd.print("0");
  }

  lcd.print(now.hour(), DEC);
  lcd.print(":");
  if (now.minute() < 10) {
    lcd.print("0");
  }

  lcd.print(now.minute(), DEC);
  lcd.print(":");
  if (now.second() < 10) {
    lcd.print("0");
  }

  lcd.print(now.second(), DEC);
  delay(1000);
}

It's that easy!

If you want to set the time to the time the sketch was compiled, just change this line to:

RTC.adjust(DateTime(__DATE__,__ TIME__));

From that point on, everything will run on its own, and the RTC will keep track of the time and date even in the event of a power outage. (Using the battery backup.)

You shouldn't have tot set it again for another 8 years; that's how long the RTC battery backup is supposed to last. However, Daylight savings, etc might cause you to want to manually tweak the time. That accuracy of the DS1307 is based on the crystal it uses. Depending on who you ask, some say the clock will lose anywhere from a few seconds to a few minutes a day. Some say maybe a minute or two a year. So who really knows? The accuracy of my clock remains to be seen.

In any event, I need to implement a manual time-setting function. The initial command to set the RTC to the compile time is fine, by forward going, I don’t want to have to pull the 328 out of the finished product to tweak the time. I also don’t want to put a header on my finished clock for in-circuit programming. I want it to look clean and finished and not so much like a test fixture/prototype.

There’s still some more work to be done…..

See this project from start to finish:
We Have a Clock
Setting the Clock
Clock Code is Complete
Clock Design Decisions
New DS1307 Kit
ChronoDot Breakout Board
Arduino LCD Clock PCB Complete
Making the LCD Clock Stand - Take 1
Arduino LCD Clock PCBs Arrived!
Arduino LCD Clock Assembly
Making the LCD Clock Stand - Take 2
Another Clock Stand
Arduino LCD Clock: New GUI
Laser Cut LCD Clock Enclosure: Take 1
Laser Cut LCD Clock Enclosure: Take 2