Jan 29, 2024
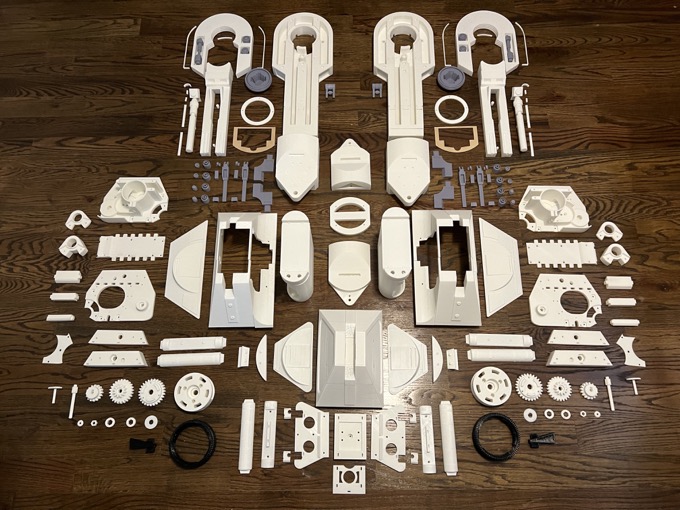
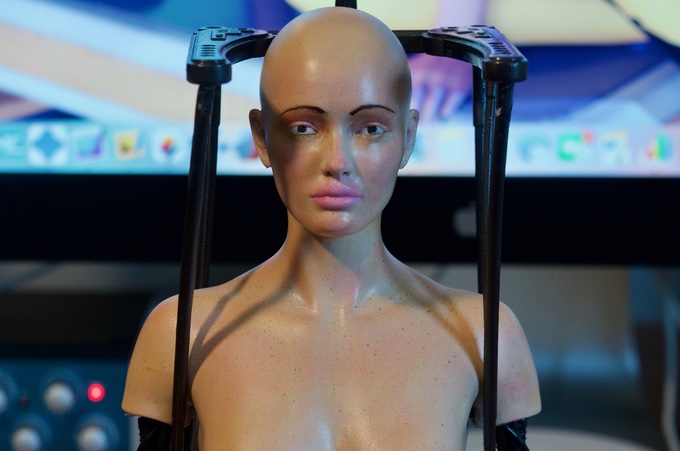
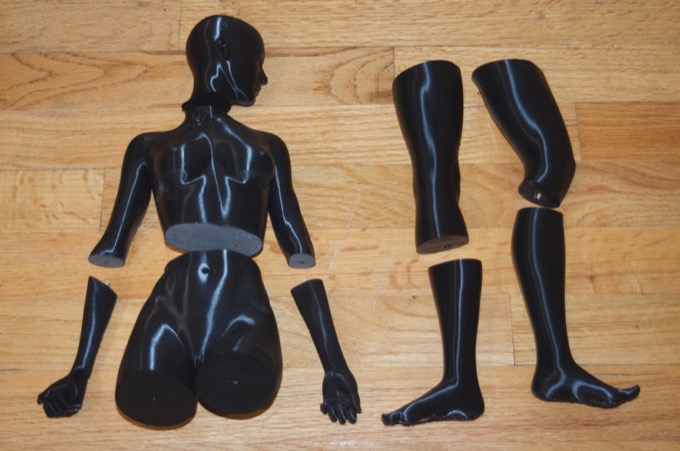
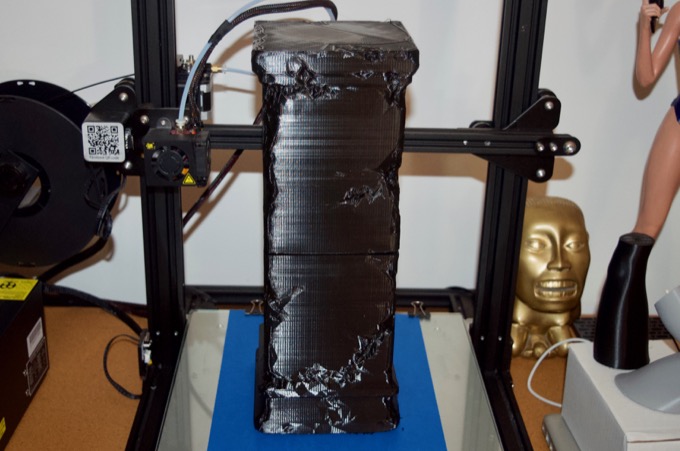
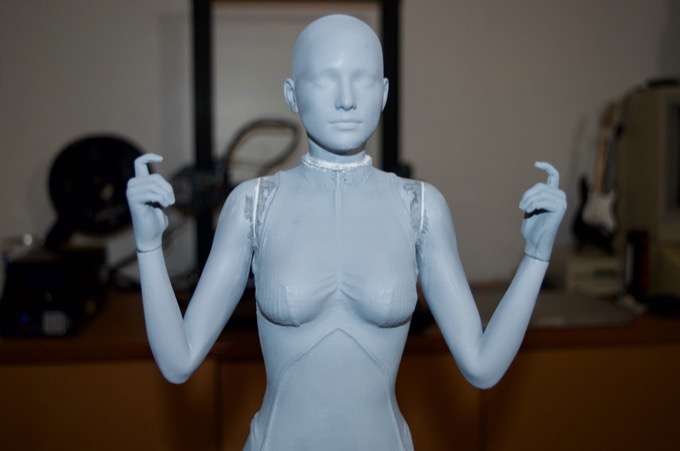
With the body and dome complete, it's time to start on the legs and feet. It took a little over two months to print all the parts. It was so much work! 175 pieces in total.
Read More... Jan 22, 2024
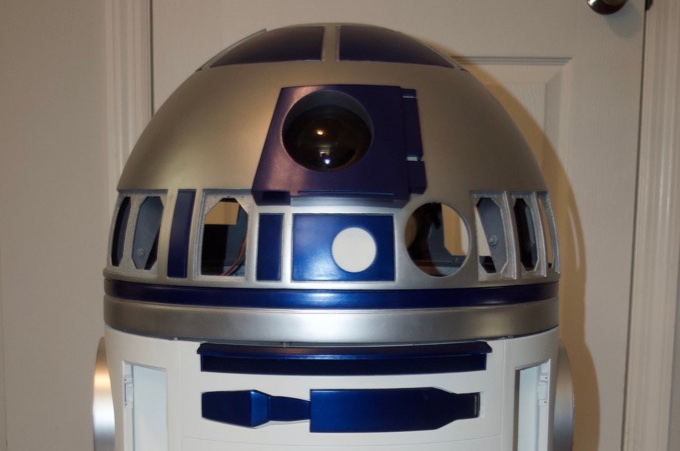
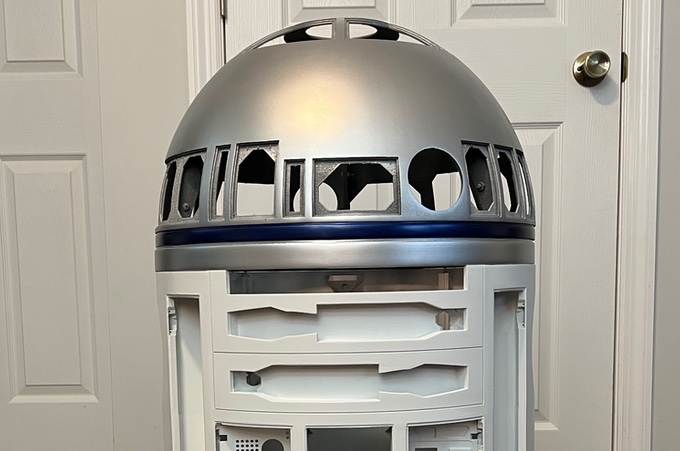
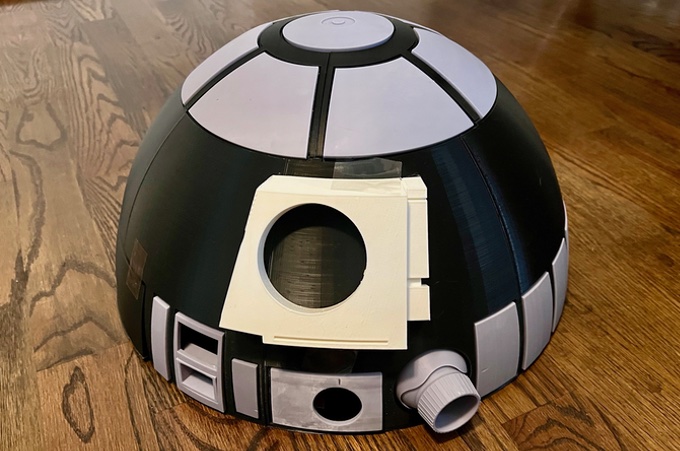
It took over a month the complete the dome. I still have to mount the holojprojectors, but I will do that later once I print the servo arms. For now, I'm calling it done.
Read More... Nov 12, 2023
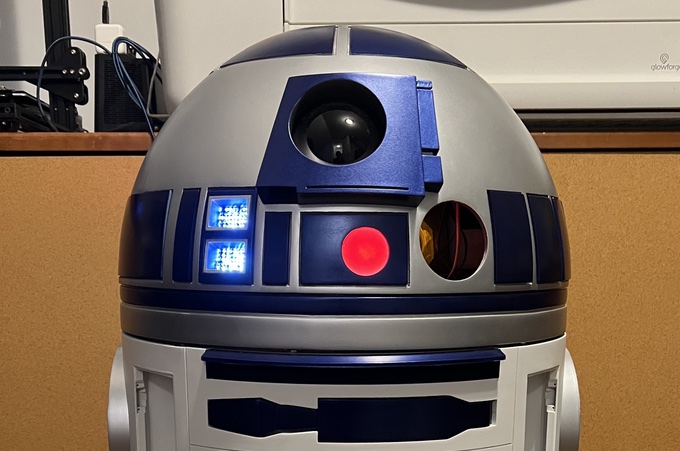
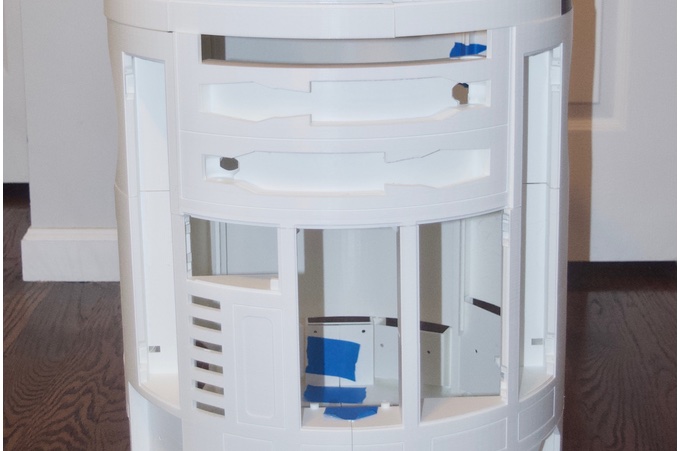
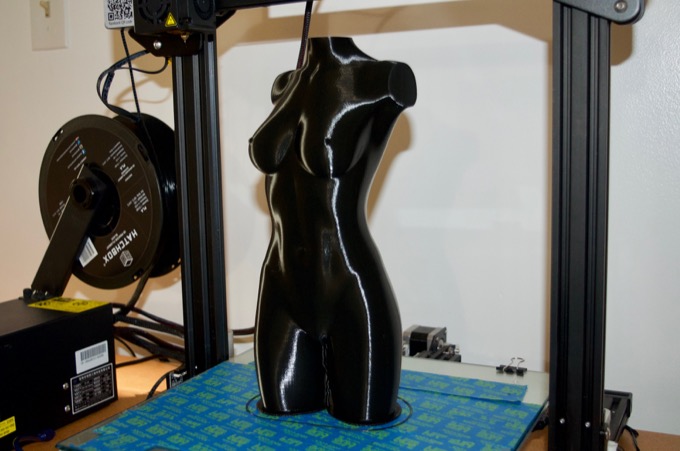
With winter approaching, I was able to complete all the sanding and painting that I need to do to assemble the body and the dome. R2 is really looking awesome!
Read More... Oct 02, 2023
After two months of painting and sanding it's really starting to look like an R2!
Read More... Jul 29, 2023
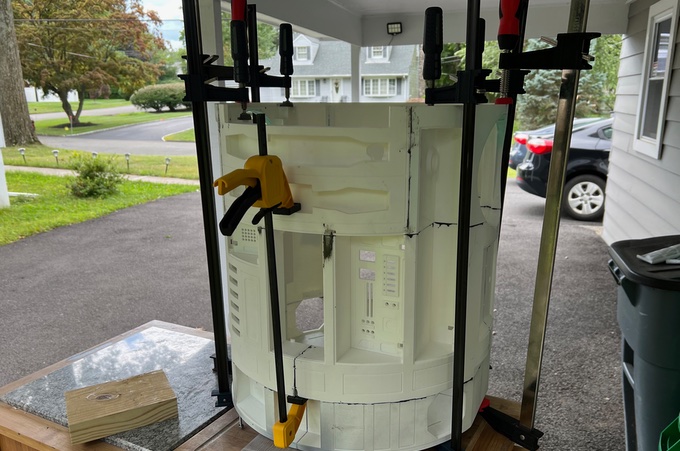
This was the most complicated and stressful glue-up I've ever had to do with 3D printed parts!
Read More... Jul 12, 2023
Finally! After well over a month of printing and sanding, I have one piece ready for painting!
Read More... Jun 21, 2023
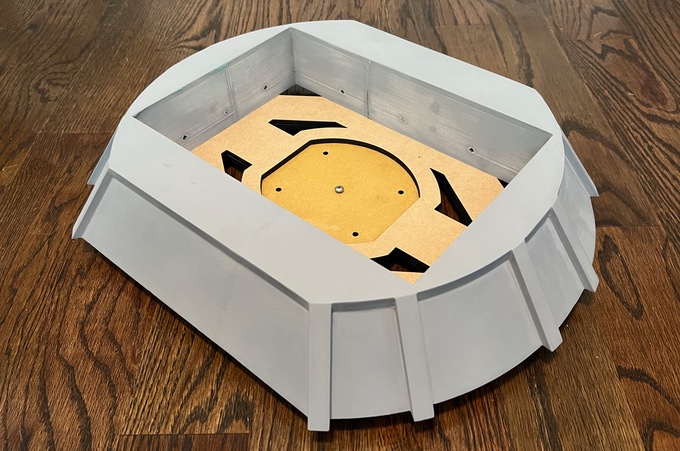
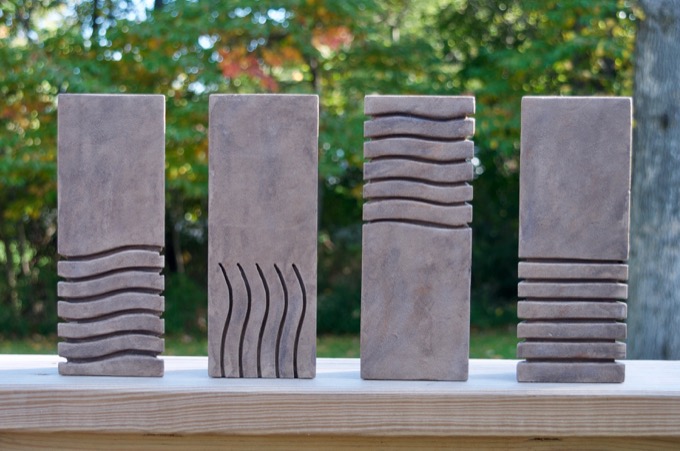
After more than 500 hours of printing, it's really starting to look like an R2!
Read More... Jun 07, 2023
I have wanted to built a life-sized, screen-accurate, R2-D2 for years. It's finally happening!
Read More...Sep 26, 2022
That's it! It's finally complete. I am so happy with how it came out. I think this is my most elaborate project yet! I can't wait to see what's next!
Read More... Sep 25, 2022
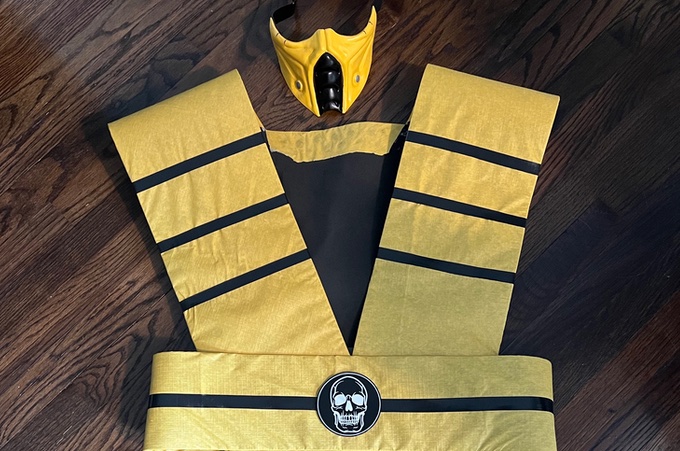
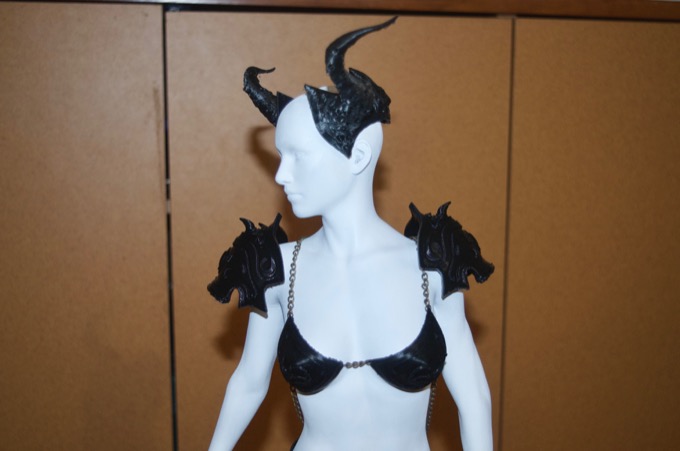
I took a step away from the Scale Mail Bust to work on a weekend project for my sister-in-law. She needs a Scorpion outfit for Comic-Con stat!
Read More...Aug 21, 2022
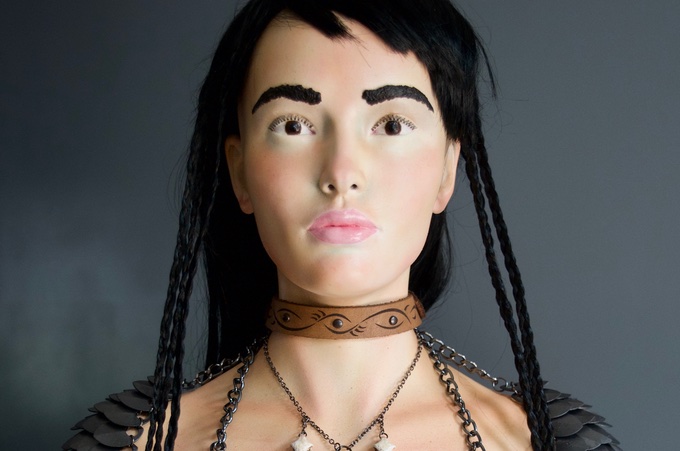
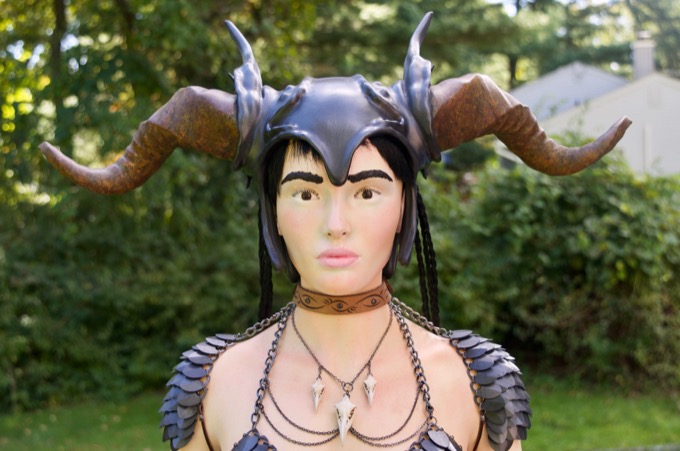
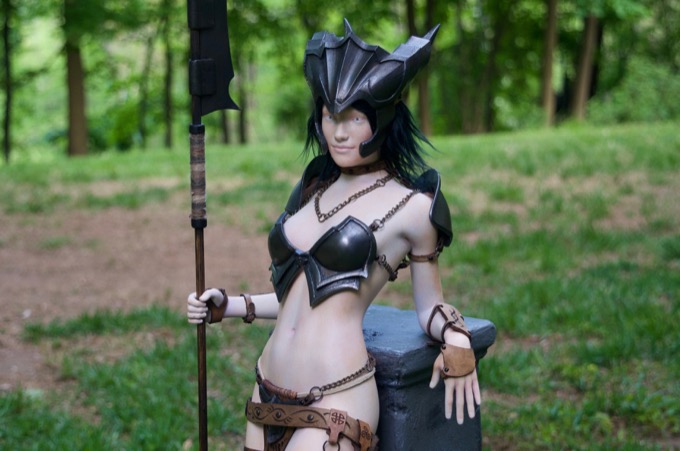
I have had so much fun working on this project. It's been keeping me pretty busy for months. I am so happy with the way that it is turning out. All I need to do is complete the headdress and make a base for it.
Read More... Aug 02, 2022
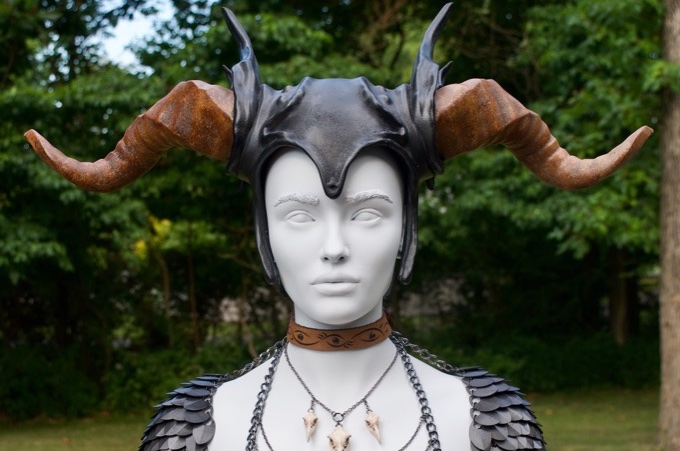
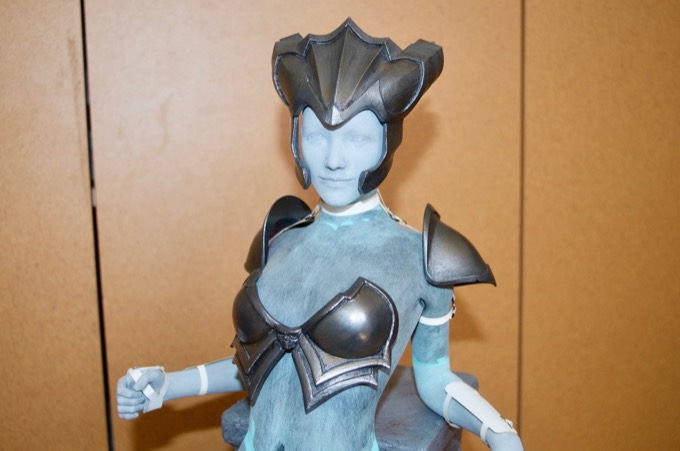
I found a really sweet headdress model that I wanted to print for the Scale Mail Bust. It's huge and will have to be broken into several smaller parts. 12 to be exact. It was a lot of work making it, but it was a lot of fun!
Read More...Jul 31, 2022
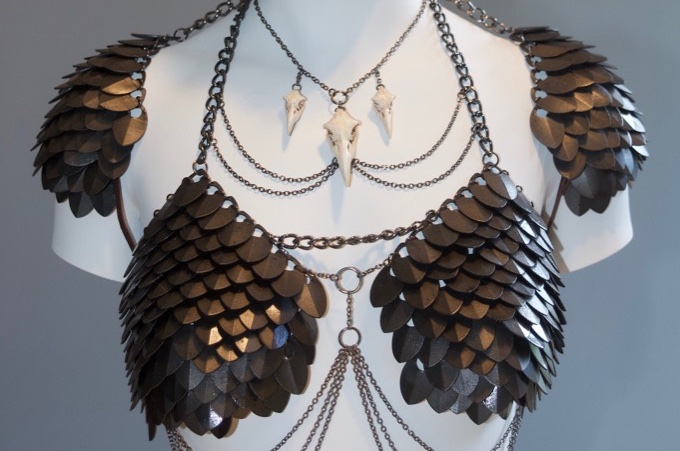
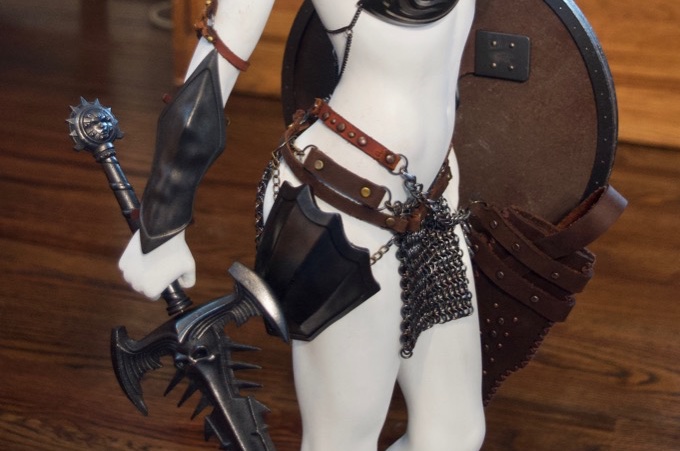
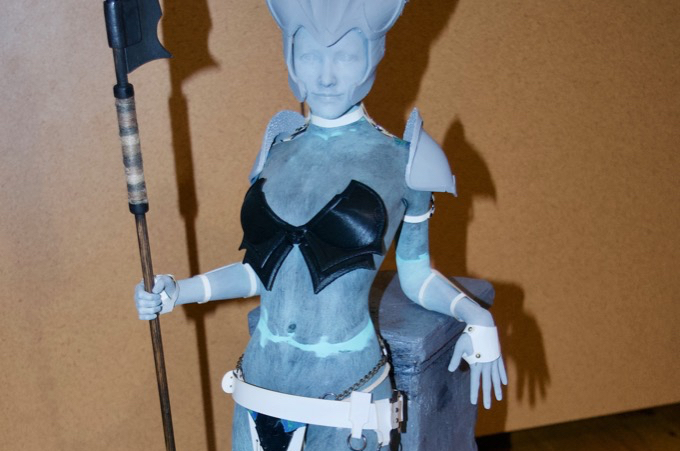
I did not realize how much work would be involved in making scale mail armor. It does go together surprisingly fast once you get the hang of it. The hard and time consuming part is painting them!
Read More...Jun 26, 2022

Time for some sanding and painting on the Scale Mail Bust. This was so much work!
Read More...May 22, 2022
The last two figurines that I made came out amazing. I've been dying to make another one. I was particularly happy with how the chainmail loincloth came out on the latest one. Ever since then I have wanted to make one with scale mail. I decided to make a bust that I can use to showcase some scale mail armor.
Read More...Apr 29, 2022
It's been six months since I finished my last big project. I wanted to put together something that won't take a month to complete, but something that I could sink my teeth into over a week or two.
Read More...Jan 29, 2022
I almost finished the 20" Victoria 6 figurine a little over 2 years ago. I was never really happy with the paint job. I've been wanting to go back and repaint the figurine for a long time. I broke the hand off the other day by accident so I figured glueing it back on and redoing the paint job would be a nice weekend project.
Read More...Oct 10, 2021
I've been wanting a set of the Fifth Element Stones for years. I just never got around to printing them. I figured this would be a great project to get into. I am really happy with how they came out. They look like still stone!
Read More...Sep 05, 2021
The Fifth Element is one of my all-time favorite movies. A few years ago, I made a clock that looks just like the
Zorg Door bomb. I've been wanting to make some more props from the movie for a long time. I figured the famous temple key would be a great one day build.
Read More...Jun 16, 2021
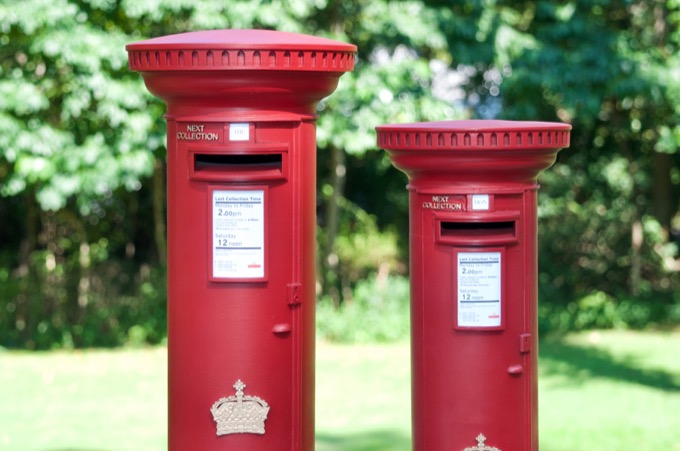
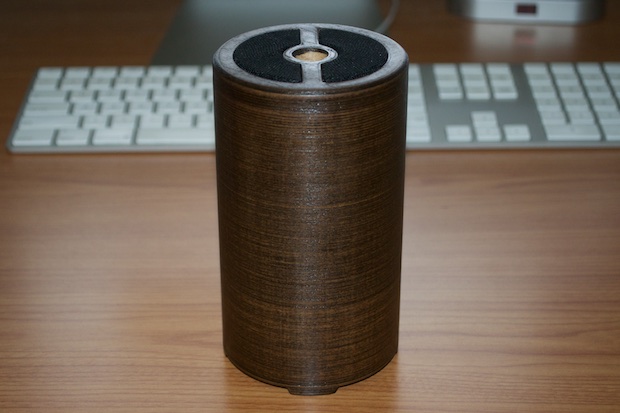
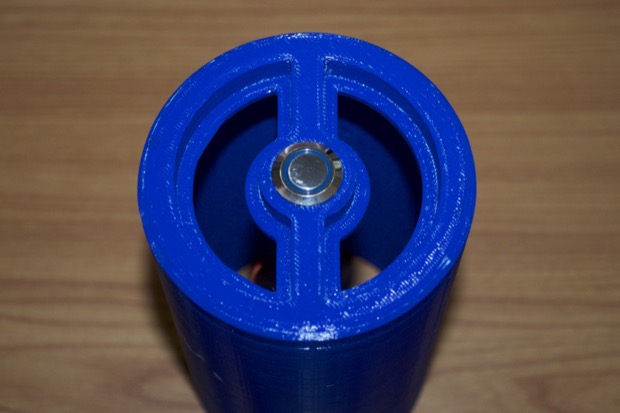
I was really pleased with the pillar box that I made for my sister last Christmas. I wanted to make one for myself, but bigger!
Read More...Jun 06, 2021

I can't believe it took me almost a year to complete this project! Granted, I took some time off because I put off purchasing a resin printer for months. I also moved to a new house. So it took me a few months to get back into the swing of things. I'm so happy with the way that it turned out.
Read More...May 21, 2021
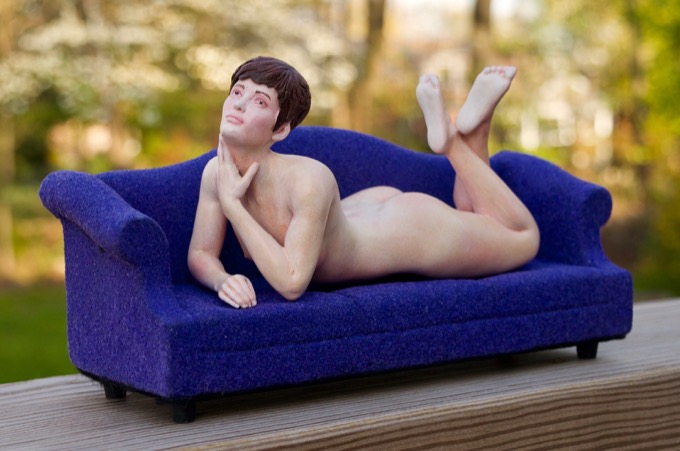
It's time to make the base for the figurine. After that I just need to paint the figurine and the project will be complete. It's been so long since I started this project that it's great to see a finish line on the horizon.
Read More...May 21, 2021
The next step in my 23" Victoria 8 figurine is to paint. I want to practice first. I decided to throw together a little sculpture to give me something to practice painting.
Read More...May 17, 2021
I found a really nice looking Beskar 3D model online and I thought it would be really cool to print a stack of them.
Read More...Apr 24, 2021
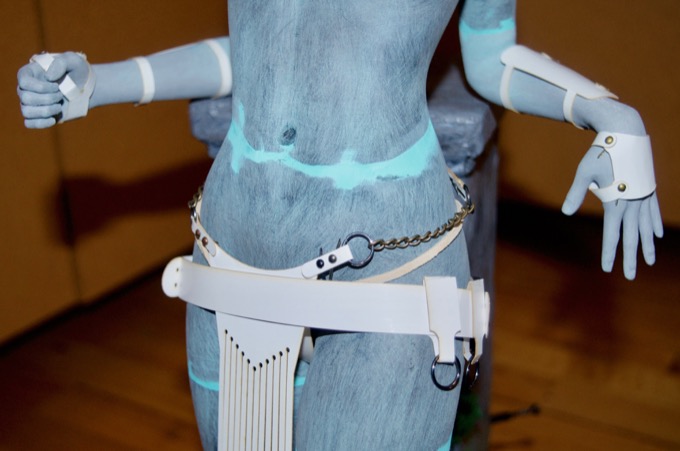
The figurine clothing and armor is now complete. I just have to paint it and complete the base.
Read More...Apr 11, 2021
For the loin cloth, I wanted to try my hand at making some chain mail. It was time-consuming and tedious work, but a nice challenge. I think the end results look really good.
Read More... Mar 30, 2021
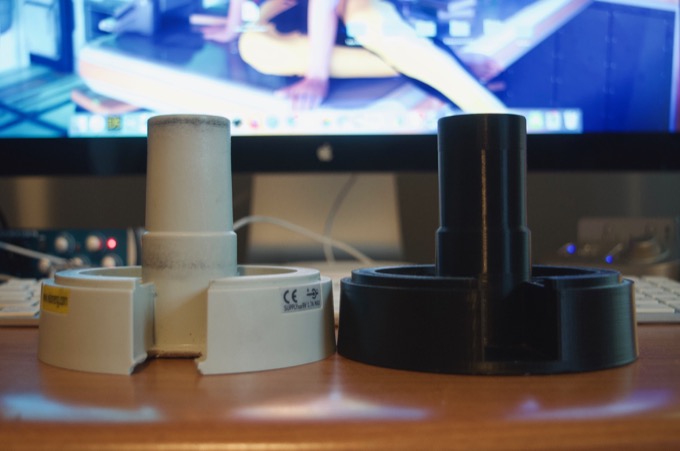
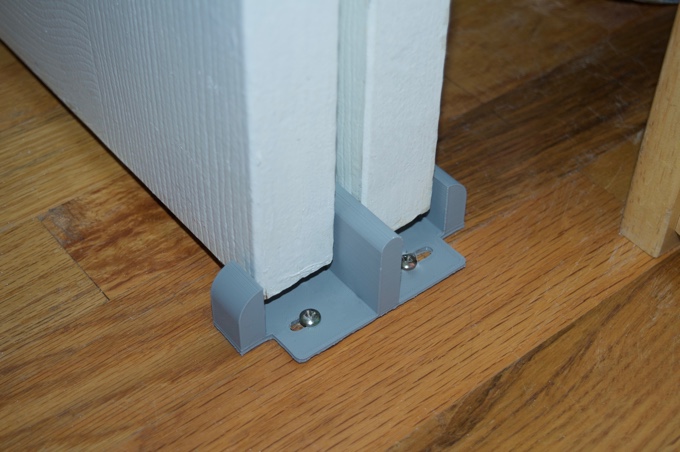
The stand for a microscope at work broke. Let's see if I can replicate it and 3D print another one.
Read More...Mar 24, 2021
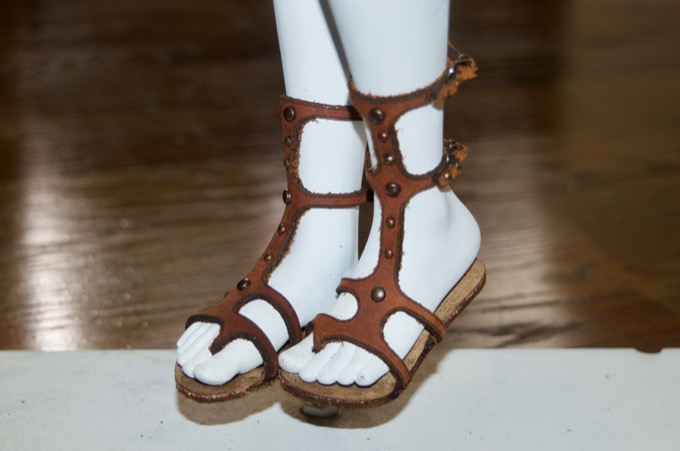
I am really happy with the way that the shoes turned out. They are way better than the shoes that I made for the last figurine.
Read More...Feb 28, 2021
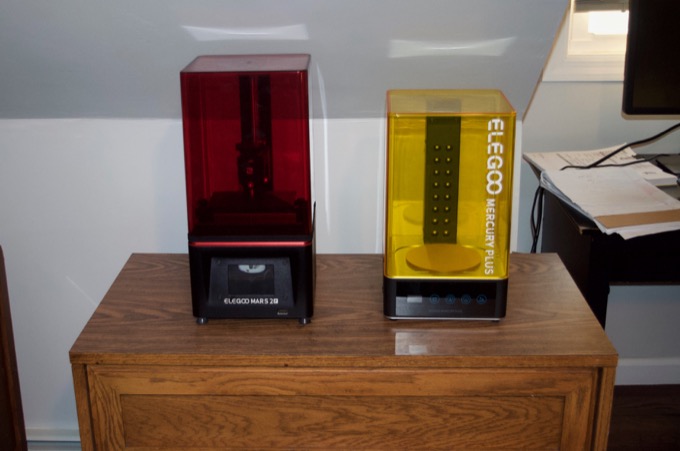
I took a six month break from working on the figurine because I was waiting for the ELEGOO Saturn resin 3D printer to hit the market. In the end I decided to go with the ELEGOO Mars 2 Pro printer instead. Now that I finally have a resin printer, I can get to work on printing the armor.
Read More...Feb 22, 2021
I've been wanting a resin 3D printer for the longest time. I can't believe I waited so long to pull the trigger.
Read More...Nov 29, 2020
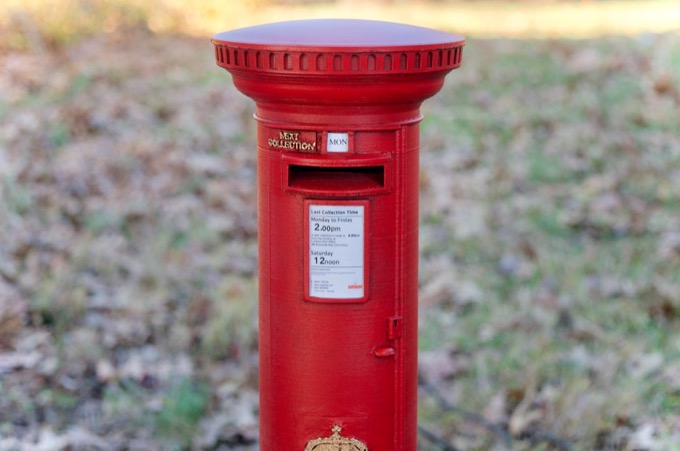
The 3D-printed Balgonie Place sign that I made for my Mom for Christmas came out so great that I decided to make something for my sister too. After all, they both have Scottish-themed rooms at home. I think a pillar box would make a nice addition.
Read More... Nov 19, 2020
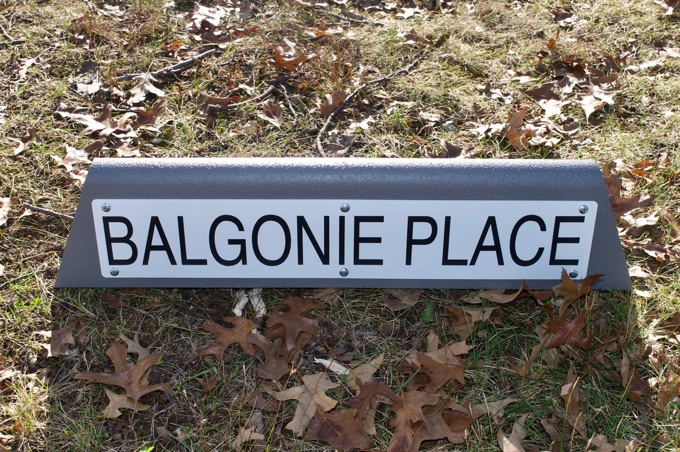
On the street where my Mom grew up in Scotland, there's a concrete sign on the corner of the street. I thought it would be something neat to 3D print for her.
Read More... Sep 20, 2020
With the weapons complete, it was time to start designing the armor.
Read More... Sep 05, 2020
It's time to make some weapons!
Read More... Aug 29, 2020
With all the parts to the new model printed, it was time to glue, sand, and paint.
Read More...Jul 27, 2020
I was so impressed with the way that my last 3D-printed figurine turned out that I just had to make another one. This model took a whopping 148 hours and 46 minutes to print.
Read More...May 17, 2020
I can't believe the figurine is complete. It looks awesome. It took me four months and a lot of hard work to complete.
Read More...Mar 21, 2020

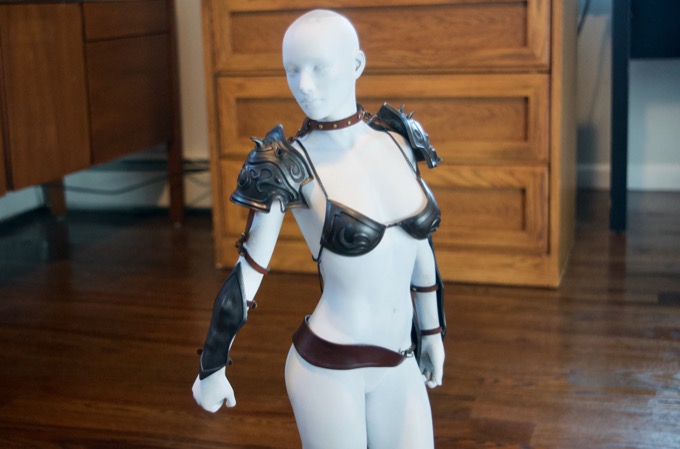
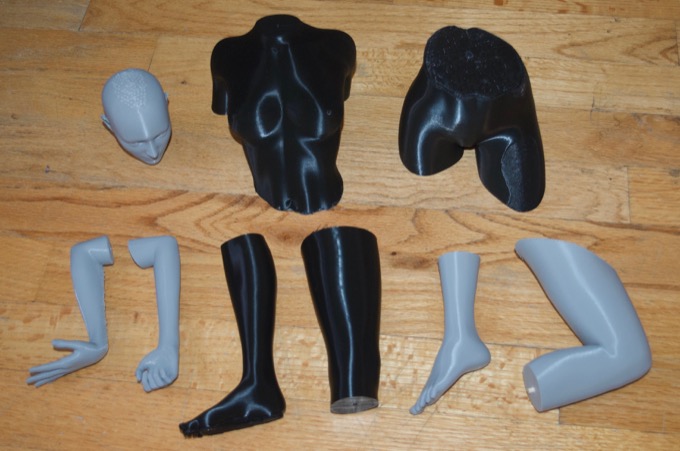
All the clothes and armor have been made. It was a lot of work, but it was a lot of fun. The model is looking fantastic.
Read More...Mar 06, 2020
All the armor pieces have been sanded, primed, filled, painted, and weathered. They turned out amazing.
Read More...Feb 28, 2020
I think that's everything that I need. I can now sand and paint all the 3D-printed parts, laser cut the leather parts, and sand and paint the figurine.
Read More...Feb 23, 2020
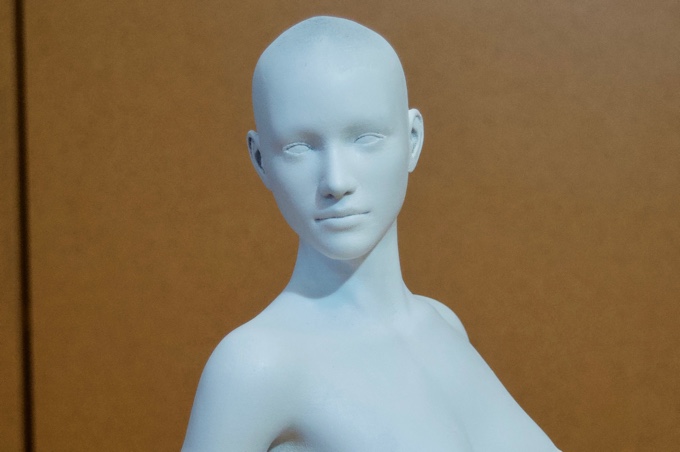
That last 3D model that I printed had clothes as part of the model. It made it really hard to paint. For this model, I decided to print the entire model without clothes and make them separately out of real materials.
Read More...Feb 16, 2020
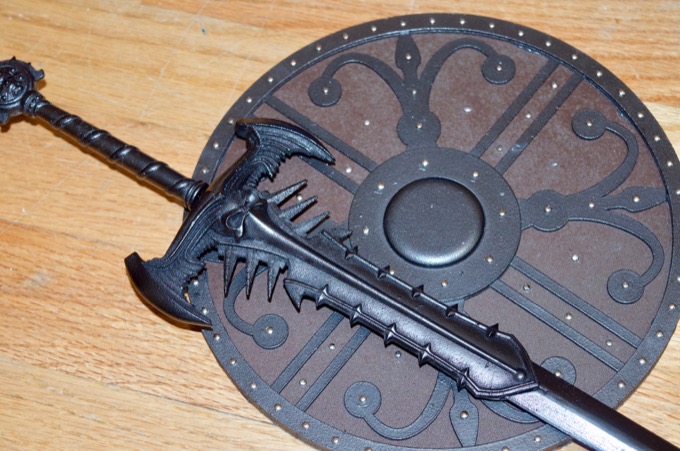
With the weapons out of the way, it was time to finish the base. It came out awesome!
Read More...Feb 15, 2020
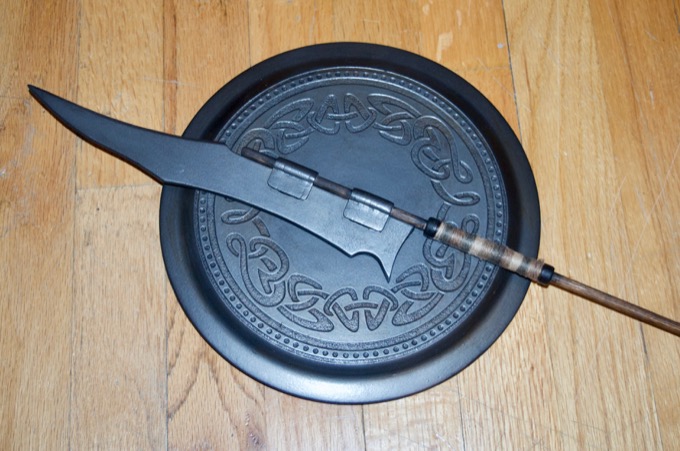
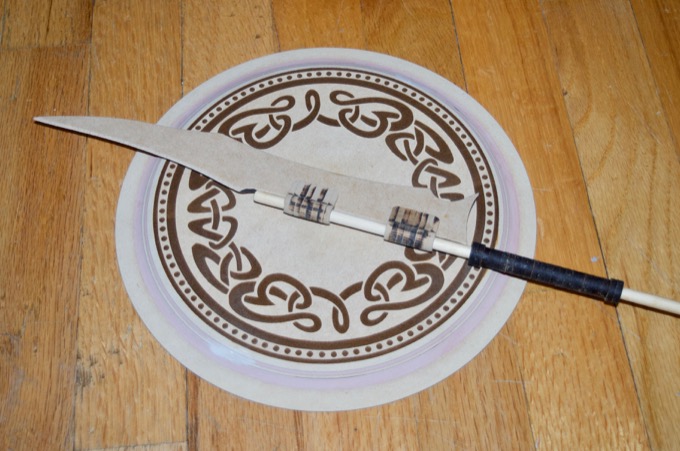
I'm really happy with the way that the spear and shield turned out. A friend of mine turned me onto the technique of using graphite powder to give objects a metallic finish. It looks awesome.
Read More...Feb 01, 2020
I can't believe it's been a month since I started this project. Time flies. This build is really starting to take shape. All the parts have been made and it's time to start painting.
Read More... Jan 17, 2020
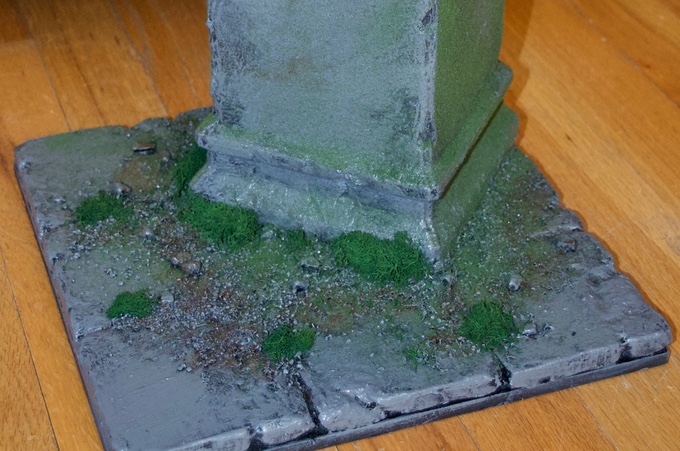
The Victoria 7 model has been printed and the weapons have been made. The last parts to make are the column and the base.
Read More... Jan 13, 2020
With the Victoria 7 model completely printed, it's time to make the spear and the shield.
Read More...Jan 12, 2020
It's time for another 3D-printed figurine. This one will be truly epic! It’s going to be bigger than the last, and way more complicated.
Read More...Nov 02, 2019

I've been wanting to print the fertility idol from Raiders of the Lost Ark for a while. I've just never found a good enough model. Until now.
Read More...Oct 27, 2019
I think I just need to get my hands on a doll wig and the figurine is done.
Read More... Oct 01, 2019
More progress has been made. The model is assembled, sanded, primed, and ready for the final paint job. I also finished making the base for it.
Read More...Sep 29, 2019
I love fixing things for free.
Read More...Sep 23, 2019
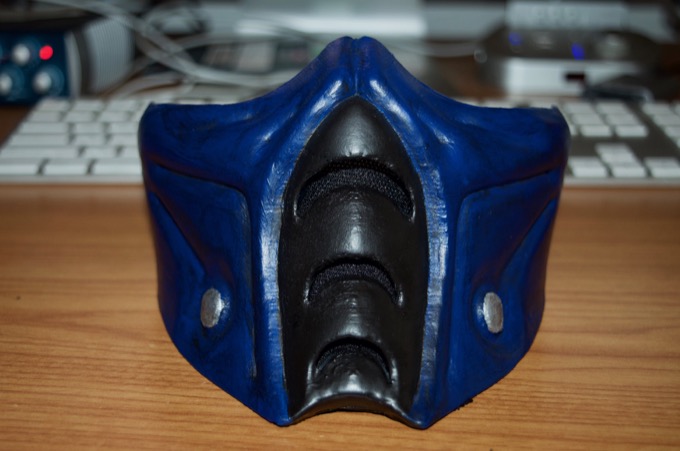
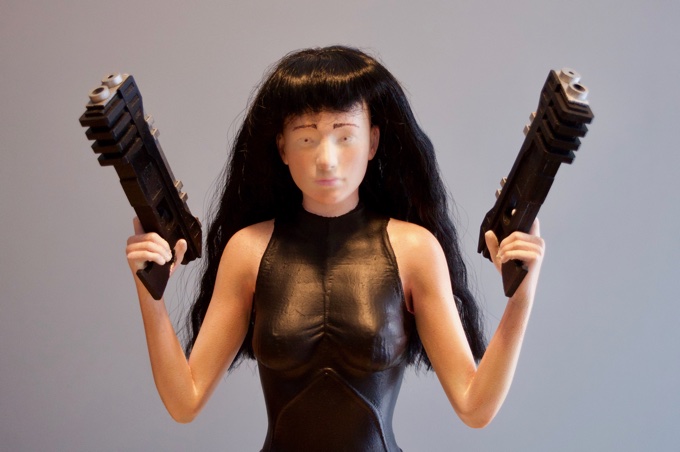
My sister-in-law is heading to Comic Con next month and is in need of a Sub-Zero Mask. I got this.
Read More... Sep 22, 2019
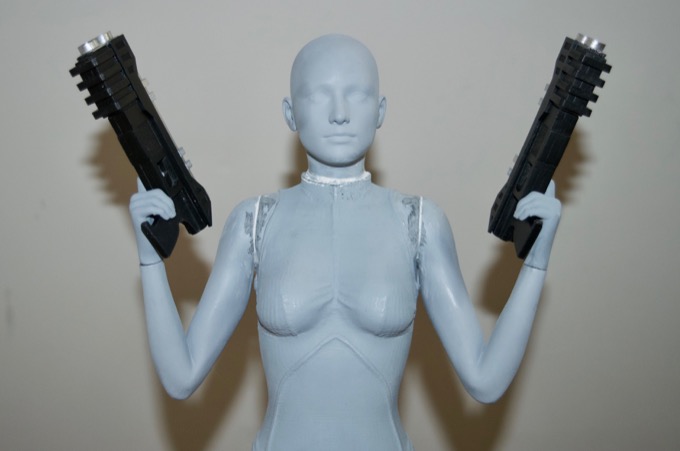
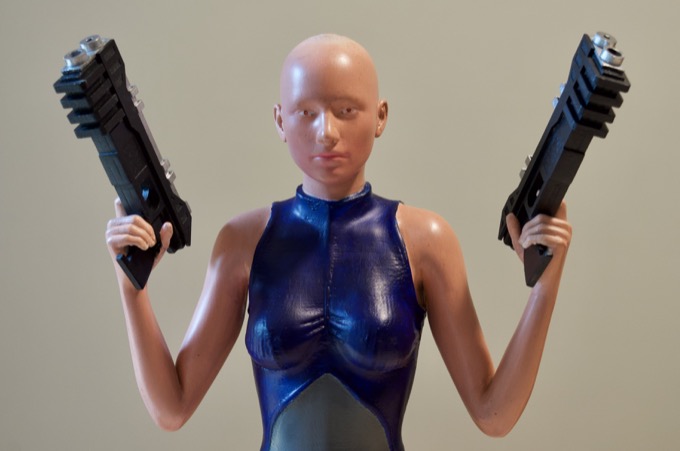
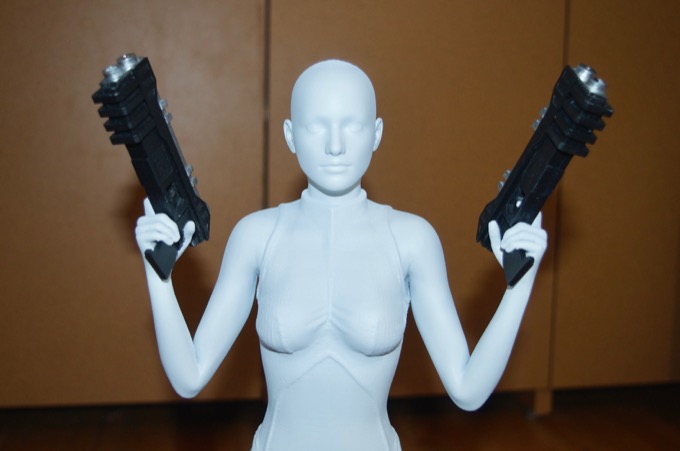
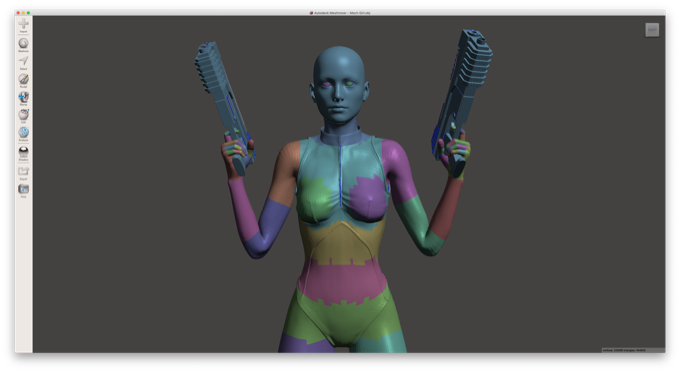
The guns came out awesome. I just have to glue on the thumbs and clean up all the seams and I can start with the final paint job.
Read More...Sep 21, 2019
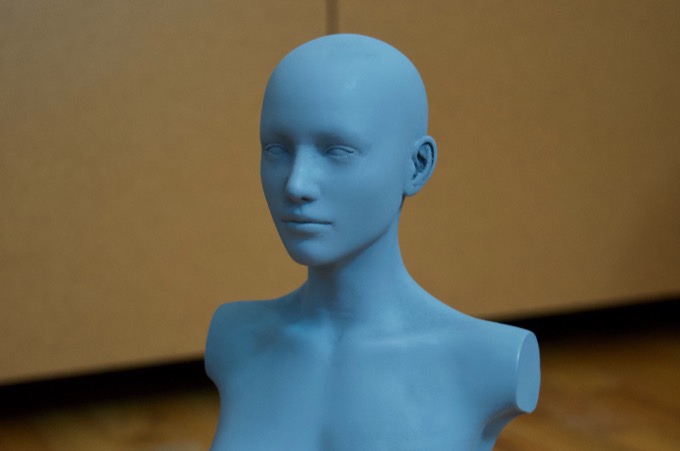
I'm thrilled with the progress that I have made with the model. There has been a lot of printing, sanding, and painting over the last few weeks. The model is looking great.
Read More...Aug 29, 2019
I'm really happy with the way that the Victoria 8 model came out. I want to make some more large-scale figurines just like it. This time, I want to give it a full paint job instead of just painting it a single color.
Read More...Aug 24, 2019
This Black 3.0 paint is amazing. The Victoria 8 figure is all painted and secured to the base that I made. It came out awesome!
Read More... Aug 04, 2019
The Victoria 8 model is coming out better than I had hoped. It looks awesome, and it's all ready for some Black 3.0 paint!
Read More... Aug 01, 2019
As soon as I caught wind of Black 3.0 paint from Culture Hustle hitting Kickstarter, I had to have a bottle. I want to make something really cool and paint is super black!
Read More...May 21, 2019
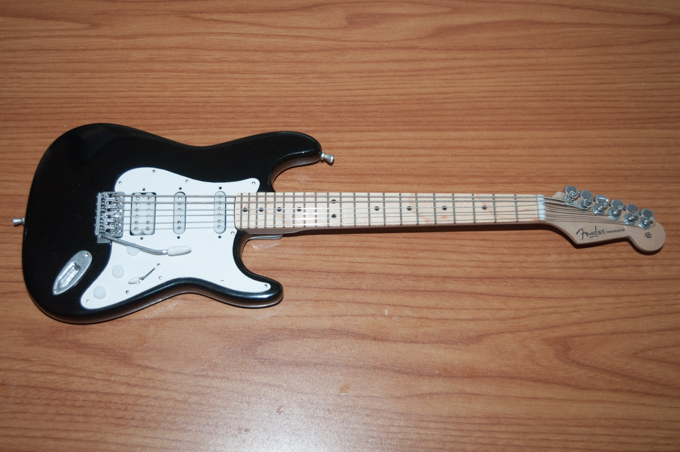
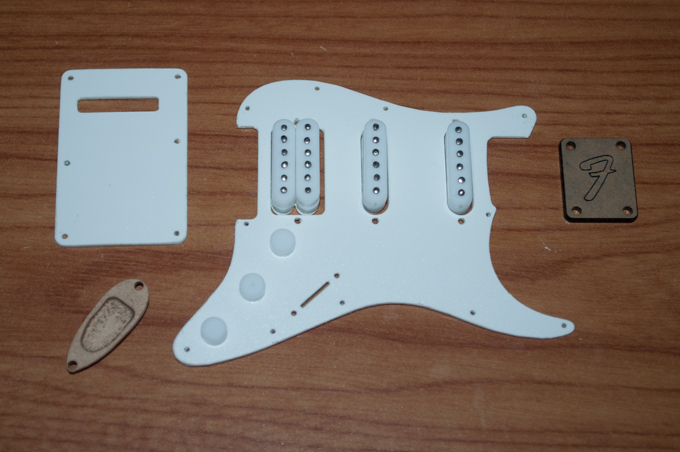
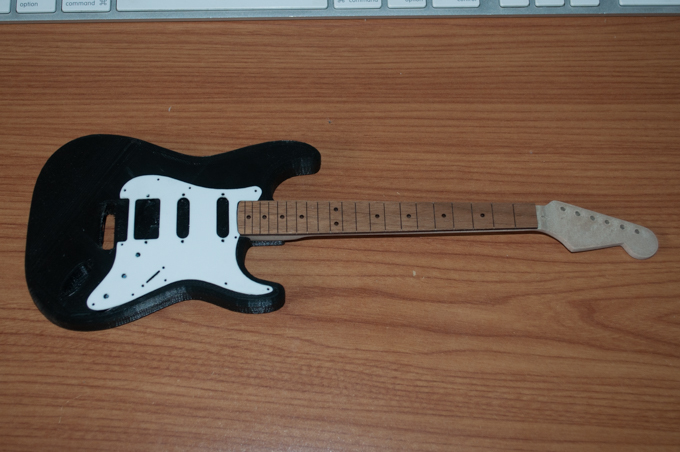
That's it! All done! Wow, this project took a log time to do, but if it's worth doing, it's worth overdoing. I spared no expensive nor detail in making sure that the Footlong Fender looked as real as possible. I think it came out amazing and I learned a lot of new things with this project.
Read More...Apr 21, 2019
I can't believe it's been over two months since I started this project. It's taking so long because it has to be perfect. There's been a lot of sanding, painting, sanding, and painting. A lot of trial and error, and some do overs.
Read More...Mar 27, 2019
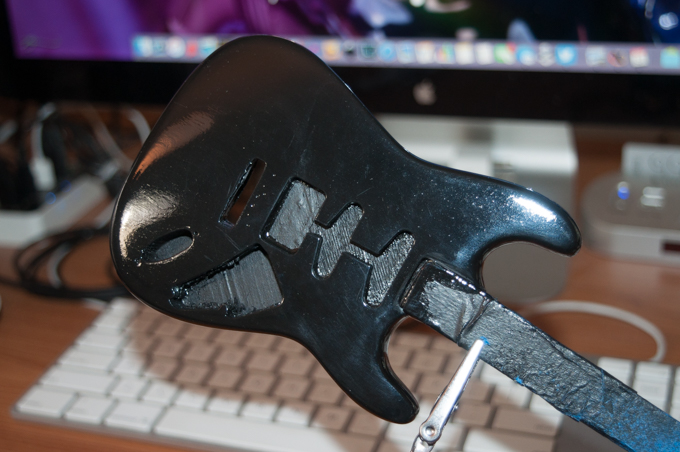
Such tiny parts! I've made a lot of progress on the Footlong Fender. It's been a lot of fun figuring out how to make such small parts. Each piece comes with its own challenges.
Read More... Mar 16, 2019
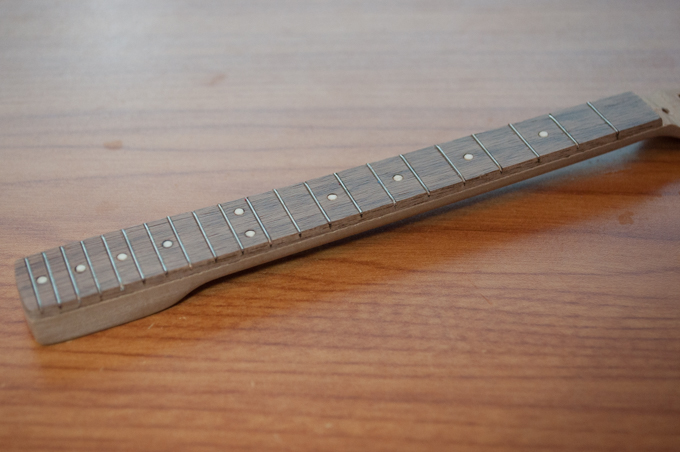
Work continues on the Footlong Fender. As far as the neck goes, I left off with having to make a new one. I over sanded the last one and it ended up being a do-over.
Read More...Mar 10, 2019
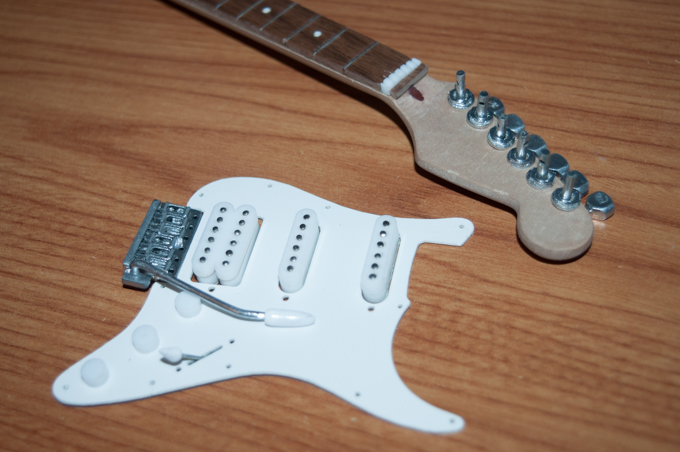
The Footlong Fender is coming along well. The body has been sanded, primed, and painted. I have a lot of the small parts made already and the neck is well underway.
Read More...Feb 14, 2019
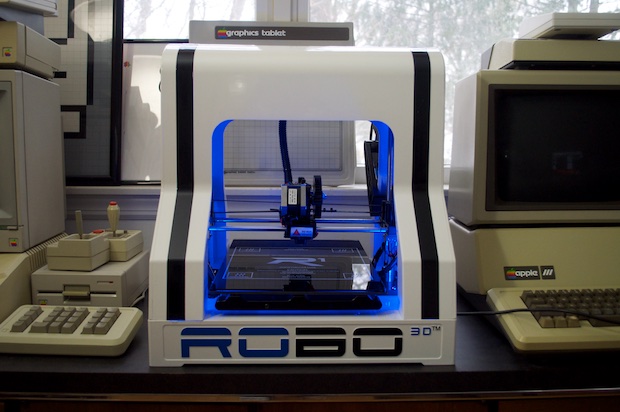
Four years ago, my wife bought me my first 3D printer for Valentine's Day. When she asked me what I wanted this year, I asked for a new one. My ROBO 3D has served me well, but it is growing a little long in the tooth and I'd really like to have a new machine that can print larger models.
Read More...Feb 12, 2019
My Dad recently got into guitar so I picked him up a Fender Strat for Christmas. He's really happy with it. It got me thinking about what it would take to build my own guitar. Not a full-size Fender, but a mini one. A footlong Fender!
Read More...Oct 06, 2018

Ever since I saw Blade Runner 2049, I've been wanting to 3D-print that little wooden horse.
Read More...Mar 18, 2018
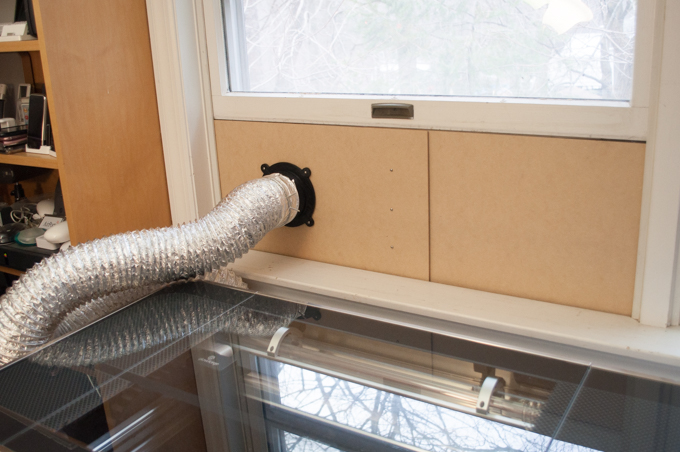
It's been a week and I'm having a blast playing around with the Glowforge. It's so easy to use. Although I haven't done much since it's been a busy week. It's been mostly tests and experiments. The first thing I really wanted to do was to come up with a better solution for the exhaust hose. It's not very practical just hanging the hose out the window. That, and it's a real pain to reach up to the top of the window behind the Glowforge.
Read More...Mar 11, 2018
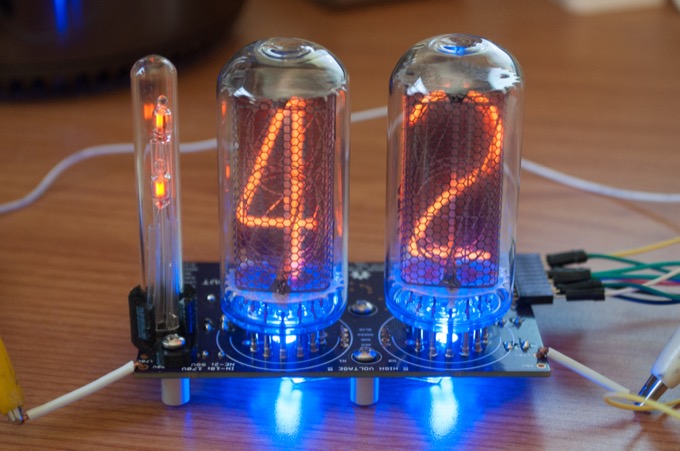
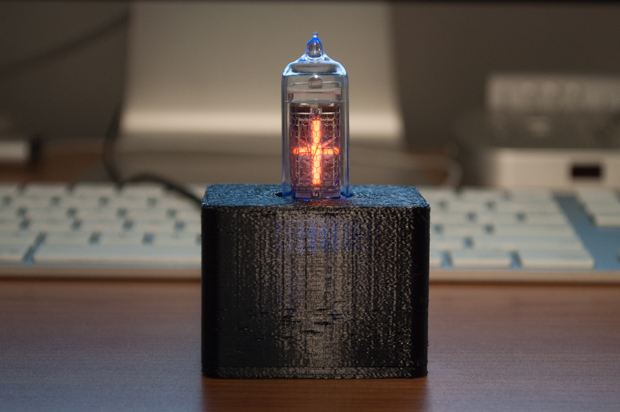
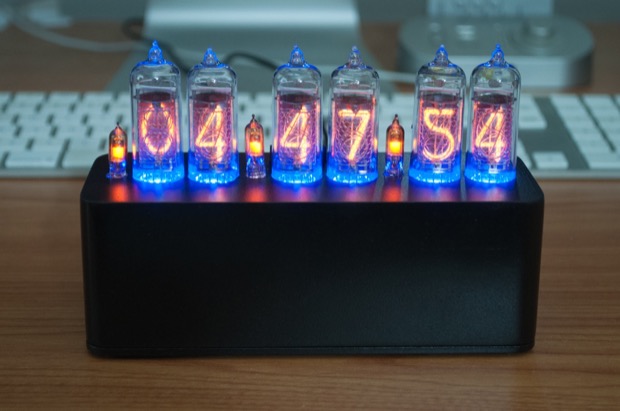
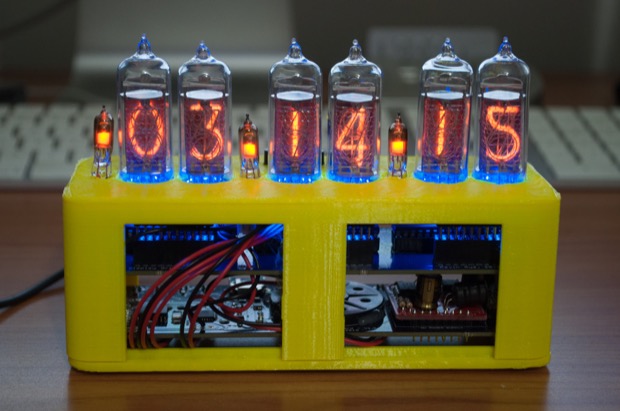
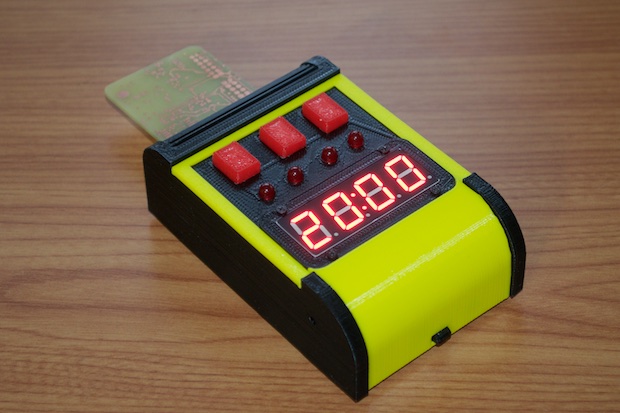
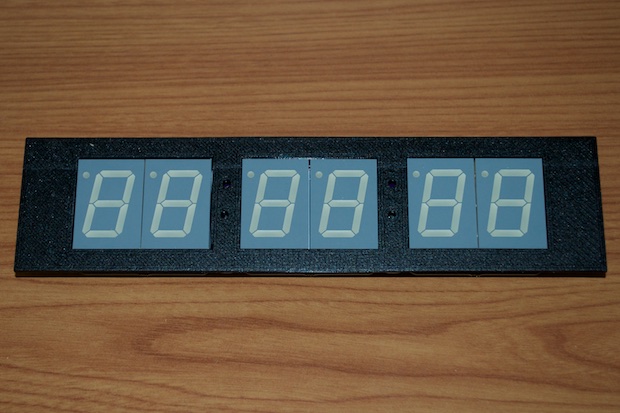
Section one of three for my IN-18 Nixie Clock has been successfully assembled. Everything works!
Read More...Feb 26, 2018
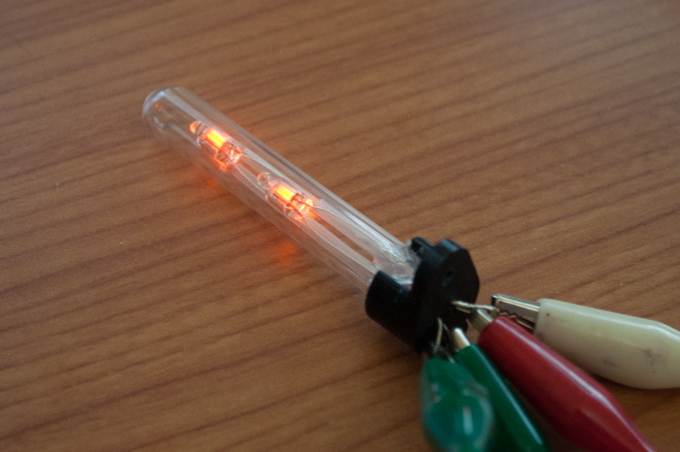
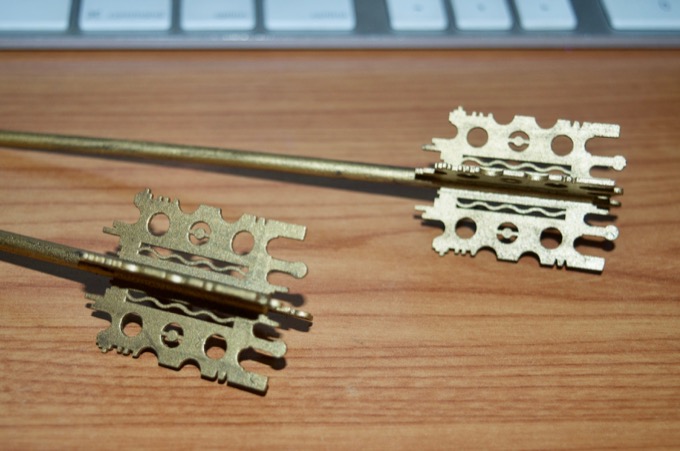
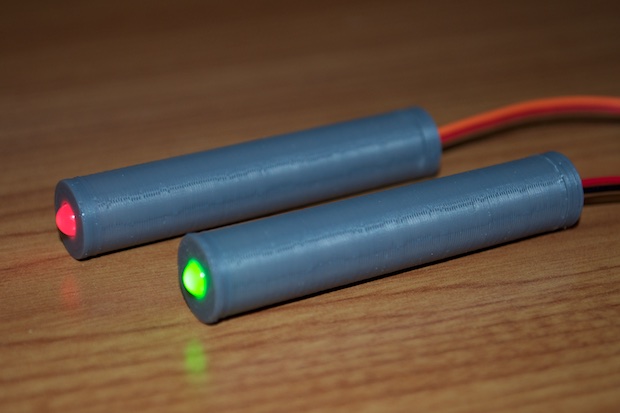
I need three nixie colons for the IN-18 clock. They can be found on eBay, but they are a little expensive for what they are. It's basically a glass tube and two little neon bulbs. There's no way I'm paying $12 each for those. They can be made for a fraction of that.
Read More...Feb 25, 2018
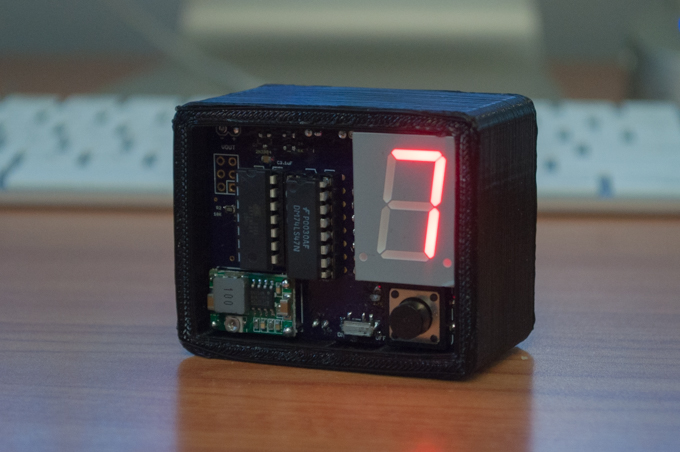
I was bored while I waited for parts for my IN-18 Nixie Clock to arrive from China. So I threw together a silly little ATtiny thing that could use a 7-segment display to display a random number from 0-9. Nothing fancy, just a silly little one-day project. This will come in very handy when the kids argue over who gets the last donut or whatever. Hey kids….pick a number!
Read More... Sep 30, 2017
I took a break from the VFD Clock to make a Portal Weighted Storage Cube. That took about a month, and now that it's finished, it's time to revisit the clock.
Read More... Aug 30, 2017
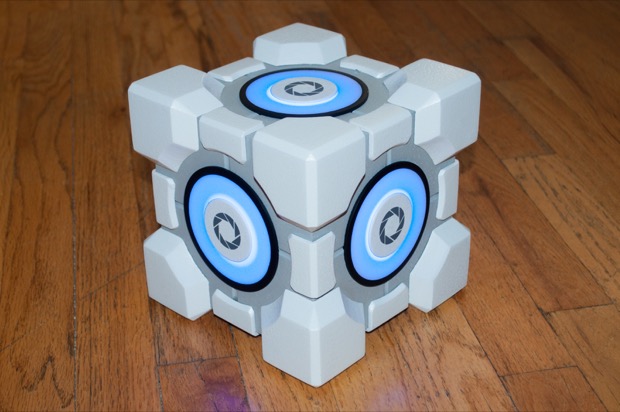
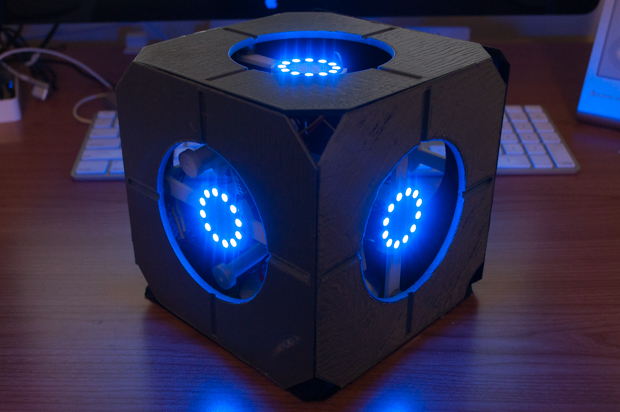
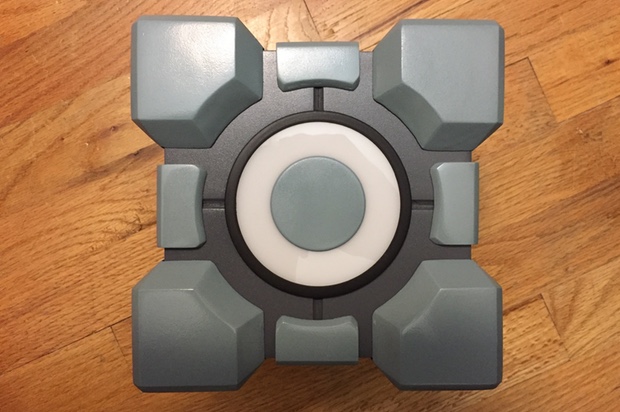
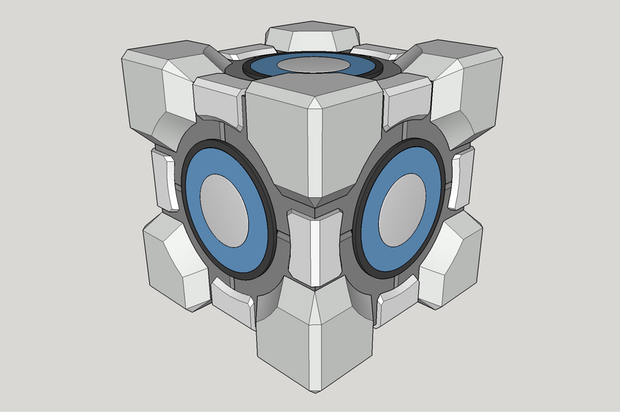
After a month of hard work my Portal Weighted Storage Cube is complete! This was such a great project because it had a little bit of everything: 3D modeling, 3D printing, laser cutting, painting, electronics, and coding. I got to do things that I'm really good and l try a few new things too.
Read More...Aug 26, 2017
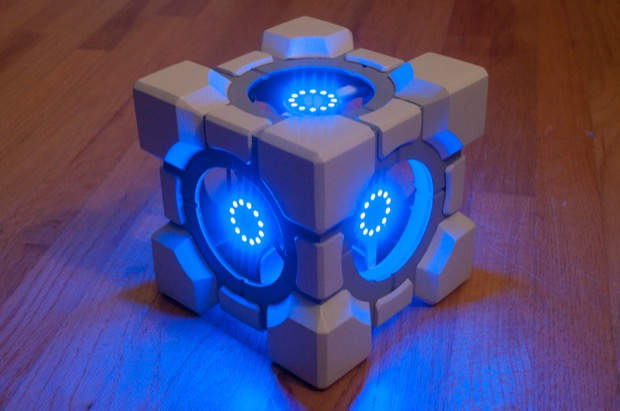
All the parts are painted and assembled. All the electronics are complete and installed. I made some awesome progress this week. The last thing to do it put some finishing touches on the code and paint the Aperture Science logos onto the centers.
Read More... Aug 19, 2017
I've made some great progress on the cube. All the sanding and painting is well under way, and all the electronics are pretty much finished.
Read More...Aug 14, 2017
I've made some serious progress on the Portal Weighted Storage Cube. All the parts have been printed, sanded, and painted. Some last minute touches, the electronics, and it'll be time for the final assembly!
Read More...Jul 26, 2017
I can't believe it took me so long to get around to playing Portal. I guess it all has to do with time. I never have time for video games. Rather than sit in front of the computer playing games for hours a day, I'd rather sit and make PCBs, write code, and design 3D models. Now that I've beaten Portal 1 and 2, I feel like I can finally make myself a Portal Cube and not feel like a poser.
Read More...Jun 14, 2017
While waiting for the paint to dry on my IN-14 Nixie Clock, I decided to tinker around with a small board idea to do something with this lonely IN-19 that I have. When I bought the IN-14s for my clock, the eBay seller threw one in as a way to make up for a delay in shipping. It's a cool little tube. But what would I ever use it for?
Read More...Jun 03, 2017
I'm really happy with the way that this clock came out. It's so much nicer than my IN-12 clock. I can't wait to get started on another one!
Read More...May 20, 2017
This clock is coming along nicely. I know I designed it a few months ago, but I shelved it for a month to wrap other things up. Now that I've decided to go ahead with it, it's been less than a month and it's almost complete!
Read More... Mar 03, 2017
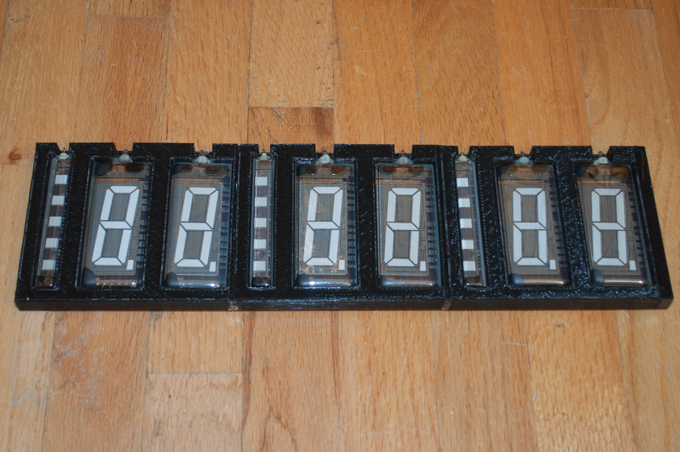
The VFD Clock is finally complete. I started it almost a year ago. However, once I actually figured out how to drive the display, it was another 7 months before I actually started it. I had so many other projects to finish first. I'm glad I waited until my plate was clear to work on this. It really came out nice. It's definitely one of my favorites.
Read More...Feb 28, 2017
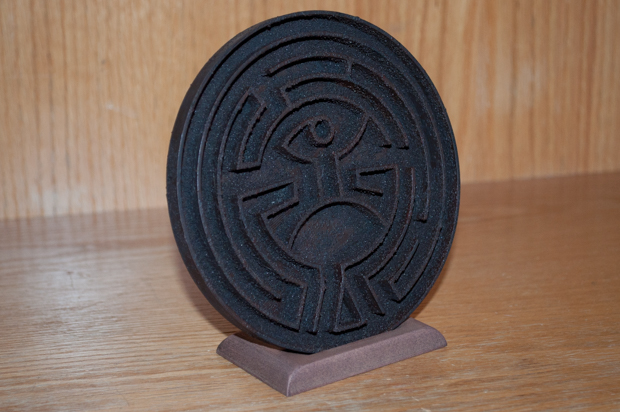
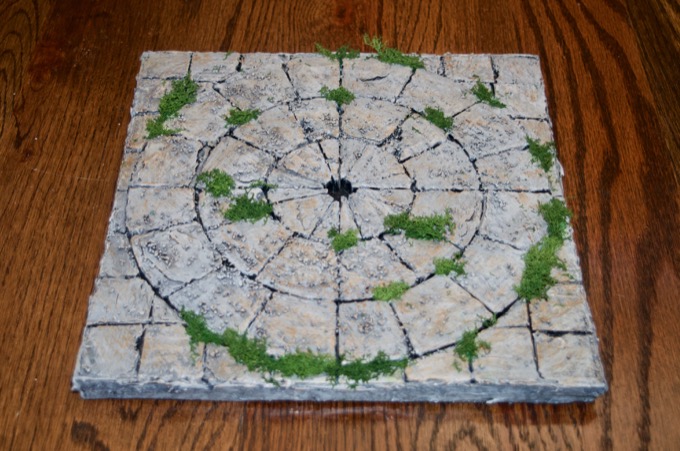
My wife and I just finished watching the first season of Westworld. What a great show. I don't want to give away any spoilers for those that have not seen it yet, but there's a cool maze prop in the show. As soon as I saw it, I thought to myself, "I am so 3D-printing one of those!"
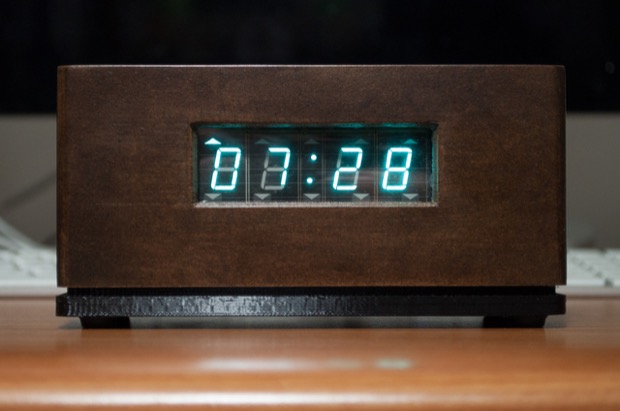
Read More...Feb 07, 2017
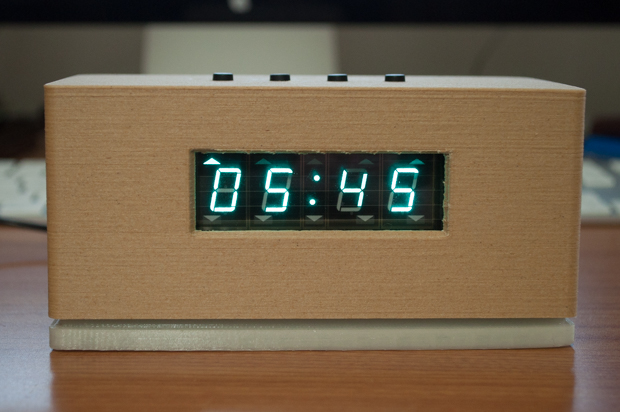
The electronics have been assembled, so it's time to work on the enclosure. I'm almost finished with this clock. I ran out of black PLA for the base, and I still need to stain the woodfill PLA top, but I'm making excellent progress.
Read More...Dec 18, 2016
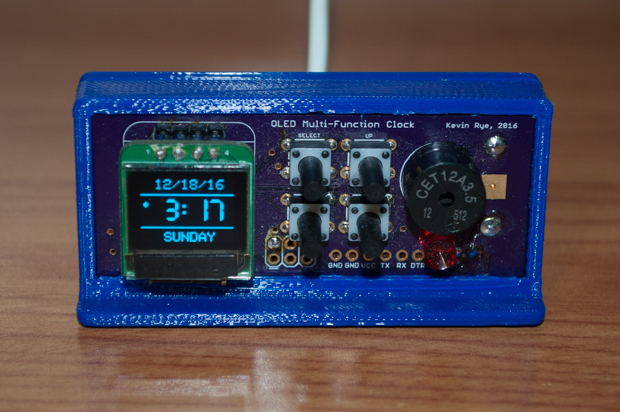
It's been almost 8 months since I assembled my Mini OLED Clock. It's been sitting unfinished on my desk since then. All I needed to do was 3D print a case for it.
Read More...Sep 18, 2016
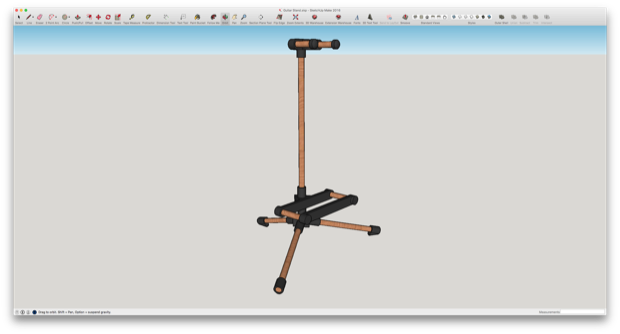
I haven’t picked up my guitar in years. It’s mostly due to the fact that it’s in its case tucked away in my closet. Out of sight. Out of mind. I’d really like to get back into playing, but every time I think about it, I never seem to get to the point that it comes out of the case. I got to thinking that if the guitar was in the computer room where I spend most of my time, I’d be more likely to pick it up and mess around with it. I decided to make a guitar stand for it. Sure, I could hop on Amazon and buy a stand, but what fun is that?
Read More...Sep 10, 2016
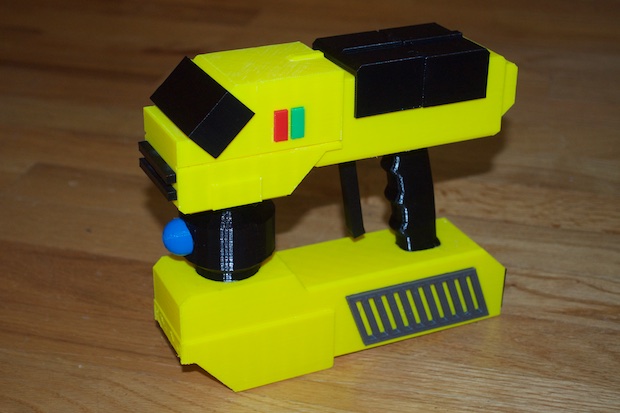
My son’s really into the game Starbound. The Matter Manipulator is the tool that you start off with in the game. He’s been making paper craft Matter Manipulators for weeks. I figured since he’s really into it, I’d have a go at 3D printing one for him.
Read More... Aug 06, 2016
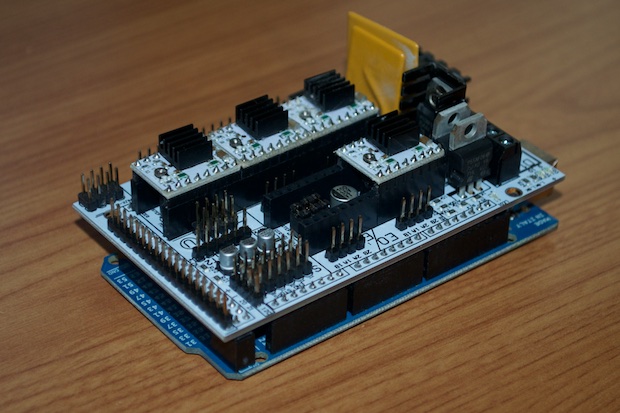
When starting a print on my ROBO3D R1 3D printer, I periodically get an error message that pops up just after the bed has leveled. The error message pops up and the printer just stops. I have to power cycle the printer, restart MatterControl, and enter M999 into the console. I posted an entry on the ROBO3D forums asking for help. The consensus was that the extruder thermistor was bad and needed to be replaced. However, I ended up frying my board during the repair and needed to replace the Arduino MEGA inside.
Read More...Jul 16, 2016
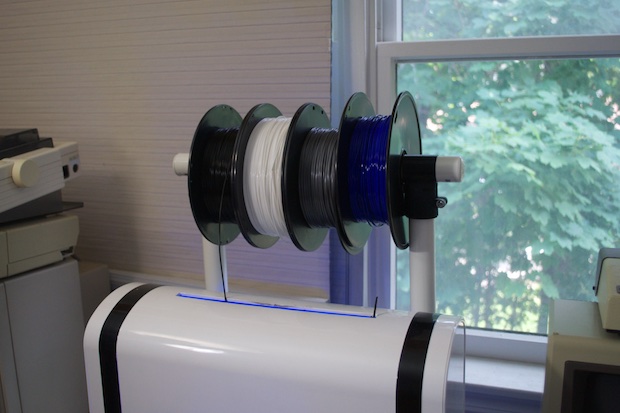
A friend of mine picked up a Robo3D. Right out of the box, he pretty much agreed with me that the stock spool holder could use an upgrade. He took it to the max and built a holder than can hold 4 rolls of filament. He was kind enough to pass along the design files so that I could make one for my pinter too.
Read More...Jul 07, 2016
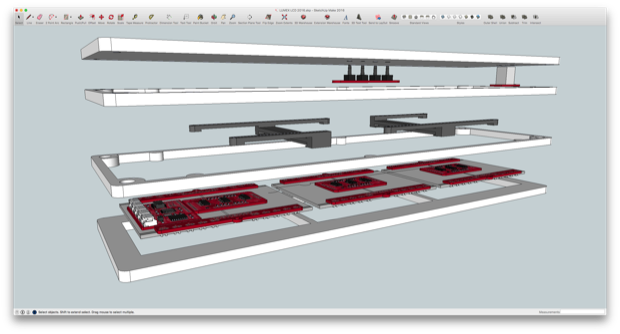
With all the PCBs assembled, it was time to get to work on the 3D model and the laser-cut enclosure.
Read More...Jun 14, 2016
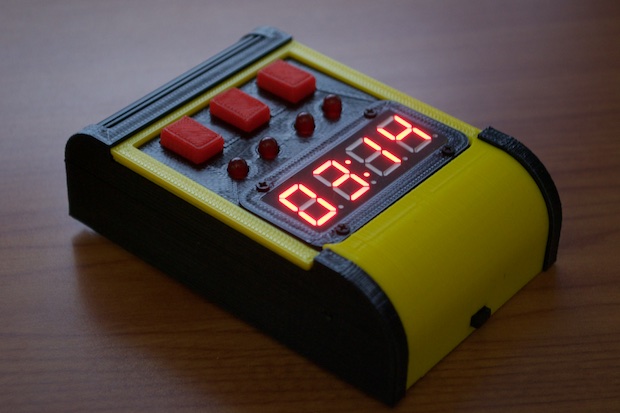
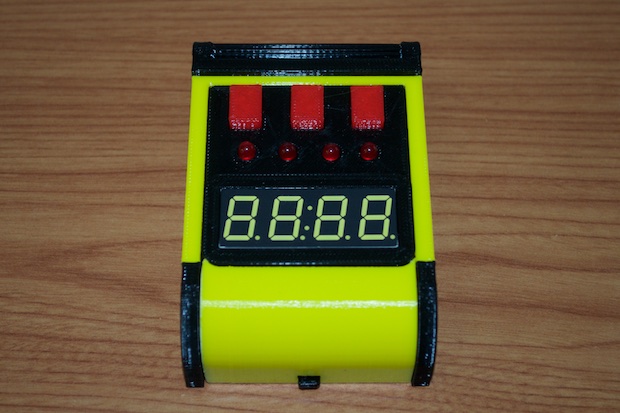
I really wanted this clock to be something special, so I spared no expense, took my time, and made sure everything was perfect. No shortcuts, half measures, or it’ll do’s. It came out better than I’d hoped. I just hope it shows in the final assembly.
Read More... Jun 13, 2016
After a month and a half of juggling multiple projects, the “Zorg Door Bomb” Clock has finally crossed the finish line. It came out great, and I’m really happy with the results.
Read More... Jun 06, 2016
With all the electronics complete, it was time to work on the enclosure. It took 15 hours to print, and a day or two for the stain to dry. I can’t believe this project is almost finished!
Read More... Jun 06, 2016
I was so excited when the board for this clock arrived. This is such a fun project; even if it is just for a laugh.
Read More...May 04, 2016
With the prototype working, and the code 99% complete, it was time to put together a PCB and get to work on an enclosure. I really want this clock to look sweet.
Read More...Apr 23, 2016
It’s the Zorg Door Bomb! The Fifth Element is one of my all-time favorite movies. I watched it again the other day and as soon as I saw Zorg’s Door bomb, I said to myself, “I’m so building that!”
Read More...Feb 14, 2016
Wow! It really works! And it looks great! Could the case be better? Yes, but I think it looks pretty good. I am really surprised at how fast I cranked this one out. Granted, all the code (with the exception of the two new set buttons) was already written. It was just a matter of taking what I had already accomplished with version 1, and making it better. Still, I completed this project in only 2 weeks. That has to be a record for me.
Read More... Feb 06, 2016
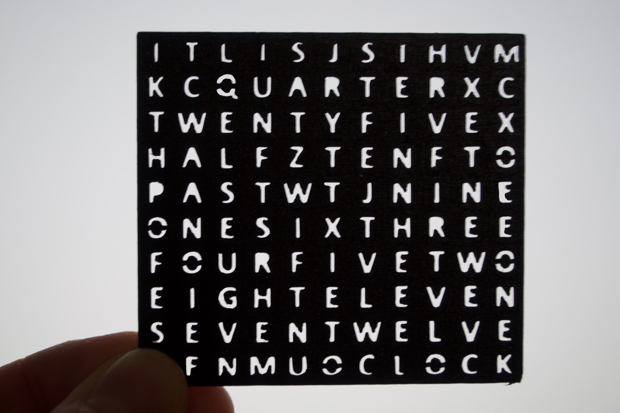
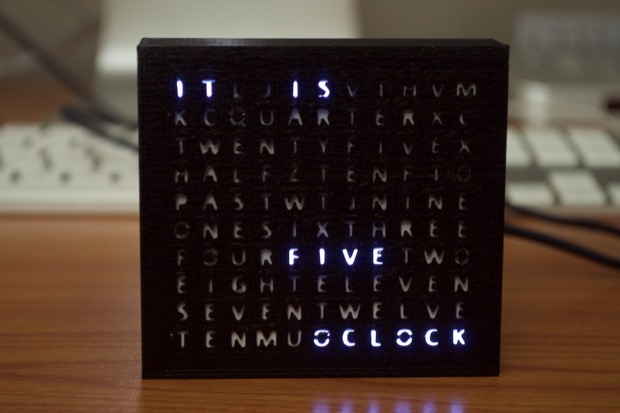
I had to get through the busy holiday season before I could get the ball rolling again. I've taken a long enough break from my hobby stuff. One project I've been meaning to revisit for well over a year is my Word Clock. I think it’s time for a tiny all-SMD version 2!
Read More...Aug 22, 2015

Since this is my first nixie clock, I really wanted it to be something special. I've been wanting to build a nixie clock for over 15 years. I started out with a 7-segment clock back in 2001 just to get my feet wet, but I just never got around to it. I'm so glad that I bit the bullet and just went for it. I put a lot of work into this clock, and spared no expense. I learned a lot from this project. I'm sure the next nixie clock will come out even better.
Read More... Aug 13, 2015

The prototype case for my nixie clock came out awesome. I want to print the final version in wood-filled PLA. You know, for that vintage look. I ordered a roll of colorFabb's woodfill PLA. It's pretty expensive stuff. It's not even a full 1kg roll and it's $58 bucks, but the results are well worth it.
Read More... Aug 08, 2015

The clock is built, the case is prototyped, and the code is 90% complete. This project really picked up some steam. I'm almost finished!
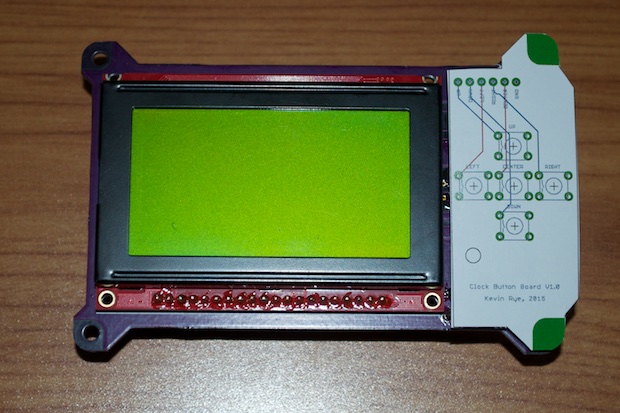
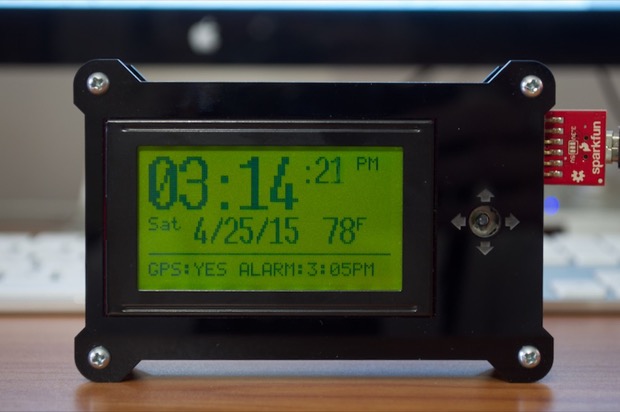
Read More...Aug 08, 2015
My new GPS button boards arrived in the mail. I hacked them into my new 3D-printed case. It works perfectly. All that's left is to firm up the code and this one's a wrap.
Read More...Jul 22, 2015
I love it when everything just comes together at the end and it just works. No hacks, no head scratching, no second spins. It just works. This project involved some serious engineering, and I'm really happy with the way that it's coming out.
Read More... Jul 21, 2015
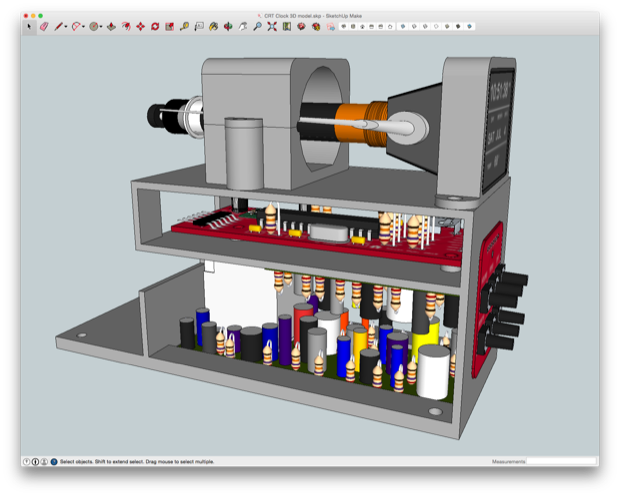
Now that I know I can display my own custom time and date on this camcorder CRT, it's time to get serious about a PCB and a 3D-printed case.
Read More...Jul 06, 2015
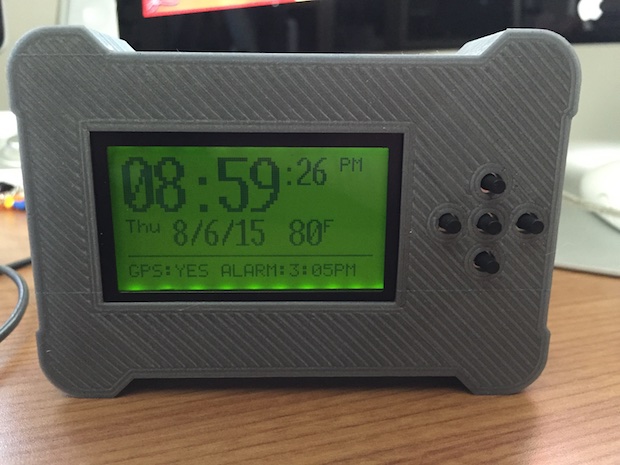
The GPS Clock has been fully assembled and sitting on my desk for months. I started this clock two years ago. I just can't seem to get the code to where it needs to be. I just want to put this project to bed already!
Read More...Jul 05, 2015
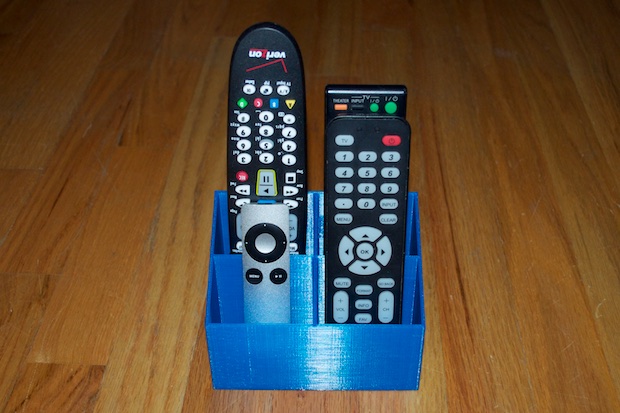
My wife's been bugging me to print some kind of remote stand for the bedroom. It's an awesome idea. We have 4 remotes in the bedroom and it seems like we're always loosing them. If we had some kind of caddy to put them in, I think we'd be less likely to lose track of them. I just keep forgetting about it. Although, I am reminded every time I have to hunt high and low for the Apple TV remote to end up finding it under one of the pillows.
Read More... Jun 27, 2015
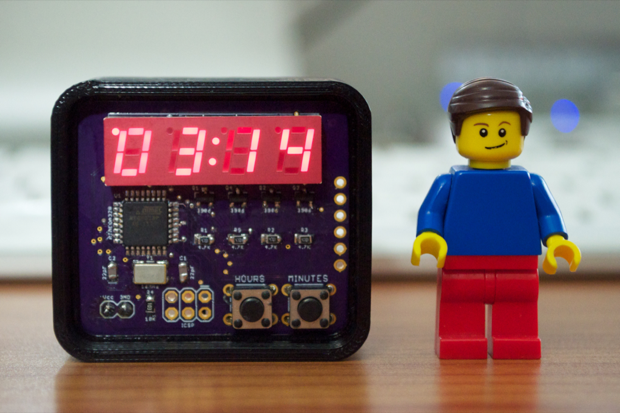
I hope the LEGO minifig gives you a good sense of scale. This clock is pretty small. It's amazing how small the Mini Clock has become after just 3 iterations. I'm really happy with the way that it came out.
Read More... Jun 27, 2015
I just can't sit still. I always have something in the works. I need to always have something in the works. This is especially true when I'm waiting two weeks for a board. I think most of my projects start during the lull of another. I especially like it when a project goes from concept to a PCB order in about an hour! If only every project was like this. I'd have a room full of gizmos!
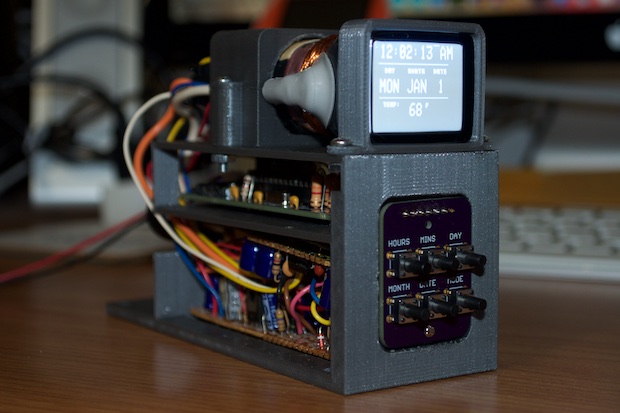
Read More... May 21, 2015
With the display electronics complete, it was time to move beyond the concept phase and begin the actual prototyping of the 3D-printed frame. It came out better than I could have anticipated. I totally nailed it!
Read More... Apr 25, 2015
It's been almost 4 months, but it's time to put the wraps on the code for the GPS clock. I've been so busy with other 3D printing and 3D rendering projects. 3D printing a joystick for the 5-way switch has proved to be far more difficult than I had anticipated. I'd really hate to think that this $2 button is going to be the death of this $100 clock! I should have just stuck with my original design and used buttons.
Read More... Apr 24, 2015
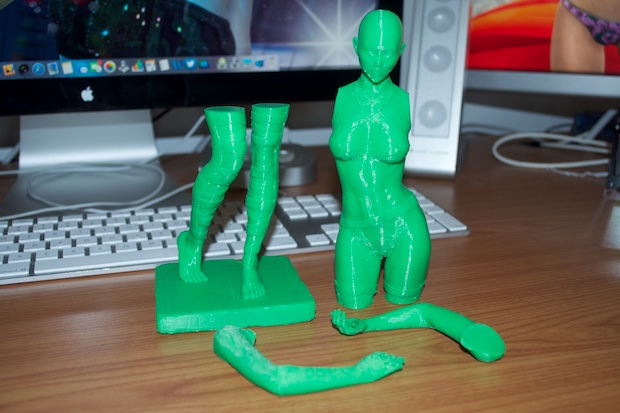
My first "official" 3D print of Mei Lin came out pretty good. However, it could be better. Everything can always be better! Not to mention, I discovered a shortcoming in the ROBO 3D firmware that messes with the z-axis. It's no wonder my last Mei Lin print was only 11" tall! I know I eye-balled the height, but I thought I was pretty darn close to 12 inches. Knowing now that my model was probably "squished", I decided to have another go at printing it.
Read More... Apr 12, 2015
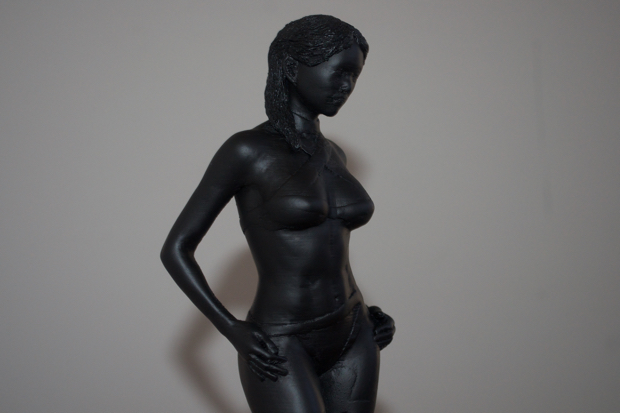
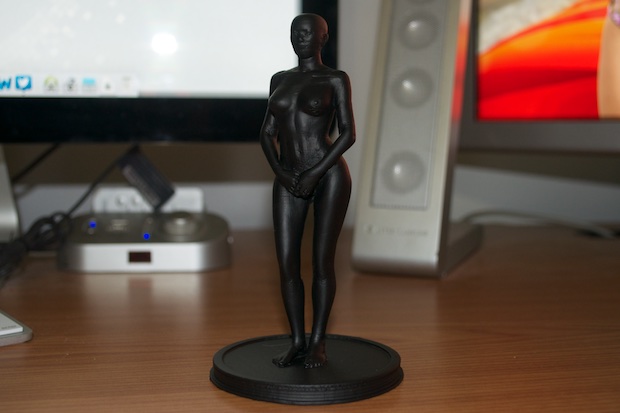
Continuing with my experiments in printing DAZ 3D models with my 3D printer, I figured I’d up-the-ante with my next print. Seeing as my last attempt was a total success, I wanted to see if I could print a model with clothes…. and twice as large!
Read More... Apr 11, 2015
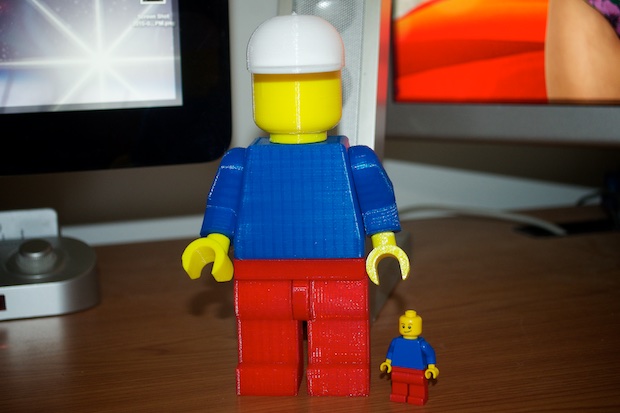
I found this LEGO Minifig on Thingiverse and I just had to print one. My kids love it, but too bad it's a prop for MY desk!
Read More... Mar 17, 2015
It's not the main reason I wanted to get a 3D printer, but a big one. I wanted to get a 3D printer in order to print large models of my 3D art creations. I've seen a few people do it online with mixed results. The how-to isn't widely documented and it's not a feature built into DAZ Studio by default. You'd think that printing a simple cube from one app shouldn't be any less difficult than printing a human-shaped figure from another. Unfortunately, it's easier said than done.
Read More... Mar 15, 2015
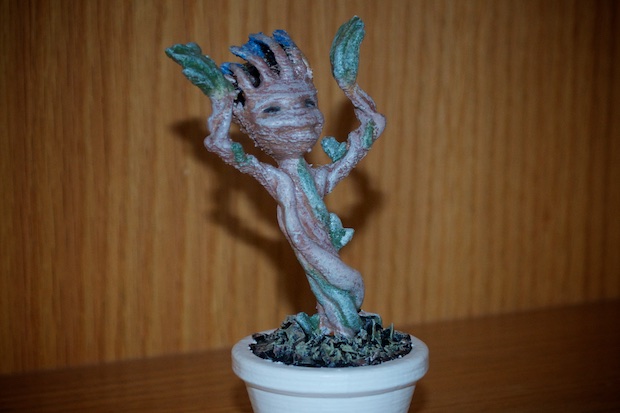
I was thumbing through Thingiverse looking for something fun to print. I came across a cute Little Groot figurine. I thought my wife would like it. Guardians of the Galaxy is one of her favorite movies. I used to paint D&D figurines back in the late 80s when I was a kid, so this didn't come out half bad considering it's been a good 25 years since I've painted something… and my wife loves it!
Read More... Feb 19, 2015

After waiting a few extra days, my patience was rewarded with the delivery of 3 rolls of filament. I think I've gotten the hang of PLA, but as far as ABS goes, I'm going to quit while I'm ahead.
Read More... Feb 14, 2015
After many, many years of putting off the purchase of a 3D printer, I finally bit the bullet. My wife ordered one for me and had it shipped overnight so that I'd have it for the 3-day holiday weekend!
Read More... 
