Apr 29, 2018
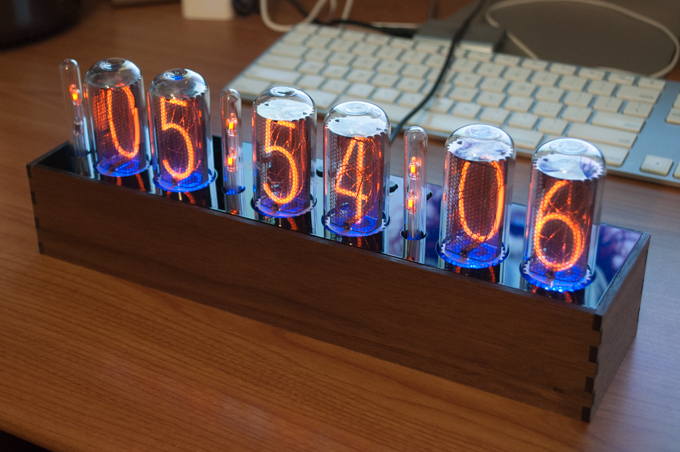
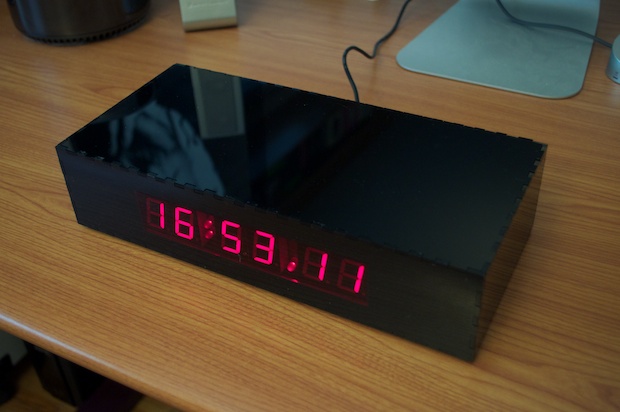
I can't believe it took four months to complete. It came out awesome. It was well worth it to be patient and do everything right.
Read More...Apr 28, 2018
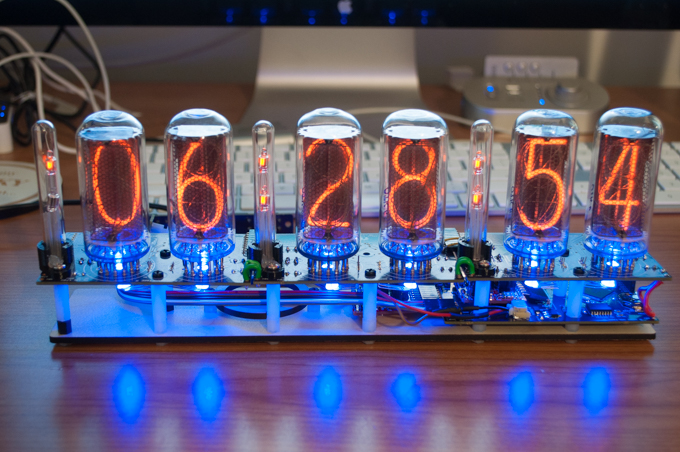
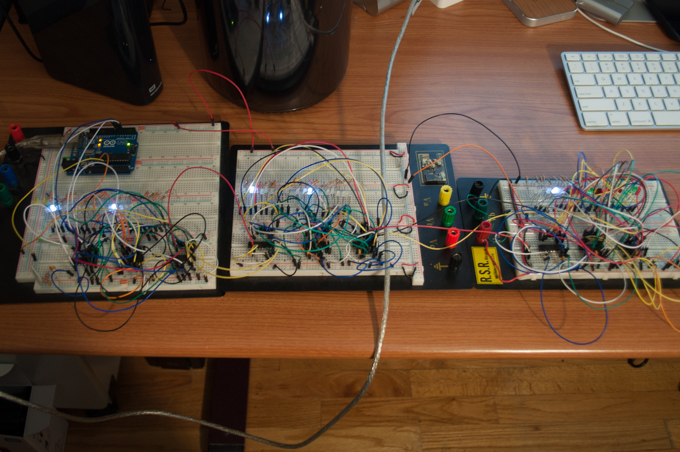
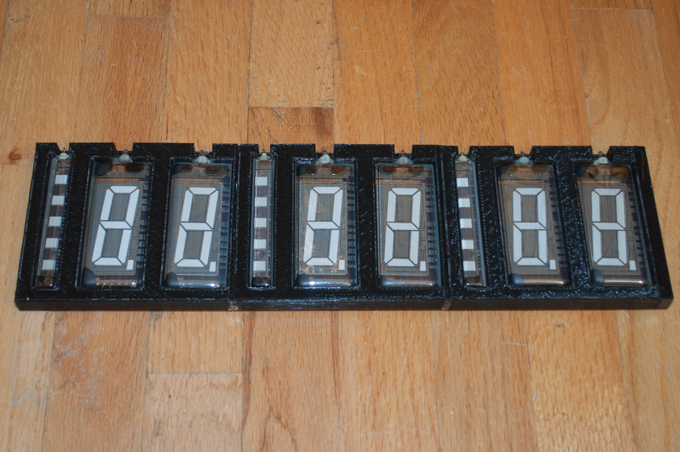
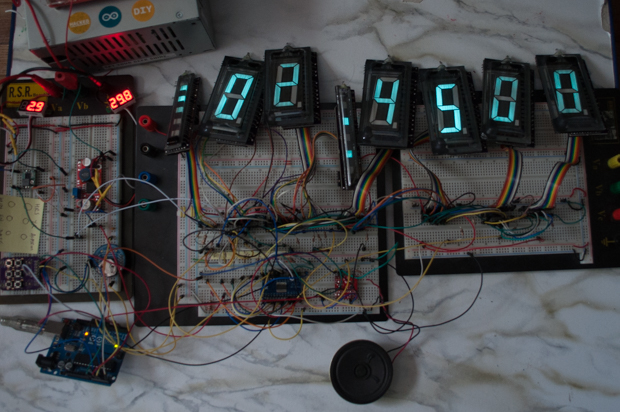
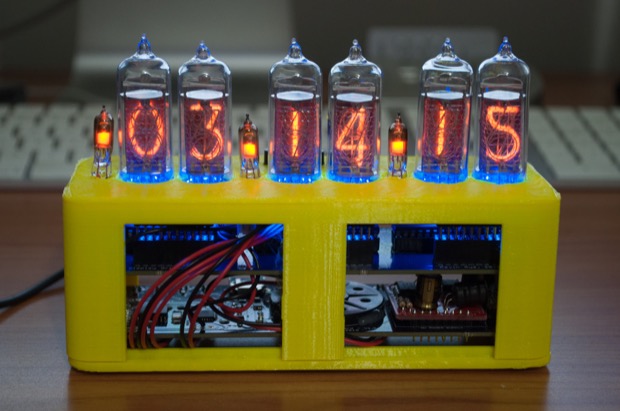
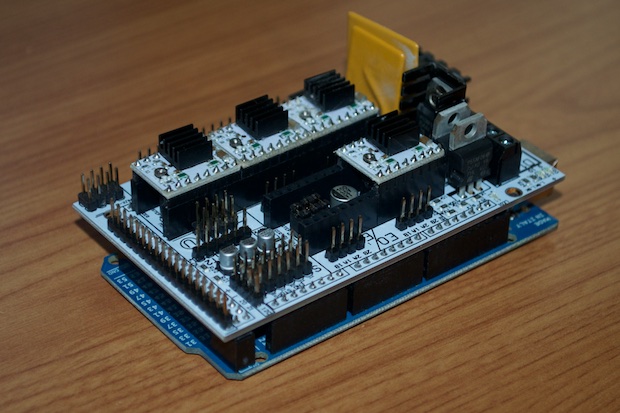
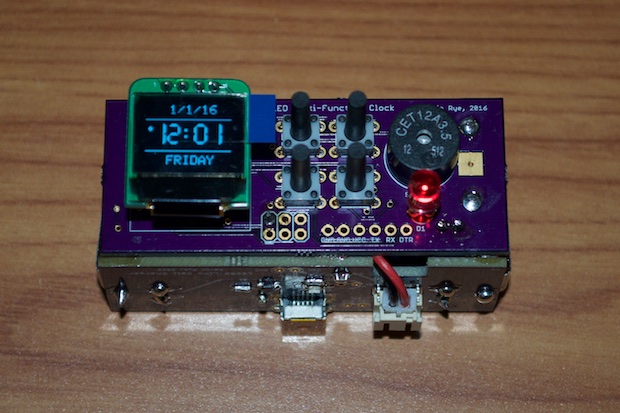
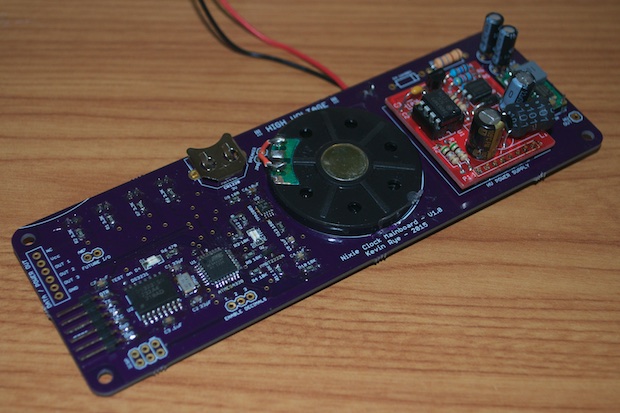
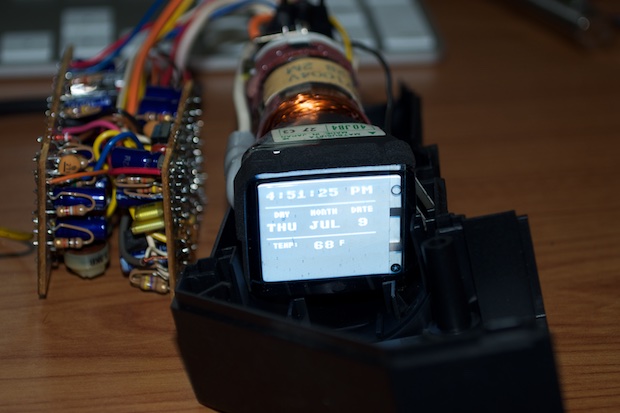
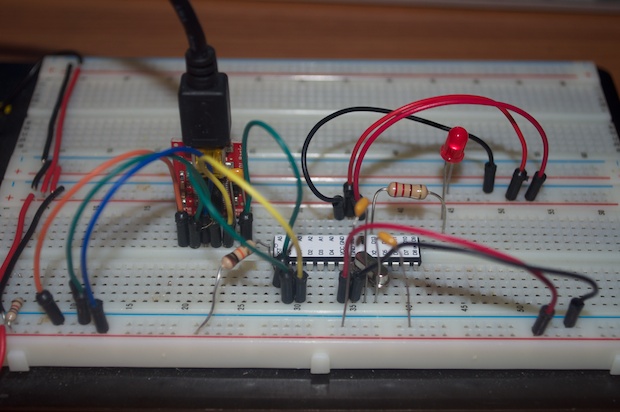
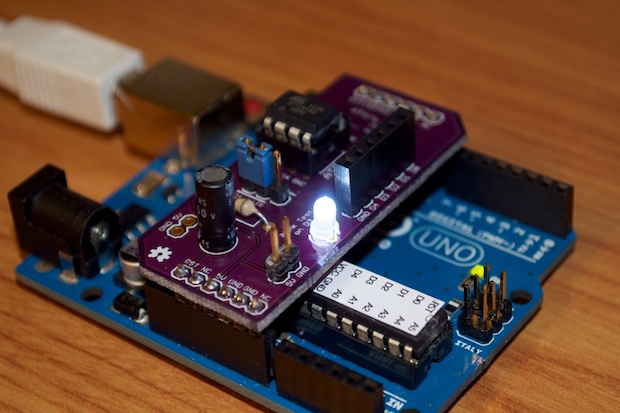
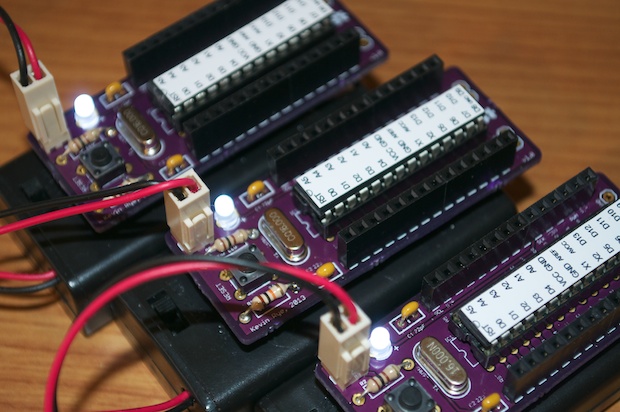
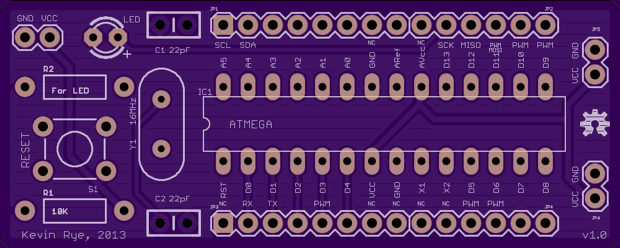
Woo hoo! My controller board works. All the hardware is complete. I just need to add the audio code and make a case for it. This clock is coming together pretty quickly!
Read More... Apr 08, 2018
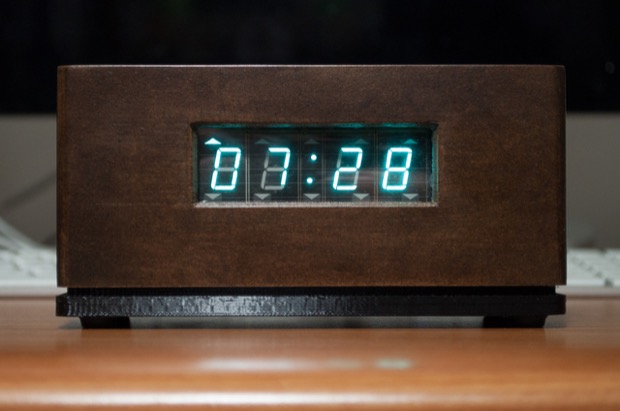
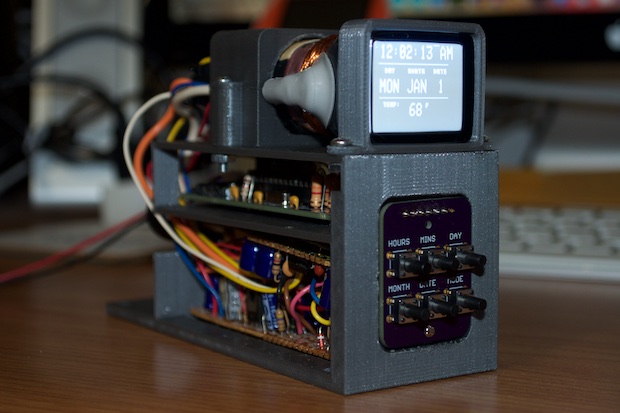
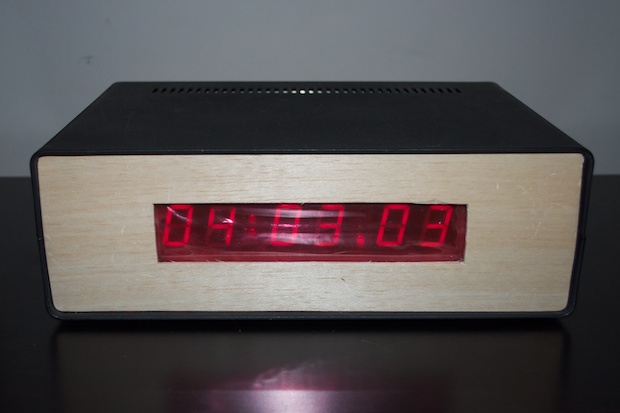
I left off six months ago with the completion of all the electronics for the new VFD clock. I was really happy with the way that it came out. All that I needed to do was make a case for it. However, I needed to wait until I had my Glowforge.
Read More... Mar 25, 2018
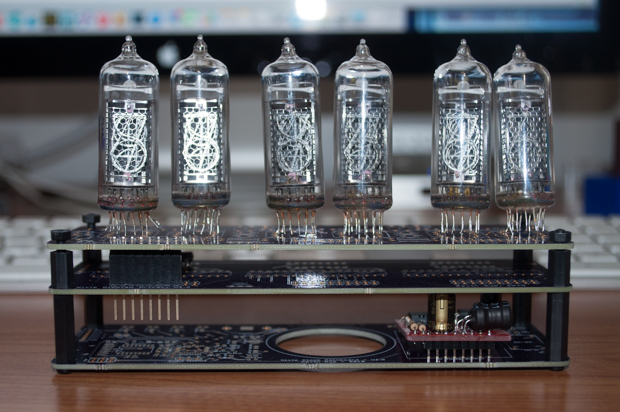
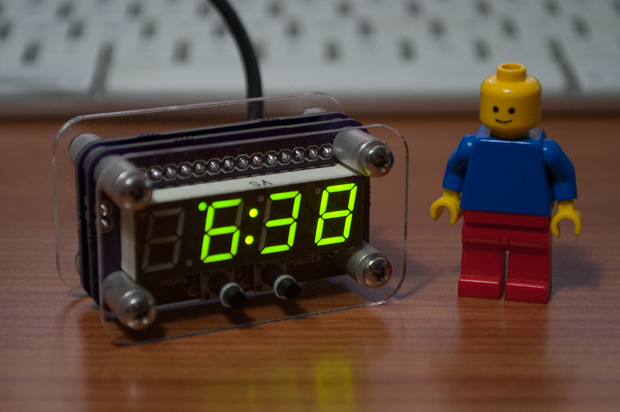
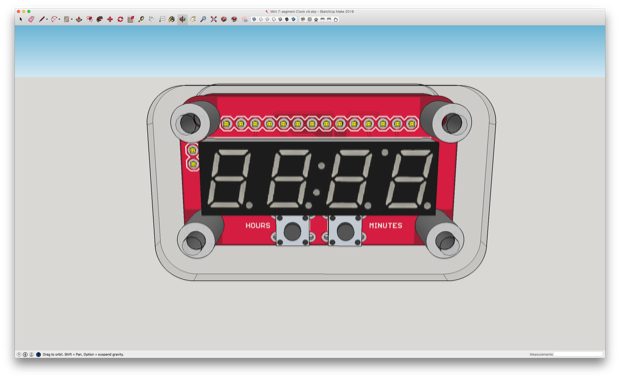
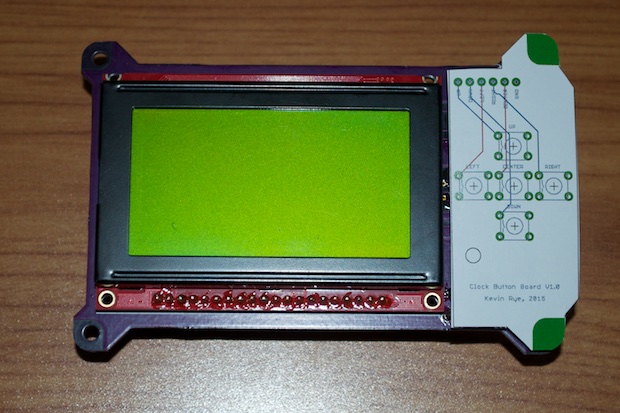
What a great weekend! Major progress has been made! All I need to do is finish the last two colons, design the controller board, and make a case for it.
Read More...Mar 24, 2018
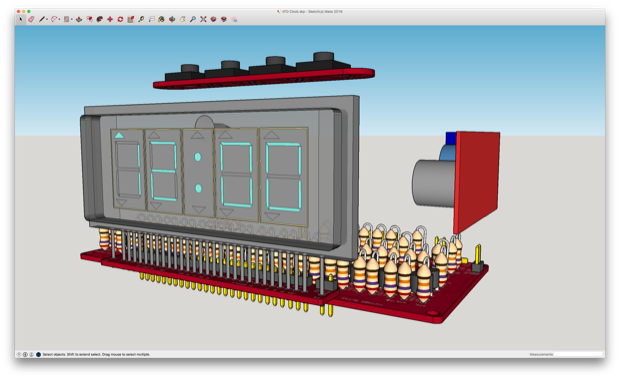
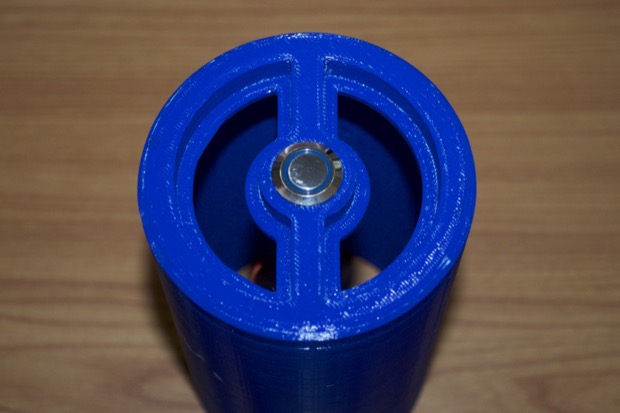
When I first designed the Word Clock 2, the plan was to laser cut the enclosure for it. However, it was going to cost too much to have it cut. It was too risky just in case the case didn't fit, or the holes in the back for the buttons weren't quite right. I decided to just 3D-print a case for it. Now that I have my own Glowforge, I can cut my own case for it!
Read More...Mar 11, 2018
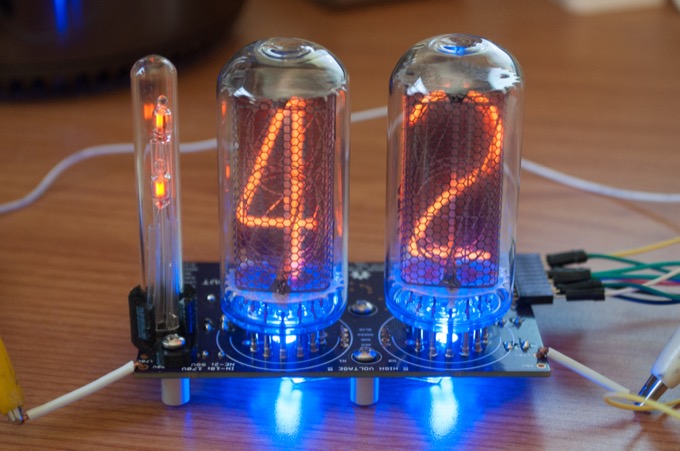
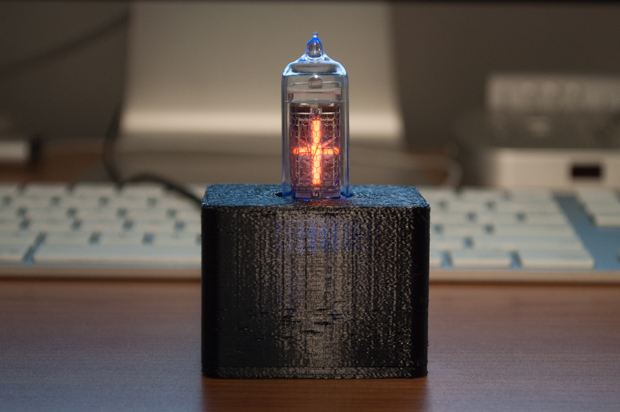
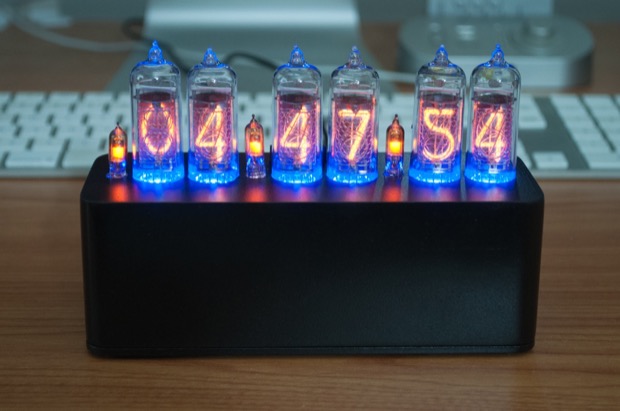
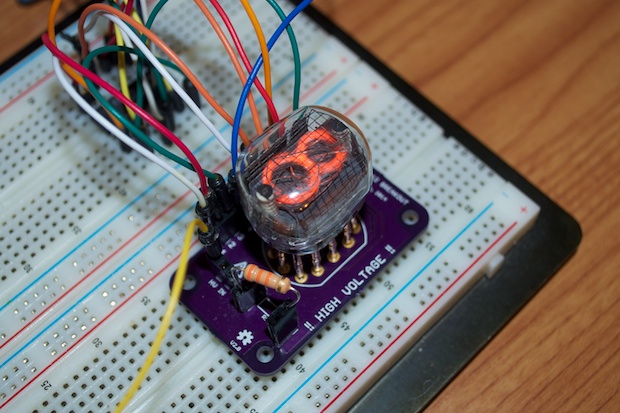
Section one of three for my IN-18 Nixie Clock has been successfully assembled. Everything works!
Read More...Feb 25, 2018
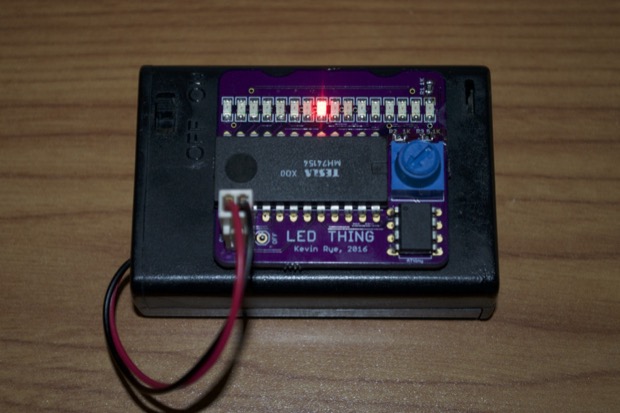
I was bored while I waited for parts for my IN-18 Nixie Clock to arrive from China. So I threw together a silly little ATtiny thing that could use a 7-segment display to display a random number from 0-9. Nothing fancy, just a silly little one-day project. This will come in very handy when the kids argue over who gets the last donut or whatever. Hey kids….pick a number!
Read More... Jan 27, 2018
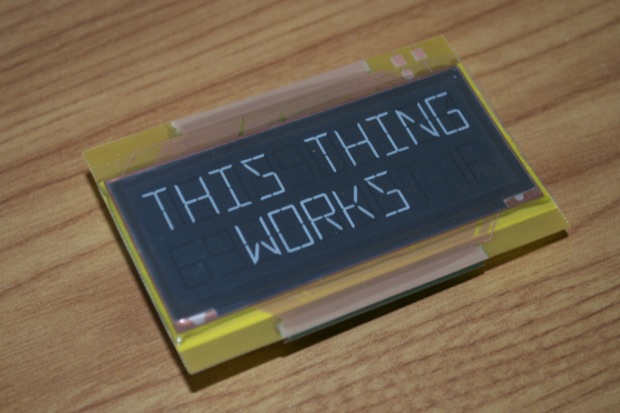
My breakout boards finally arrived. What a long two weeks! I popped one into my breadboard and I applied 160 volts. It works!
Read More...Jan 20, 2018
While I waited for my IN-18 breakouts to arrive, I got to work on figuring out how I was going to drive them. I know common 74141 nixie drivers won't work, so I need another solution. I found a video over at the EEVblog that showed that the TPIC6B595 could be used to drive nixies without the need for transistors, so I figured I'd go for it.
Read More...Oct 10, 2017
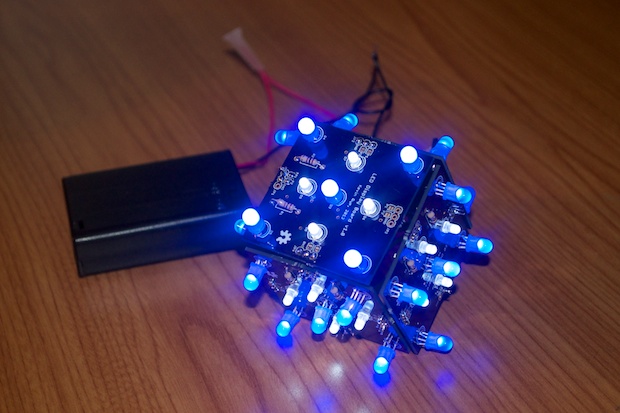
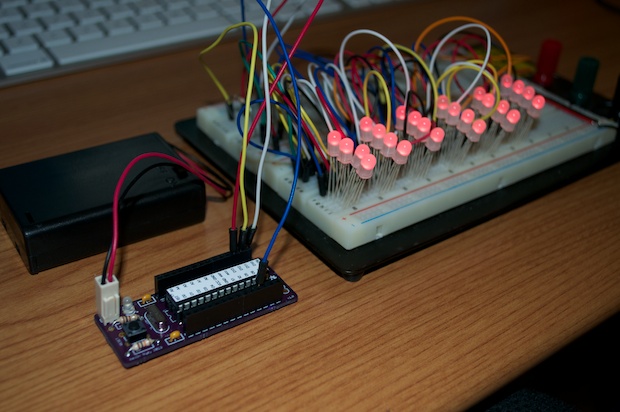
I got my PCBs in, assembled everything, and uploaded my code. Everything works as it should. I just need to design a case and it's a wrap!
Read More...Sep 30, 2017
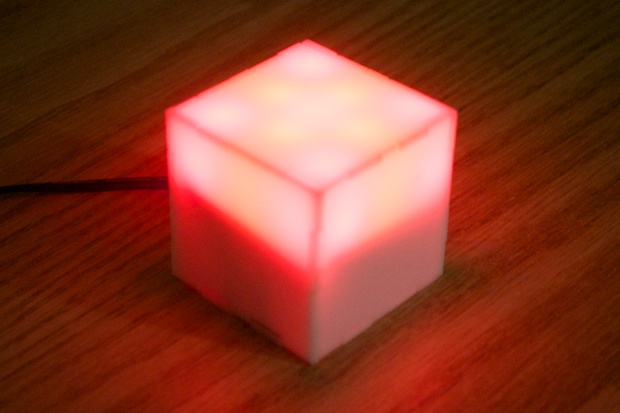
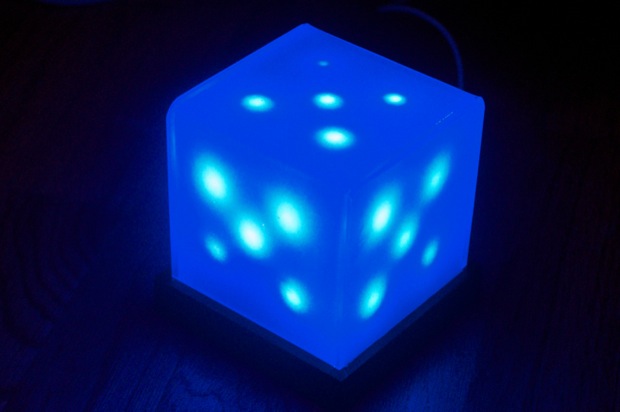
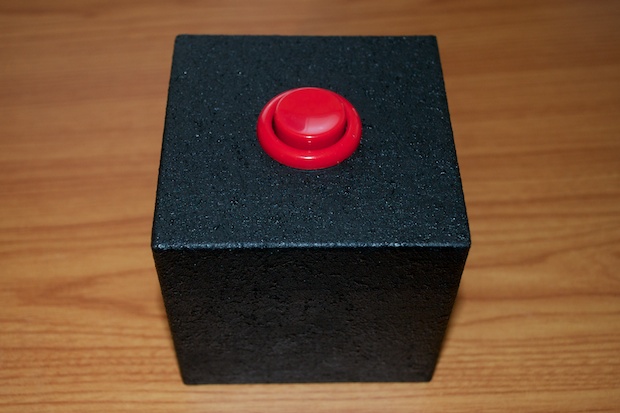
I took a break from the VFD Clock to make a Portal Weighted Storage Cube. That took about a month, and now that it's finished, it's time to revisit the clock.
Read More... Aug 26, 2017
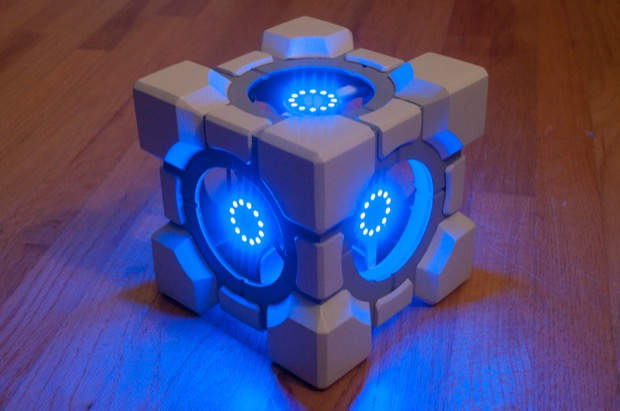
All the parts are painted and assembled. All the electronics are complete and installed. I made some awesome progress this week. The last thing to do it put some finishing touches on the code and paint the Aperture Science logos onto the centers.
Read More... Aug 19, 2017
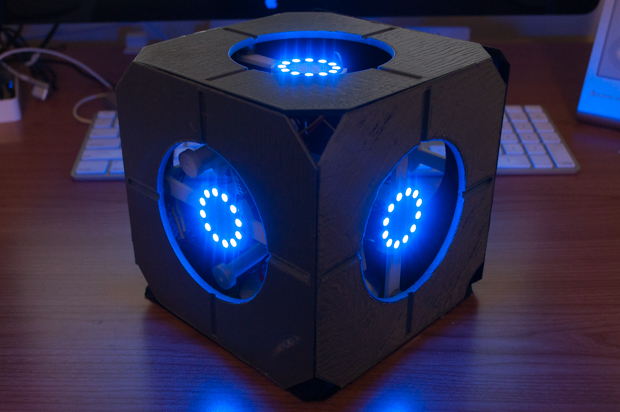
I've made some great progress on the cube. All the sanding and painting is well under way, and all the electronics are pretty much finished.
Read More...Jul 01, 2017
The good thing about making a lot of clocks is that after a while, writing the code become a bunch of cutting and pasting. The code for this clock closely mirrors that of both of my nixie clocks as well as my LCD clock. I just had to make a few small tweaks. After about two hours, I had all the code written for the time mode, date mode, and alarm mode.
Read More...Jun 29, 2017
When I set out to make my last VFD clock, I decided to drive the tubes with a MAX6921 chip. However, I couldn't for the life of me figure it out. I looked at a bunch of other projects online and tried to reverse engineer them, but I just couldn't get that chip to do anything. In the end, I gave up and decided to just drive the whole thing with transistors. With a new, more complicated clock in the works, it's time to figure out this chip.
Read More... Jun 14, 2017
While waiting for the paint to dry on my IN-14 Nixie Clock, I decided to tinker around with a small board idea to do something with this lonely IN-19 that I have. When I bought the IN-14s for my clock, the eBay seller threw one in as a way to make up for a delay in shipping. It's a cool little tube. But what would I ever use it for?
Read More...Jun 03, 2017
I'm really happy with the way that this clock came out. It's so much nicer than my IN-12 clock. I can't wait to get started on another one!
Read More...May 20, 2017
This clock is coming along nicely. I know I designed it a few months ago, but I shelved it for a month to wrap other things up. Now that I've decided to go ahead with it, it's been less than a month and it's almost complete!
Read More... Apr 26, 2017
I left off last time with the notion that I'd be able to create a new IN-14-nixie clock based off the design that I used for my IN-12 nixie clock. The plan was to use the main controller board as-is, and combine the driver and display boards. This proved to be more difficult than I had anticipated. The routing of the high voltage traces left much to be desired, simply due to the lack of real estate. I decided to not only use the original controller board, but the driver board too. After all, OSH Park gives you three boards for each order, so I have some left over from the last clock. I might as well use them up.
Read More...Mar 03, 2017
The VFD Clock is finally complete. I started it almost a year ago. However, once I actually figured out how to drive the display, it was another 7 months before I actually started it. I had so many other projects to finish first. I'm glad I waited until my plate was clear to work on this. It really came out nice. It's definitely one of my favorites.
Read More...Mar 01, 2017
What a long two weeks it's been! I was dying to get my hands on the boards! The assembly was a snap and I think it came out way better than I had imagined.
Read More...Feb 21, 2017
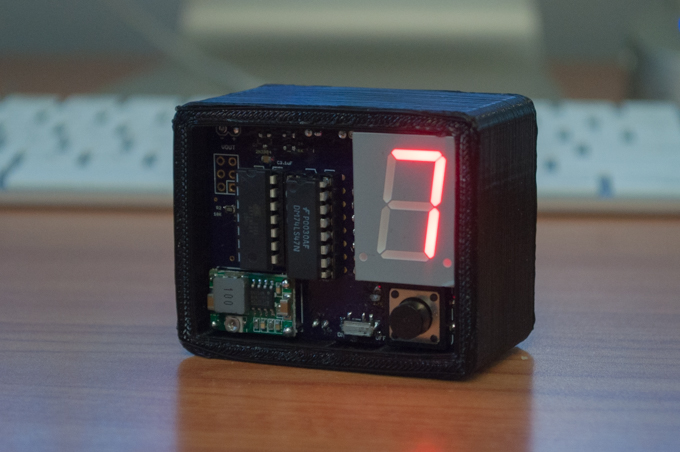
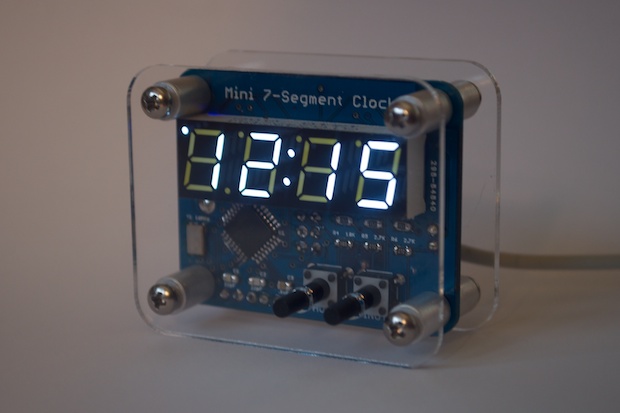
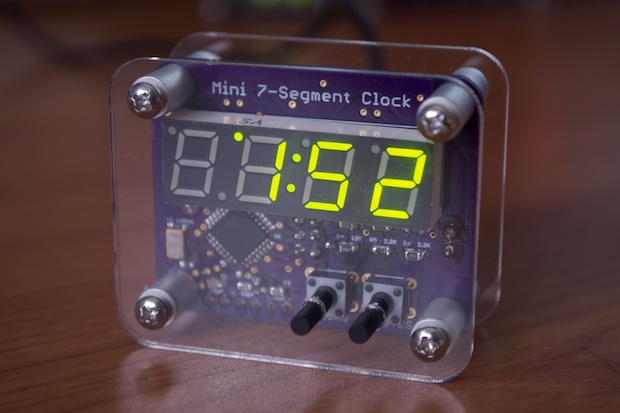
A friend of mine at work cut the cord on his cable TV. Needless to say, the cable box had to be returned. Unfortunately, he relies on that little clock under the TV all the time. He asked if it was possible to basically take my Mini 7-segment Clock V2 and cut it in half. Challenge accepted!
Read More...Feb 07, 2017
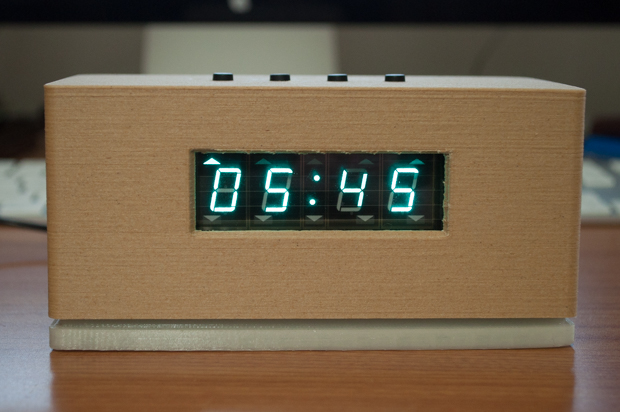
The electronics have been assembled, so it's time to work on the enclosure. I'm almost finished with this clock. I ran out of black PLA for the base, and I still need to stain the woodfill PLA top, but I'm making excellent progress.
Read More...Jan 28, 2017
All the electronics are complete. I'm so pleased that everything worked on the first go without any tweaks. All that's left to do is design an enclosure for it.
Read More... Dec 18, 2016
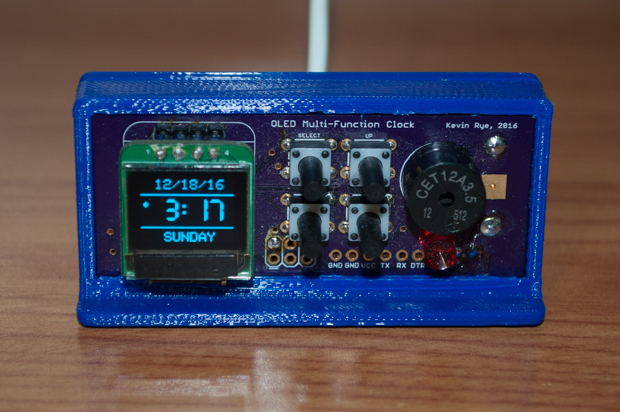
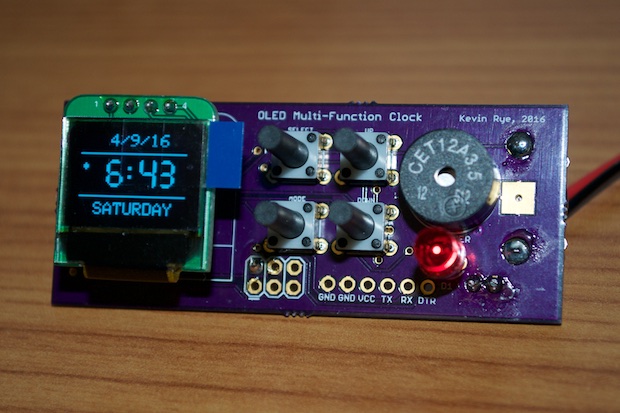
It's been almost 8 months since I assembled my Mini OLED Clock. It's been sitting unfinished on my desk since then. All I needed to do was 3D print a case for it.
Read More...Dec 04, 2016
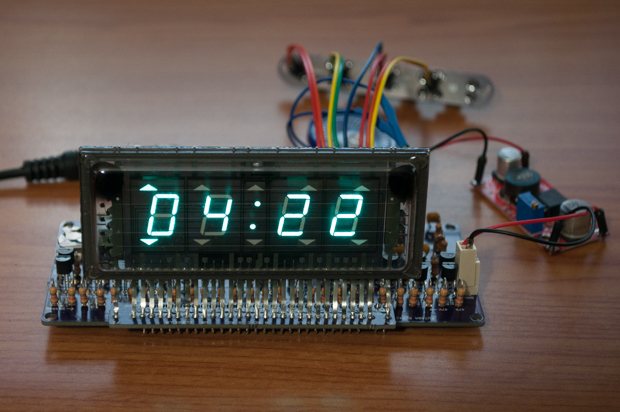
With all the clock code written and the audio stuff worked out, it was time to pay closer attention to some of the details. Like properly driving the filaments.
Read More...Nov 27, 2016
The progress that I've made on this clock over the past week is amazing. It also helped that there was a 4-day Thanksgiving weekend in the mix. All the clock code is complete, including the alarm menu and the audio.
Read More...Nov 19, 2016
It’s been at least 6 months since I last played around with this VFD. I had so many other projects in the works that I needed to finish first. I really want this clock to be something special, so I saved it for when all my other projects were complete. That, and I’m supposed to be saving my money since the holidays are right around the corner.
Read More... Aug 29, 2016
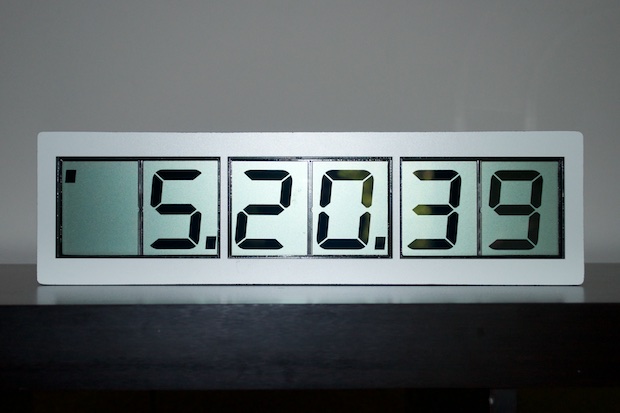
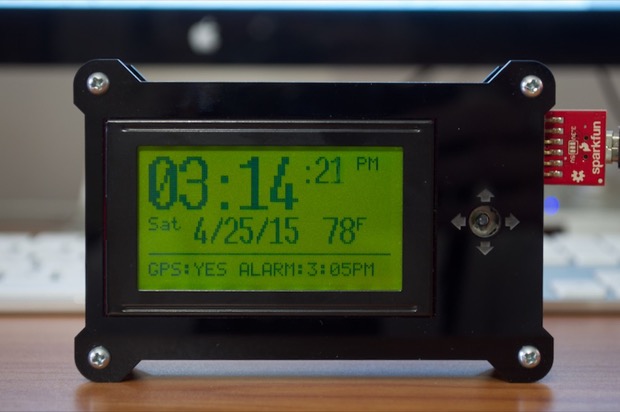
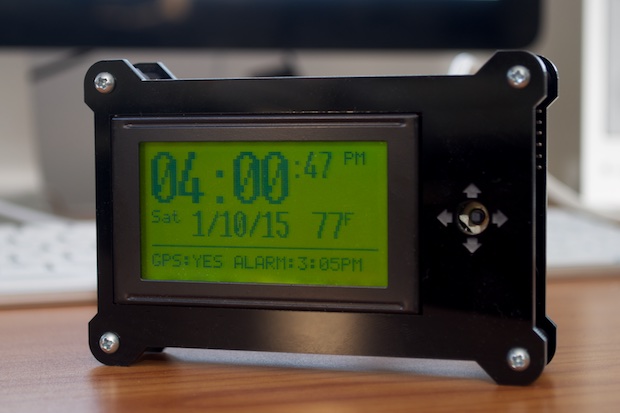
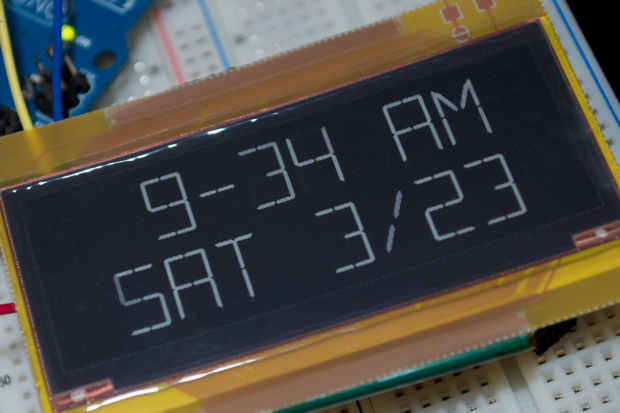
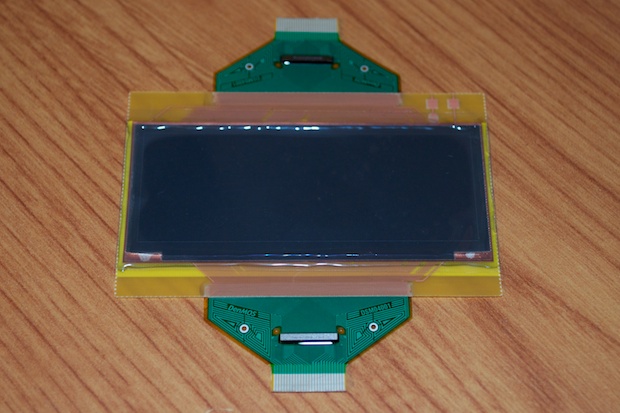
I’m so thrilled that I finally completed my 15” LCD clock. It was so much work and it took a long time to complete, but it came out awesome. It's like they say... if it's worth doing, it's worth over-doing.
Read More... Aug 06, 2016
When starting a print on my ROBO3D R1 3D printer, I periodically get an error message that pops up just after the bed has leveled. The error message pops up and the printer just stops. I have to power cycle the printer, restart MatterControl, and enter M999 into the console. I posted an entry on the ROBO3D forums asking for help. The consensus was that the extruder thermistor was bad and needed to be replaced. However, I ended up frying my board during the repair and needed to replace the Arduino MEGA inside.
Read More...Jul 22, 2016
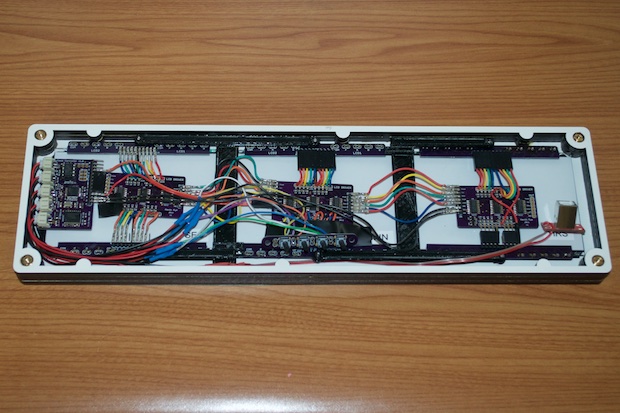
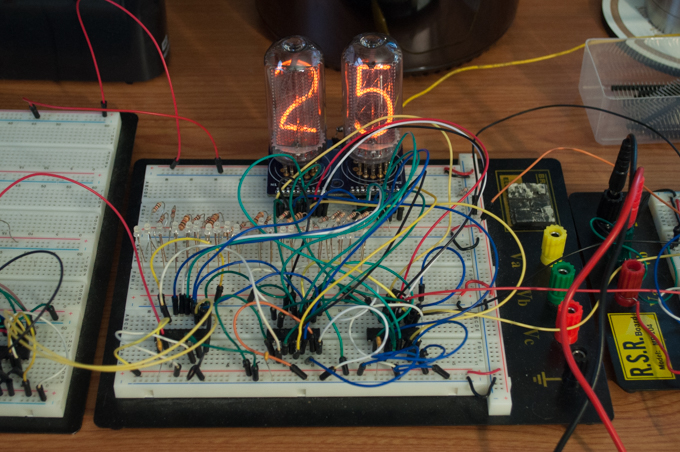
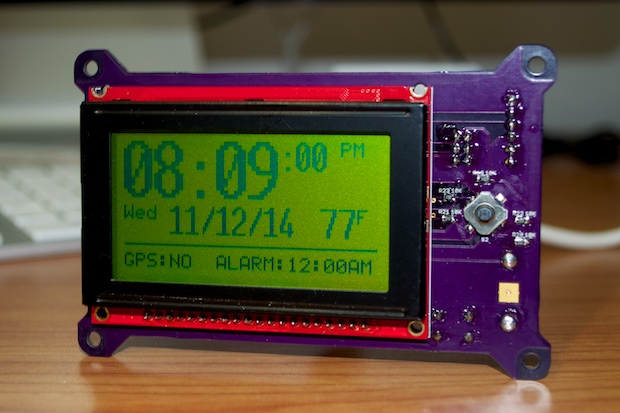
After some delays, I finally got the panels for the clock laser-cut. I thought I was going to just drop the electronics in and screw the back on, but I ended up having to redo a lot of the wiring to get things to fit. I’m still not done. As it turns out, I need to reorder some more panels to make the enclosure a little thicker. The wiring for the set buttons takes up more space that I had anticipated. So the clock’s not compete yet, but much progress has been made.
Read More...Jul 07, 2016
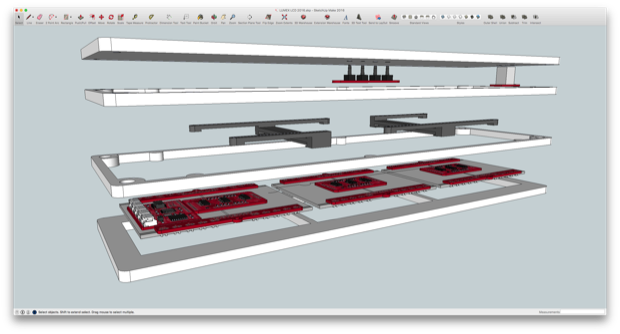
With all the PCBs assembled, it was time to get to work on the 3D model and the laser-cut enclosure.
Read More...Jun 14, 2016
I really wanted this clock to be something special, so I spared no expense, took my time, and made sure everything was perfect. No shortcuts, half measures, or it’ll do’s. It came out better than I’d hoped. I just hope it shows in the final assembly.
Read More... Jun 13, 2016
After a month and a half of juggling multiple projects, the “Zorg Door Bomb” Clock has finally crossed the finish line. It came out great, and I’m really happy with the results.
Read More... May 27, 2016
My PCBs finally arrived! As parts and PCBs become available, I’m bouncing back and forth between this, my 3” LCD Clock and my Zorg Bomb Clock. It seems like all the PCBs showed up within days of each other. So much to do!
Read More...May 27, 2016
If you've been following along lately, you know I've been juggling multiple projects. It's probably not the best way to do things, but it all just sort of happened. After a few weeks of jumping back and forth between projects, things are really starting to come together. Some of these projects are finally starting to see a finish line.
Read More...May 04, 2016
With the prototype working, and the code 99% complete, it was time to put together a PCB and get to work on an enclosure. I really want this clock to look sweet.
Read More...Apr 30, 2016
My first attempt at making an 18650 battery charger for my Mini OLED Clock was a disaster. I made some silly mistakes on the board, and needless to say, I let the smoke out. I hope this new board works.
Read More...Apr 28, 2016
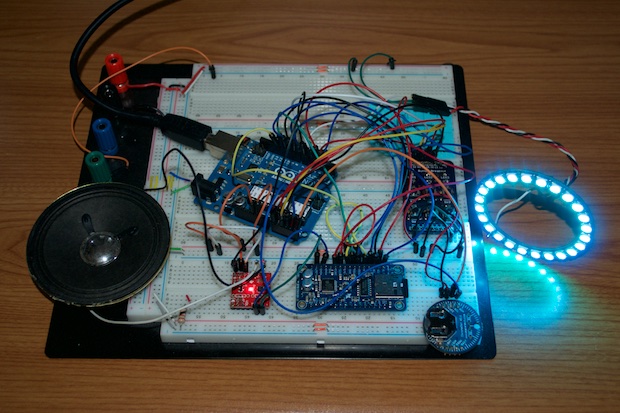
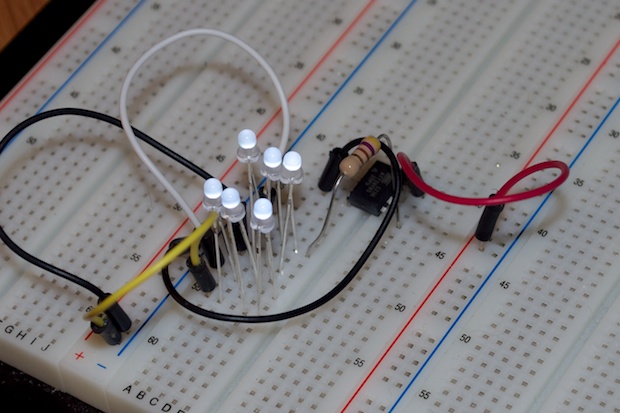
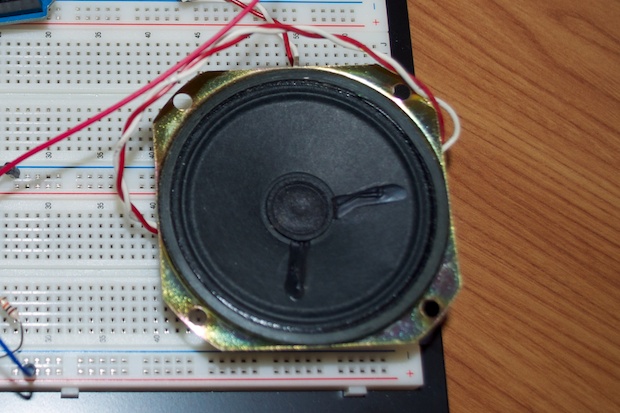
The Talking Clock is coming along pretty good. However, I wanted to add a little flare to it. When the clock annunciates the time, I thought it would be really cool to have some LEDs come on. Maybe fade in and then fade out. With all the buttons that I have, the audio amplifier, and the VS1053 breakout board, I’ve pretty much run out of I/O. How am I going to PWM multiple RGB LEDs with only 1 pin left? The answer was Neopixels.
Read More...Apr 23, 2016
It’s only been 3 weeks since I got my hands on some 3” LUMEX LCDs, but already I have made some fantastic progress with this clock. All the PCBs have been designed and ordered. It’s just a matter of waiting for the PCBs to arrive, designing the enclosure, and putting it together.
Read More...Apr 18, 2016
I’ve had a 74154 4-to-16 Decoder/Demultiplexer sitting in my parts organizer in a drawer marked "Random Chips" for 15 years. So what's it do? Let's find out!
Read More...Apr 14, 2016
In my last post for these awesome 3" LUMEX LCDs, I left off by concluding that I'd need some dedicated LCD driver chips. Well, I have the drivers now, and the displays look sweet!
Read More...Apr 09, 2016
My Multi-Function OLED Clock PCBs arrived. I hit a few snags putting it together, but in the end it came out fantastic. The battery board that was supposed to go with it is a different story.
Read More...Apr 07, 2016
In my last post for the VS1053 breakout board, I left off with simply playing an MP3 by pressing a button. Basically a "Hello World" for the breakout board. Now it's time to dig in and see what it'll take to make a talking clock.
Read More...Apr 02, 2016
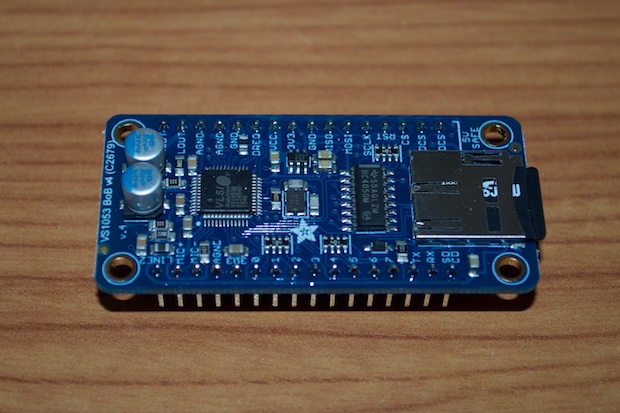
This is going to be sweet. I got my hands on Adafruit’s VS1053 MP3 Breakout Board. Making a talking clock should be pretty easy with this!
Read More...Apr 02, 2016
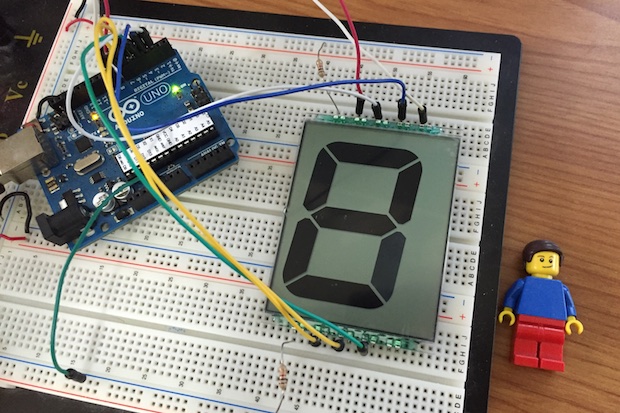
I picked up these sweet LUMEX S101D22TR 7-Segment LCDs the other day. They were only $3.50 a piece.
Read More... Mar 27, 2016
Time for some PCBs! This clock is going to look pretty cool once it’s assembled. With a 3D model, I can get a better idea of what it’ll look like. While the PCBs are being manufactured, I can get to work on coming up with some kind of 3D-printed enclosure.
Read More... Mar 23, 2016
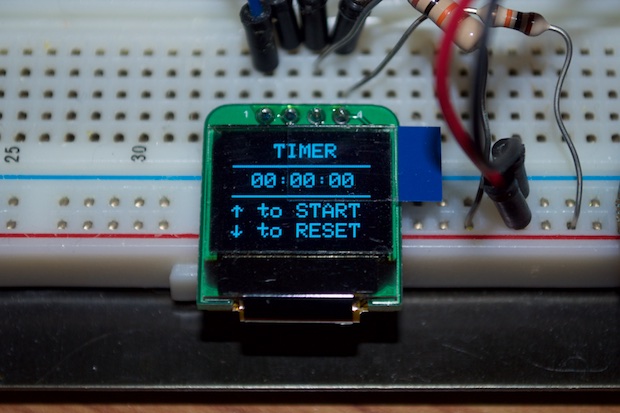
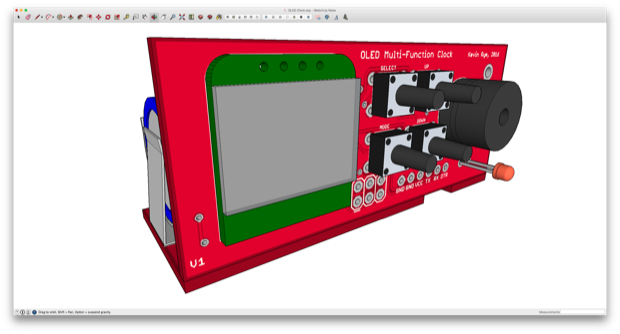
OK, so maybe I’m not quite ready to design the PCB yet. Although I was very happy with the way that the clock and alarm features came out, I felt that it needed more. I only used about 15K of the 328’s 32K, so there was definitely room to add some more goodies. I decided to spend another day on the code and implement a timer and stopwatch function.
Read More... Mar 22, 2016
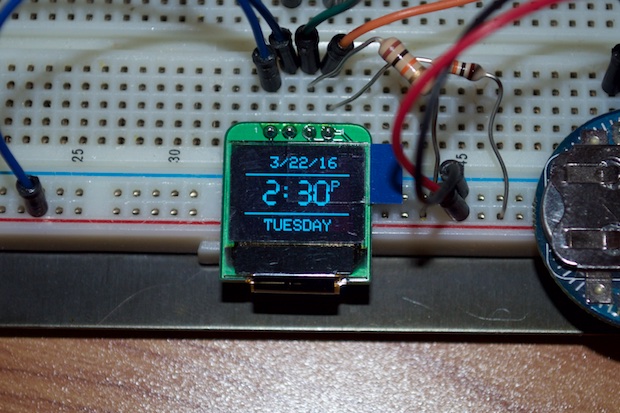
I’ve been meaning to make an OLED clock for a while, I just haven’t gotten around to it. I managed to score these super tiny 64x48 OLED displays from eBay for $10 bucks each.
Read More...Feb 06, 2016
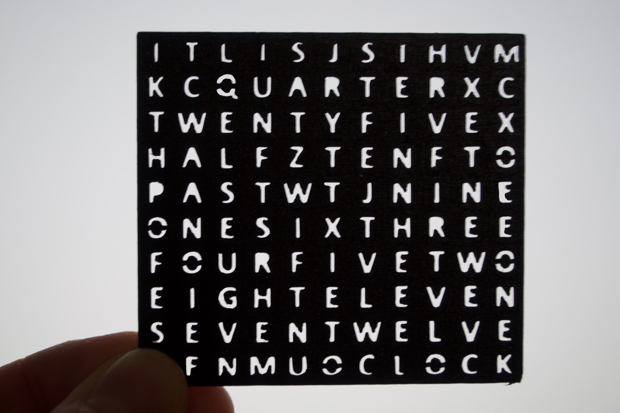
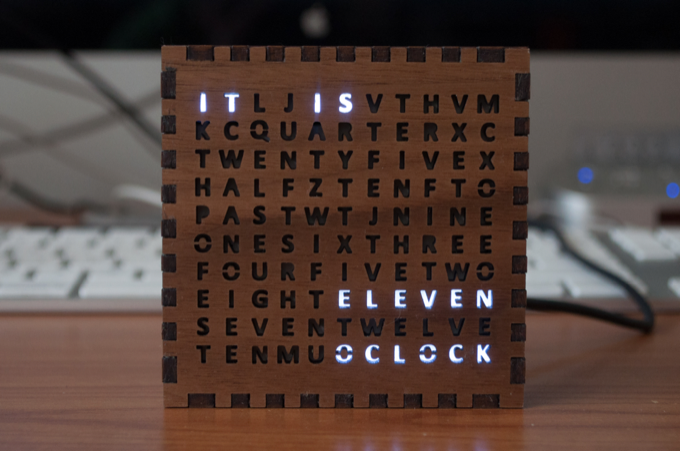
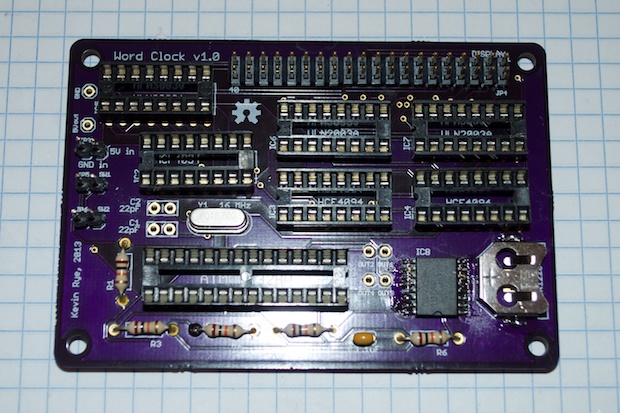
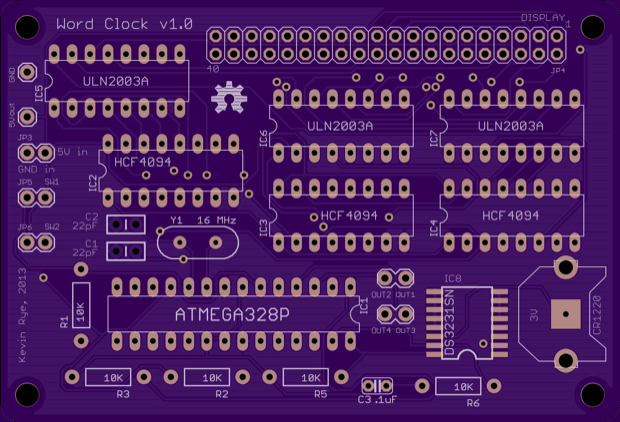
I had to get through the busy holiday season before I could get the ball rolling again. I've taken a long enough break from my hobby stuff. One project I've been meaning to revisit for well over a year is my Word Clock. I think it’s time for a tiny all-SMD version 2!
Read More...Aug 08, 2015
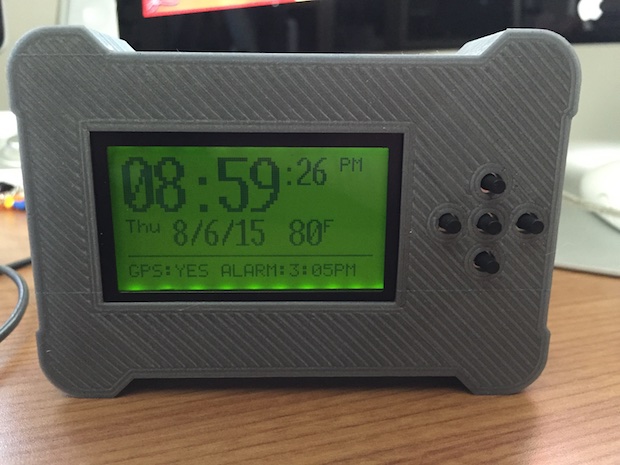
My new GPS button boards arrived in the mail. I hacked them into my new 3D-printed case. It works perfectly. All that's left is to firm up the code and this one's a wrap.
Read More...Jul 30, 2015
There is still much work to be done. I have to put in a bunch of code for the set buttons, the date, the alarm. Little things. I also still have to design a 3D-printed enclosure for it, as well as order some more nixies for the 2 that arrived DOA. In any case, it's coming along great!
Read More... Jul 22, 2015
I love it when everything just comes together at the end and it just works. No hacks, no head scratching, no second spins. It just works. This project involved some serious engineering, and I'm really happy with the way that it's coming out.
Read More... Jul 21, 2015
Now that I know I can display my own custom time and date on this camcorder CRT, it's time to get serious about a PCB and a 3D-printed case.
Read More...Jul 20, 2015
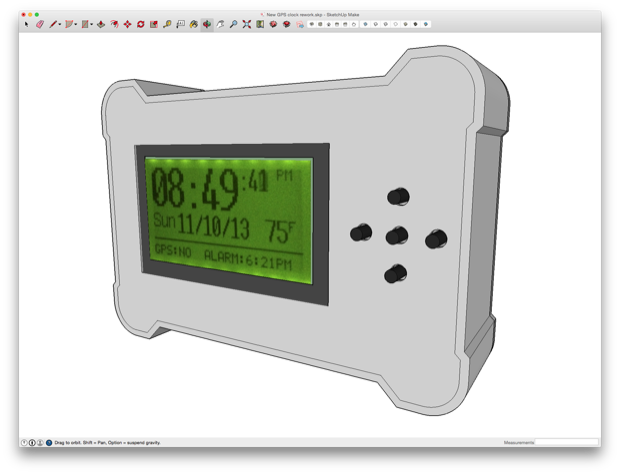
With the GPS button board designed and ordered, it was time to put together a 3D model and design a new case for the clock.
Read More...Jul 20, 2015
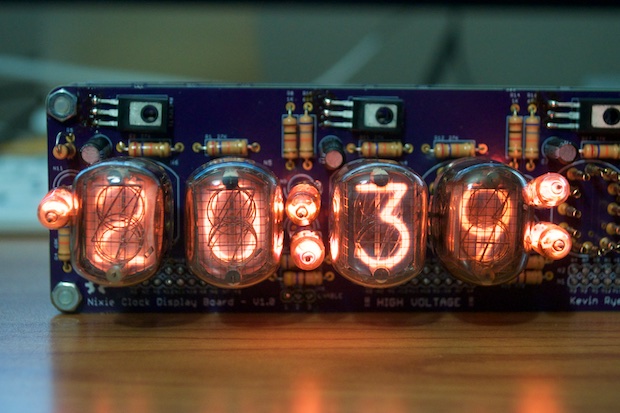
At long last! My nixie main boards arrived. This project has been long in the making, but it's finally starting to come together.
Read More... Jul 10, 2015
Not only have I successfully figured out how to use the TVout library to display a custom "gui" showing the date and time, but I also figured out how to hack it into a vintage camcorder viewfinder CRT.
Read More... Jul 06, 2015
The GPS Clock has been fully assembled and sitting on my desk for months. I started this clock two years ago. I just can't seem to get the code to where it needs to be. I just want to put this project to bed already!
Read More...Jun 30, 2015
I've always wanted to make an oscilloscope clock or something similar using a really small CRT. Perhaps input some video with the use of something like the Uzebox ATmega game console. I found a cool little 5" black and white TV in the garbage the other day. Although it seems like it's toast and maybe a lost cause, it got me thinking about cool TV and CRT hacks.
Read More... May 26, 2015
I got my hands on a few really small 7-segment displays around 10 years ago. Back in the day, I didn't have the slightest clue as to how to multiplex them. I just put the wraps on a new 7-segment clock to replace the innards of my old 7490 clock. Seeing how easy it was to multiplex those 7-segment displays, I thought I'd have a go at trying to make another Mini 7-Segment Clock out of one of these teeny-tiny displays.
Read More... May 11, 2015
I was extremely satisfied (and proud) of the way that the enclosure turned out for the rework of my 7490 Clock. The electronics on the other hand, is another story. The innards of that clock were from a prototype I built in 2001. It was a proof of concept. It led to the design of what would become an extremely well-polished and accurate clock. It's just a shame to throw it in a closet and forget about it. The case came out so nice and it looks great in the living room. I'm going to gut it, and replace my old 7490 prototype board with something brand new.
Read More... Apr 25, 2015
It's been almost 4 months, but it's time to put the wraps on the code for the GPS clock. I've been so busy with other 3D printing and 3D rendering projects. 3D printing a joystick for the 5-way switch has proved to be far more difficult than I had anticipated. I'd really hate to think that this $2 button is going to be the death of this $100 clock! I should have just stuck with my original design and used buttons.
Read More... Jan 10, 2015
I've been working on this clock for a long time, and a lot of effort has been put into it. I've learned so much from this project. I do have to admit some parts of the code aren't as elegant as they should be, but it works. With the code complete, all that's left to do is try my hand at designing a 3D printed joystick for the 5-way switch.
Read More... Nov 08, 2014
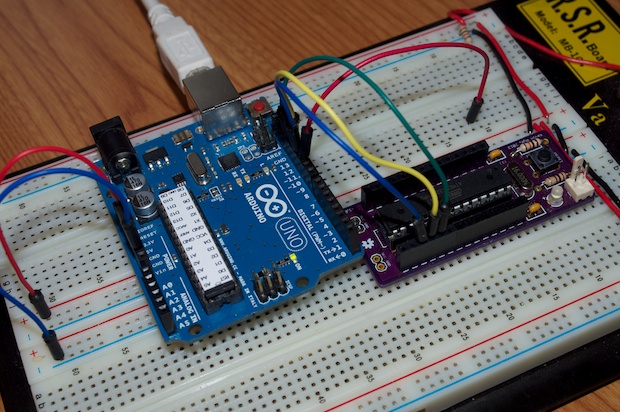
If you’re following along, you know that version 1.0 of my GPS clock was a total bust. I somehow managed to screw up the PCB. I had the FTDI RX and TX lines tied to the wrong port on the ATmega2560. There was just no way to rework the board. Besides, I like to keep my final projects looking neat and clean. Rework wires are just a big no-no in my book. That meant that I had to fix the error on the PCB and place another order. I got my boards and most of my parts. I soldered together what I could. So far, it looks like it’s going to work!
Read More... Oct 18, 2014

Many a time have I had to set up my Arduino UNO as an ISP in order to burn the bootloader to either another Arduino or an SMD project. It’s a pain every time having to look up the pinouts and construct a cable each time. Having a shield is so much easier than messing around with jumper wires and DIY homebrew cables.
Read More... Oct 06, 2014
In order to drive a nixie, you can use a 74141 BCD decoder. Sure, you can use transistors, but you’ll need a bunch of them. You can drive all 10 nixie segments off one 74141 chip. All you have to do is feed it a number in binary and the chip lights up the corresponding cathode on the nixie; the same way you’d drive a 7-segment display with a 74247.
Read More... Sep 25, 2014

I was amazed at how fast my GPS PCBs arrived in the mail. Usually OSH Park takes a good 2 weeks to turn around a board. However, this time they arrived in 5 days. The boards look great...and they arrived just in time for the weekend!
Read More... Sep 20, 2014
I’m in the very early stages of prototyping a nixie clock. I picked up some MJE340 power transistors to switch on some IN-3s. I can then use a digital pin on my Arduino to turn on the IN-3s through the transistor. I’ll then have myself a blinking colon for my nixie tube clock.
Read More... Sep 14, 2014
Wow, has it been a long time since I worked on the GPS clock. A whole 8 months! The prototyping and PCB design was completed a long time ago. I just didn’t want to order the PCBs until the code was complete. The PCBs cost $60 bucks from OSH Park. That’s a lot of money to spend on PCBs that might not work, so I really wanted to make sure everything was solid. I just keep getting distracted with other projects. It’s time to just bite the bullet and finish it.
Read More... Jul 23, 2014
I did it! I finally finished upgrading the clock internals and the enclosure. I think it came out amazing. I just can’t believe after all these years that this clock finally looks like something I can be proud to display. I’m really happy with the results.
Read More... Jul 09, 2014
The last prototype Arduino board I made for the 7490 clock rework didn’t turn out as well as I had hoped. The board did what it was supposed to do, but the implementation wasn’t that great. The more I thought about it, the more it became clear that the Bare Bones Arduino boards I designed months ago were the perfect solution. After all, it’s projects like these that inspired me to create the Barebones Arduino in the first place.
Read More... Jun 15, 2014

Since I wasn’t happy with the engraving on the first spin, as well as totally forgetting to make a cut out for the display, I revised my SVG file and resubmitted it to Ponoko. As far as the color, I think it’s going to look pretty good. I might lower the value of the resistors in order to brighten up the digits. I’ll have to see what it looks like when it’s all put together.
Read More... May 29, 2014
With my PCBs and the laser cut acrylic in hand, it was time to wrap this guy up. I think this clock came out so much better than version 1. I can’t think of a reason to do a version 3. With this, I think I’ve done all I can do with a 16x2 LCD clock.
Read More... May 25, 2014
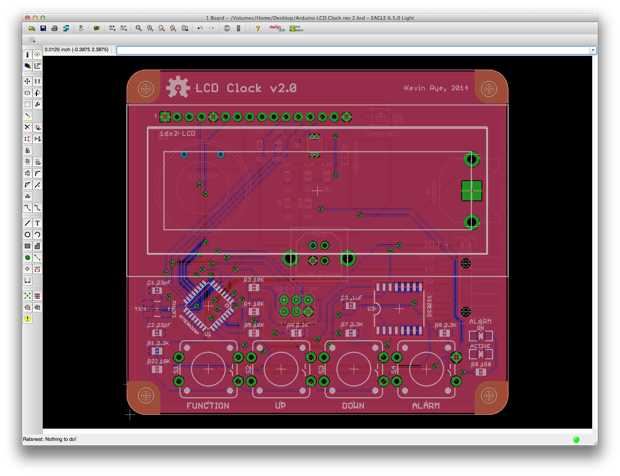
When I had shelved this clock a year ago, I had gotten pretty far with the PCB. Although I still had some design decisions to make, as well as a ton of code to write, it was pretty much complete. Now that I’ve spent some time working with SMD Atmegas, I decided to redo the PCB to make it all SMD.
Read More... May 21, 2014
While the PCBs for the new daughterboard were being fabbed, I took the time to design a new laser-cut acrylic enclosure. It needs a few tweaks, but overall it came out awesome... and the PCB fits like a glove!
Read More... Apr 25, 2014
Despite looking like a prototype, as well as a total piece of junk, I’m still very proud of the first clock I built in 2001. The 7490 clock was the first “big thing” that I ever designed and made from scratch. It’s a shame to leave it just sitting in the closet. After 13 years, I think it’s time to finally get it up and running the way it should, give it some upgrades, and a new enclosure.
Read More... Apr 22, 2014
My Mini 7-Segment Clock kit is a go! All my parts have come in and it’s all ready for sale! It's a neat little kit, and a neat little clock. I warn you though, it's not for the faint-of-heart! This is no beginner-kit. It's 80% SMD, so ninja skills with a soldering iron are required. Not to mention you’ll need to burn the bootloader on the Atmega.
Read More...Feb 10, 2014
Definitely not my best work, but it’ll do. I just wanted to use up that last PCB left over from the Tesseract build. I guess it was better to use the PCB for something rather than have it sitting in a parts drawer.
Read More...Feb 08, 2014
I love that feeling you get when you spend weeks working on a project, it all comes together in the end and it just works. I’m really happy with the way that version 2 came out.
Read More... Feb 06, 2014
I received the PCBs for the Temperature Shield a week or two ago, but I had to hold off on putting them together. I had a few other things to wrap up first. I also needed to order some more DS18B20 temperature sensors. I finally have all my parts now as well as a little free time, so it’s time to put this one together.
Read More... Jan 25, 2014
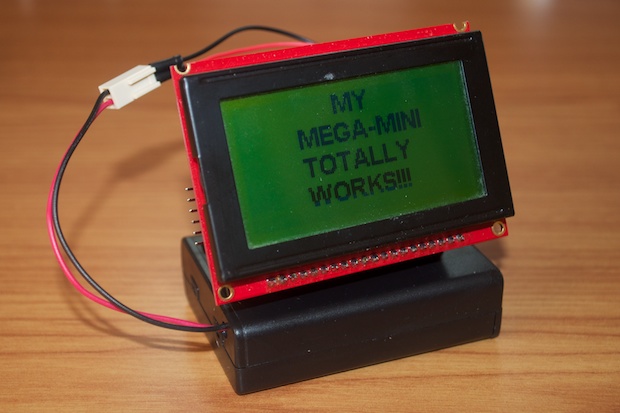
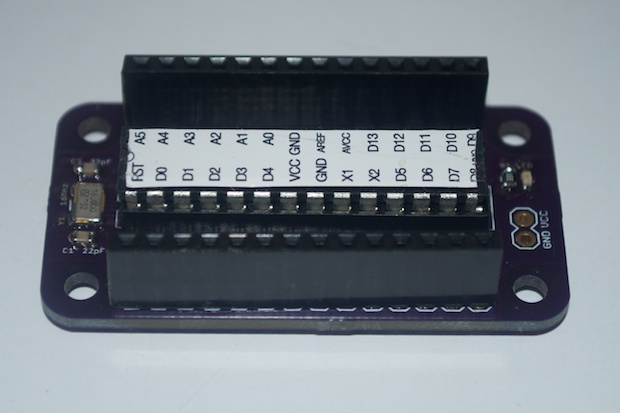
I left off with my MEGA MINI boards not working. I was banging my head against the wall trying to figure out what went wrong. I figured I’d shelf it for a week and look at it again another day with a clear head. I posted my schematic on the Arduino forums and asked if someone could lend a second set of eyes and let me know if it made a stupid design error. It turned out I had .1uF caps on the crystal! Can you believe it?
Read More... Jan 23, 2014
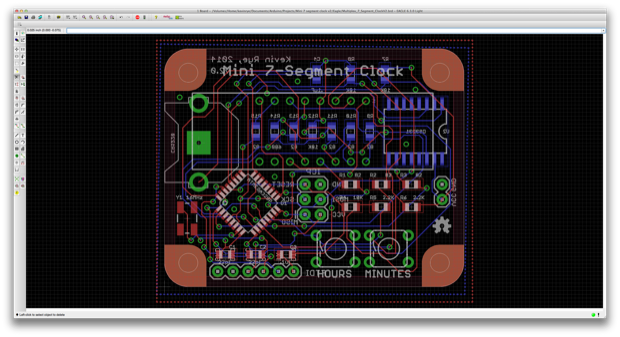
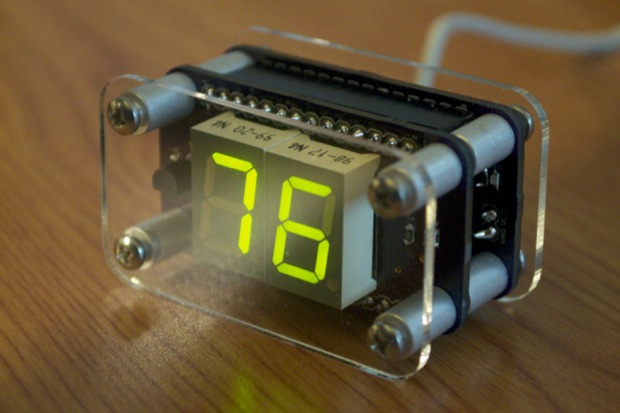
My Mini 7-Segment Clock has to be one of my favorite projects to-date. I really like the way that it came out. It's so tiny!
I’ve had a lot of people ask me if I plan on selling a kit for it. I even received an email from a reader who sent off to have some boards fabbed. He put one together himself and reported that it worked out great. When someone else builds one of your designs, it's a nice little pat on the back.
Read More... Jan 17, 2014
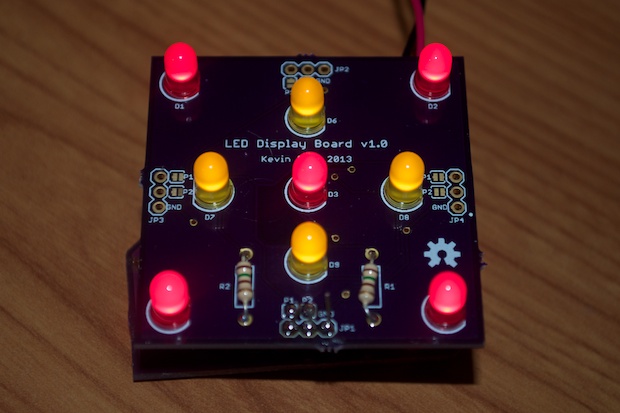
I really liked the way that the Tesseract came out. It was supposed to be the Night Light 2.0, but after some research it became apparent that blue LEDs mess with your sleep patterns. Blue LEDs aren’t exactly the ideal thing for a kid’s night light. I decided to use the leftover LED Display Board from the Tesseract for the new Night Light.
Read More... Jan 14, 2014
It’s only been 12 days and already I have my PCBs in-hand. This was such an easy build, and they work great. Now I just have to wait for my Temperature Shield to come in and I can complete my first project with one of these.
Read More... Jan 11, 2014
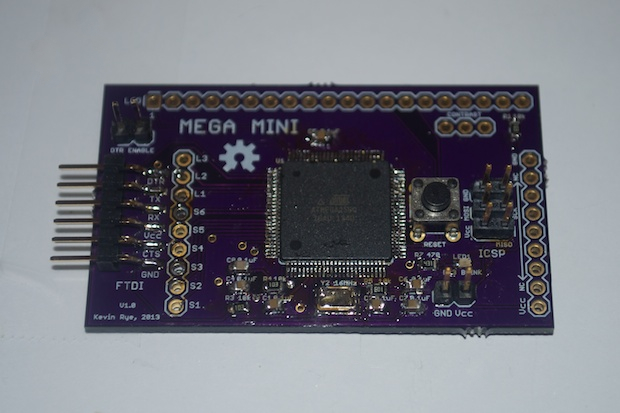
After a 2-week wait, my MEGA MINI PCBs arrived in the mail. They turned out pretty cool. I assembled two of them and installed Atmega Studio on my PC. Unfortunately, I can’t seem to write the bootloader to them. I was able to read one of the chips, but after a quick lunch break, it stopped working. I hope I didn’t kill $36 bucks worth of Atmega2560s!
Read More... Jan 02, 2014
With version 3 of my Bare Bones Arduino board off being fabbed, as well as the laser-cut acrylic, it was time to go ahead a design my first shield.
Read More... Jan 02, 2014
I really liked the way that my Bare Bones Arduino boards came out. Both versions. They’ve really come in handy. They’re great for throwing quick projects together. However, I’d like to make a new version with holes so that they can be mounted between some sheets of acrylic. I’d also like to swap out all the through-hole components for SMD versions.
Read More... Dec 31, 2013

This 7490 clock has been a thorn in my side for a little over 5 years. It's never run right. It looks great, but it runs fast. Is it time for yet another rebuild, or can I just fix it with a cap or something?
Read More... Dec 26, 2013
With the software and hardware for the Tesseract complete, it was time to wrap up the enclosure. I think it came out great, and the kids think it’s amazing.
Read More... Dec 22, 2013
Once my MEGA MINI PCBs arrive, I’m going to need a way to upload sketches to them. I plan on using the MEGA MINI as a test-bed for my GPS clock. I’ve never soldered or in-circuit programmed an Atmega2560 before. I’d hate to waste $100 worth of tech assembling the GPS clock for it to not work. So I want to make something simple as sort of a practice run. In order to program the board, I’ll need an FTDI programmer. I picked up SparkFun’s FTDI Basic Breakout board for $15 bucks.
Read More... Dec 17, 2013
After about two weeks, my Tesseract PCBs arrived. I couldn’t wait to put them together. The hardware and software are both complete. It’s just a matter of painting the enclosure and the Tesseract will be complete!
Read More... Dec 15, 2013
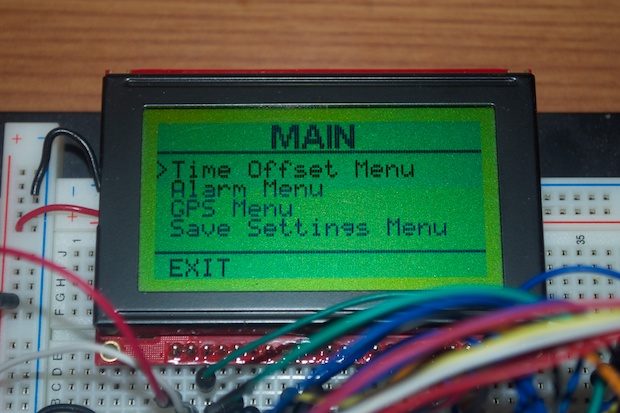
I decided to use a 5-way switch the fully control the clock’s menu system. Removing the rest of the buttons required a re-write of the menu system. I first needed to map the whole thing out in order to better visualize what options the menus would use, and what actions would be allowed in each menu. I created a spreadsheet to map it all out. It was then a matter of translating that into code.
Read More... Dec 05, 2013
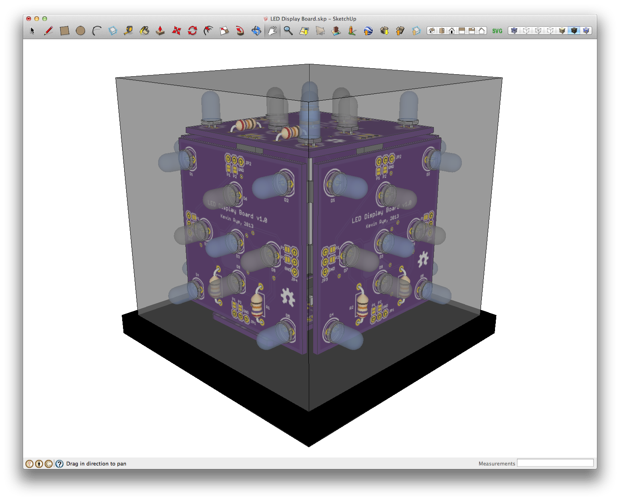
I’d like to try my hand and making a Tesseract. I love all the Marvel movies, as well as my kids. So I think they’ll get a kick out of seeing one on my desk.
Read More... Nov 18, 2013
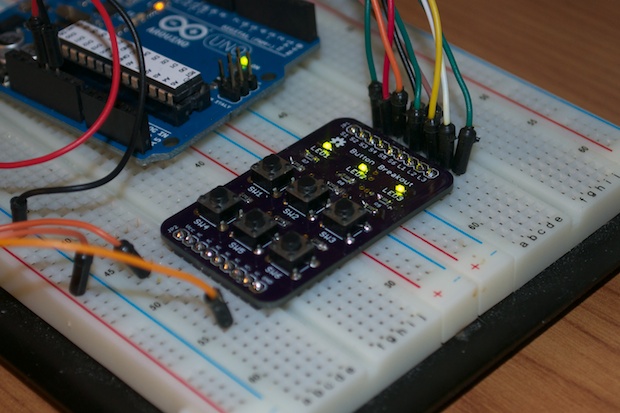
I came up with the idea that it would be cool to have a little button breakout board that I could quickly pop on to my breadboard when I suddenly found myself in need of some buttons. Instead of scrounging for buttons and resistors and taking up a whole ton of space, I could just simply connect a "mini keyboard" to the breadboard and be up and running in seconds.
Read More... Nov 10, 2013
I decided to ditch the IR remote in my GPS clock in favor of buttons. Once I had all the IR code implemented, I realized that it just wasn’t the way to go. Instead of the IR remote, I’m basically going to include a keypad on the clock that pretty much mirrors the functionality of the remote.
Read More... Nov 01, 2013
With the weekend upon me, I was eager to continue writing the code for my GPS clock. I had already identified the need to continue developing on an Arduino Mega 2560, but I’d need to order one if I was to move forward. Rather than order one from SparkFun, I grabbed a Mega 2560 from RadioShack on the way home from work. Of course, I paid an extra $10 bucks “going retail”, but it’s a small price to pay to have it in hand for the weekend rather than waiting a week for it to arrive via snail-mail.
Read More... Nov 01, 2013
It’s been a few months since I worked on the GPS clock. I couldn’t nail down exactly how I wanted it to work. I had a few ideas floating around, as well as a list of what features I wanted to include. However, in order to build the clock without compromises, I would have to overcome several hurdles. Considering I was already juggling a few other projects, I figured it was best to shelf it until I had a clearer vision of exactly how I wanted it to work and how I’d pull it off.
Read More... Jul 17, 2013
I hopped on eBay and found that you can get Atmega328s from China for $2 a pop. Rather than spend over $30 bucks ordering them from SparkFun, I ordered a 5 pack from eBay for only $10.50. You can’t beat that! I crossed my fingers and hoped that they weren’t fakes. I’ll just have to burn the bootloader and find out.
Read More... Jul 11, 2013
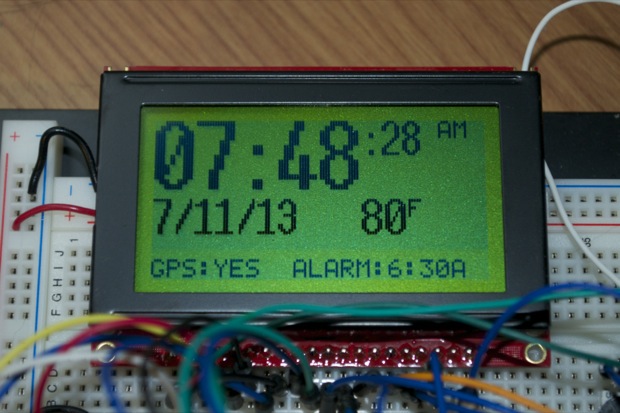
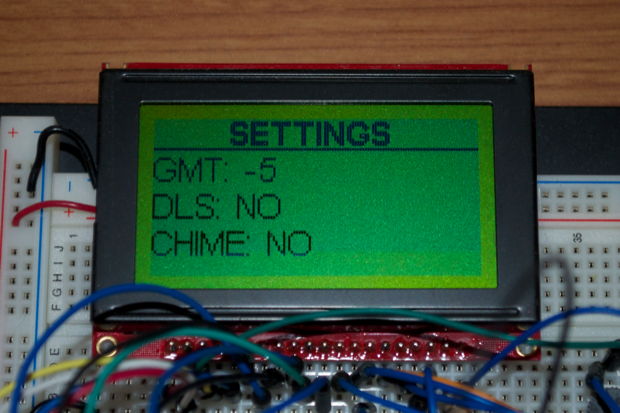
A while back I picked up a SparkFun 128x64 LCD and an Adafruit 66-channel GPS module to have a go at making a GPS clock. The great thing about setting the time and date via GPS is that I won't have to put any buttons on the clock. It'll set itself!
Read More... Jul 04, 2013
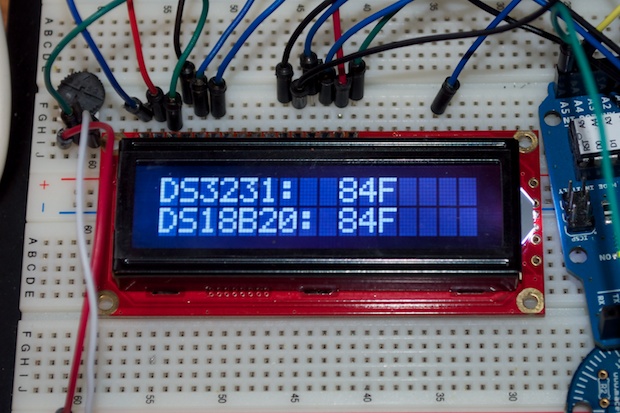
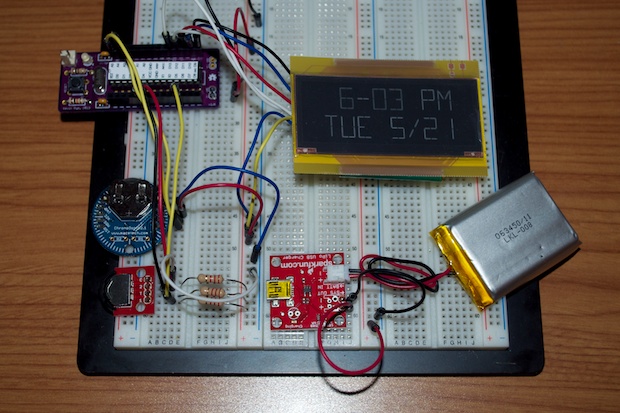
One thing that I definitely want to add to Rev 2 of my LCD clock is the ability to display the temperature. I found out that since the DS3231 has a temperature compensated internal crystal, you can poll it for the temperature. I wondered how accurate it would be. What good is displaying the DS3231’s temperature if it runs 10 degrees over ambient? There was only one way to find out.
Read More... Jun 12, 2013
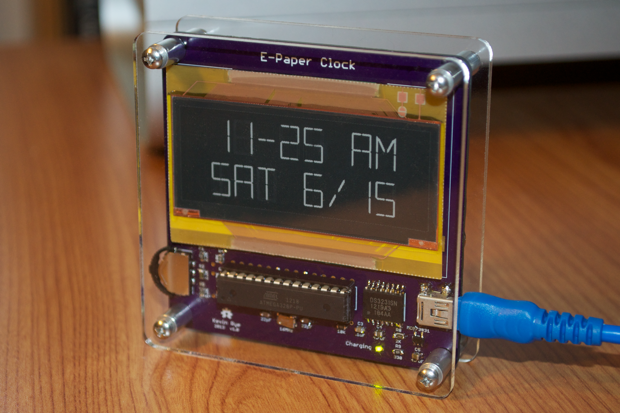
My E-Paper boards finally arrived. I wasted no time in putting one together. I was really excited to see if I got everything right. Needless to say, I totally nailed it! It's so awesome putting in that last piece, powering it on and seeing all your hard work pay off!
Read More... Jun 04, 2013
I was really pleased with the way that my LCD clock turned out. Being my first Arduino project, I was a little nervous that it wouldn’t work, but I totally nailed it! There were a few trials and errors in making a stand for it before I figured out how to make a laser-cut enclosure for it. In the end, it turned out great and it works like a charm. So, how can I make it better?
Read More... May 21, 2013
I shelved the E-Paper clock for a few months so I could finish up some other stuff. (Bare Bones Arduino, RGB Night Light, SpeakJet Board, and the 7490 Clock.) That stuff’s all been wrapped up, so it’s time to switch gears back to the E-Paper clock and wrap it up.
Read More... Apr 20, 2013
I finally received the 30 RGB LED breakout boards that I designed for my RGB Night Light. Time to get my build on!
Read More... Apr 08, 2013
After a few failed attempts at making a home made PCB for my ATtiny Programming shield, I decided to go ahead and upload my Eagle file to OSH Park.
Read More... Apr 06, 2013
With my Bare Bones boards assembled and my RGB LED Night Light proof of concept complete, it’s time to get serious with the Night Light project.
Read More... Apr 05, 2013
Although I’m pretty happy with the way my Bare Bones Arduino boards came out, they could be smaller. I give you…version 2!
Read More... Apr 02, 2013
The SoundBox was a fun project. I learned a lot from it. But it’s a one trick pony and a total waste of the $30 worth of tech I ended cramming into that custom enclosure I made. It would be a shame to waste such a nice looking enclosure. Since I’ve been playing around with the ATtiny, I thought it would be cool to cram it full of RGB LEDs and make a cool rainbow-colored night light for the kids’ room.
Read More... Apr 01, 2013
The Bare Bones Arduino PCBs that I ordered from OSH Park came back. It took 13 days to turn them around. It always seems like such an eternity!
Read More... Mar 22, 2013
I was having some trouble formatting the strings for the time and date. I kept ending up with extra zeros at the end. I posted a question over at the Arduino forums and someone suggested dumping the strings in favor of the sprintf() command.
Read More... Mar 19, 2013
Back in January when I discovered the SoundBox PCBs were junk, I kicked around the idea of making a bare bones Arduino board in favor of dedicated PCBs for simple spur-of-the-moment projects. Firing off a quick project would then just be a matter of code.
Read More... Mar 18, 2013
Since I finished the Word Clock, and I'm waiting for SparkFun to send me a new e-paper display, I figured it was a good time to start playing around with the ATtiny85s that I picked up a few months ago.
Read More... Mar 16, 2013
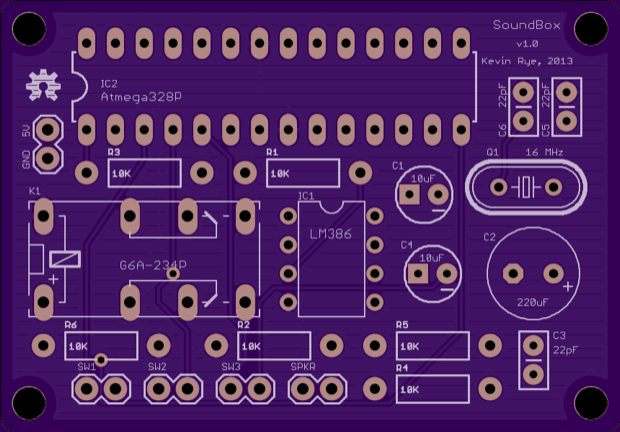
Finally! At long last! The SoundBox is complete.
Read More... Mar 10, 2013
I know it’s been a month since I picked up the e-paper display, but I’ve been so busy with other projects. OK, let’s see what this thing can do…
Read More... Mar 09, 2013
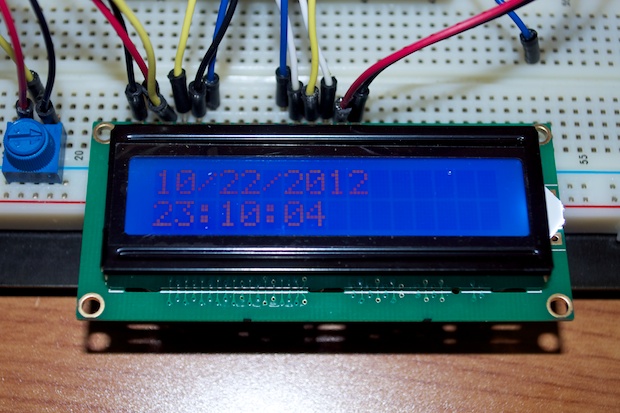
Was I happy with the GUI for my 16x2 LCD Digital Clock? Sure. I did what it needed to do. It displays the time and date. It displays the time in 24-hour mode. Why? Because it was easy. If I wanted to display the time in 12-hour format, I’d have to massage the numbers a bit.
Read More... Jan 29, 2013
After 18 days, my Word Clock PCBs finally arrived. Man, does it take forever for them to turn around a board!
Read More... Jan 27, 2013

It happens to the best of us. You design a board. Wait for the board. Get the board. Assemble the board. Board doesn’t work.
Read More... Jan 20, 2013
I needed to pick up a few more parts for the
Word Clock. I’m still waiting for the PCBs to come in, but I already identified the need for a few more switches and connectors to finish it up once the boards come in. I figured while I was at it, I’d shop around SparkFun for some cool parts to be used in future projects.
Read More... Jan 06, 2013
I completed the PCB for the Word Clock last night, but I slept on it for the night before submitting it. It’s a good thing too, because I thought of something else.
Read More... Jan 03, 2013

Since I finished the
LCD Clock, build a
few stands, and finished the
SoundBox PCB, it was time to start the Word Clock.
Read More... Jan 02, 2013
I completed the circuit for the
FartBox. It’s time to put the wraps on a PCB and send it out to be fabbed.
Read More... Dec 13, 2012
Save yourself the headache and buy your Atmegas with the bootloader pre-loaded.
Read More... Dec 12, 2012
I have all my parts. I have my PCBs. I have a new Dremel. It’s time to put this bad boy together!
Read More... Dec 08, 2012
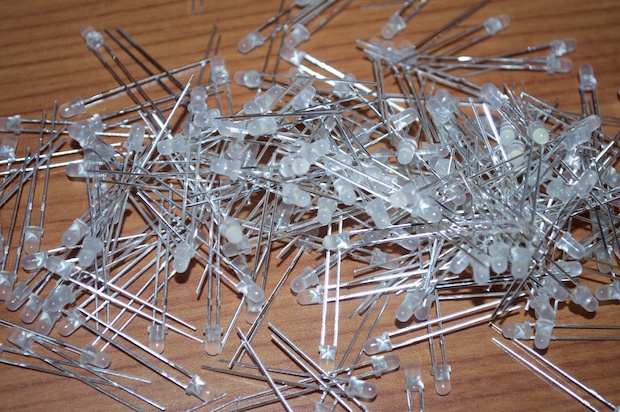
Jameco wanted .89 cents for a white LED. That’s insane when you need 100 of them. eBay to the rescue! I grabbed 200 LEDs from a seller in China for $9 bucks! Let’s just hope they work.
Read More... Dec 07, 2012
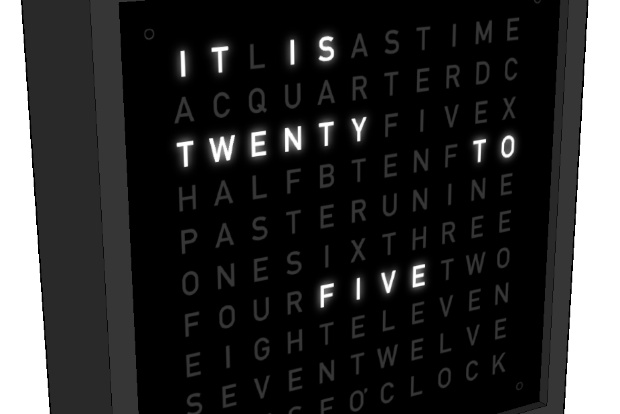
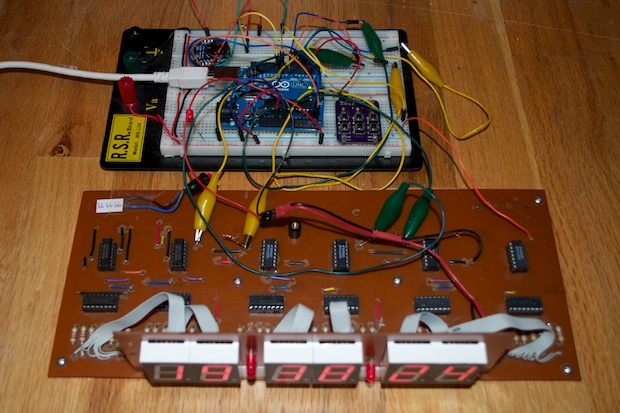
While I wait for all the final pieces to fall into place with my Arduino LCD Clock, it’s time to start up another project: a Word Clock.
Read More... Dec 07, 2012
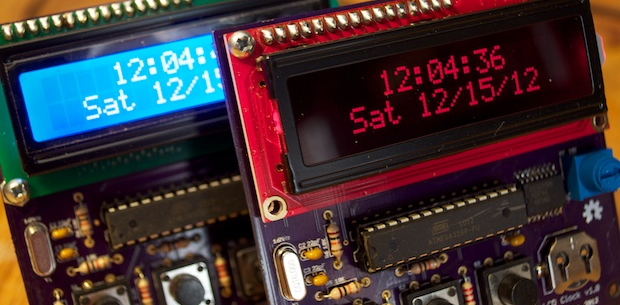
Woo hoo! The boards I designed for my Arduino LCD Clock have finally arrived! They look awesome!
Read More... Dec 01, 2012
Yes. It farts. That’s pretty funny.
Read More... Nov 20, 2012
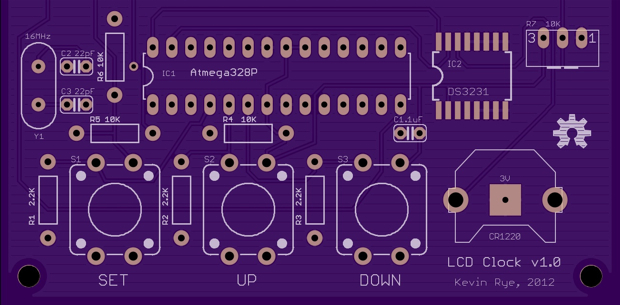
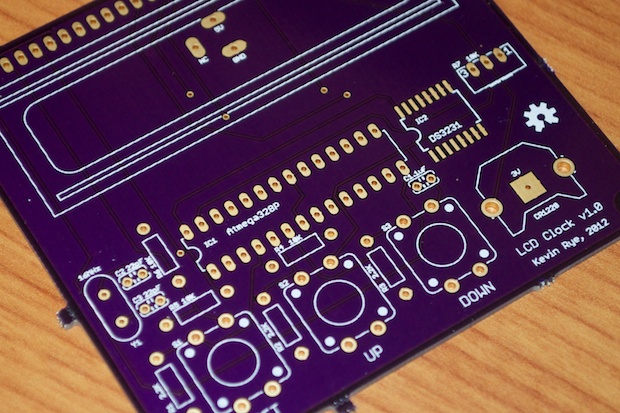
My Arduino LCD Clock PCB is complete and ready to be fabbed.
Read More... Nov 20, 2012
The ChronoDot DS3231 breakout board didn’t arrive over the weekend like I had hoped. I had to wait a few more days for it. Delays! Delays! Delays!
Read More... Nov 15, 2012
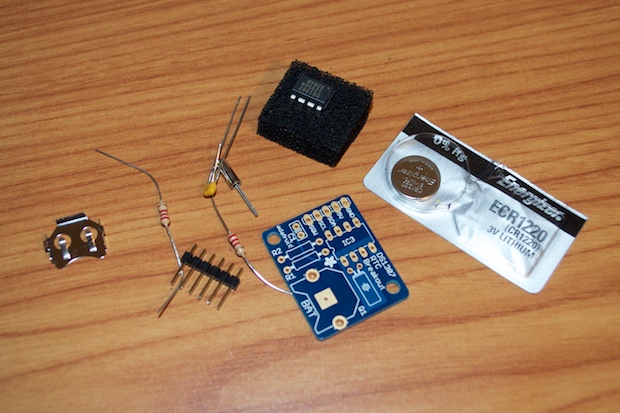
I wish I had enough foresight to install an 8-pin DIP on the last breakout board I ordered. That way I’d have a way to test the chips I ordered from Jameco. I can’t tell if I killed the chips, or I’m just hooking them up incorrectly. In any case, I ordered another breakout board from Adafruit to test them out,
Read More... Nov 08, 2012
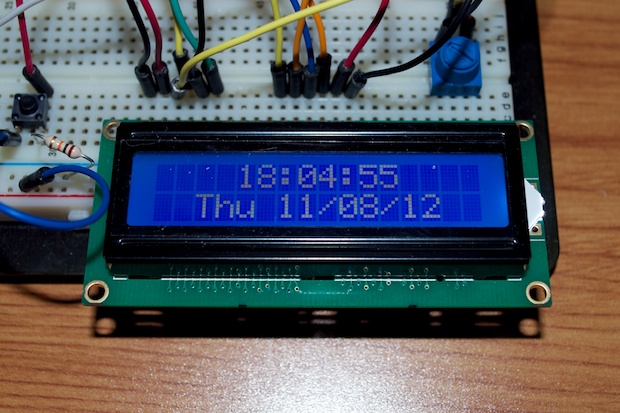
I finished the code for the clock. I would have been finished a week ago, but Hurricane Sandy hit my town pretty hard and I lost power for 8 days. What a setback. Anyway, power’s up and it’s full-steam ahead!
Read More... Oct 24, 2012
I reached another milestone today. I figured out how to read the state of a pin and react to its state. In other words, I can tell the Arduino to “do something” based on whether or not the pin is HIGH or LOW! This is awesome. That means I can now hook up a switch to a pin and press it to set the clock.
Read More... Oct 23, 2012
I got the DS1307 up and running. It was pretty easy to interface it with the Arduino. You just hook the SDA and SCL pins to the Arduino’s analog 4 and 5 inputs, import the RTC library and you’re done.
Read More... Oct 21, 2012
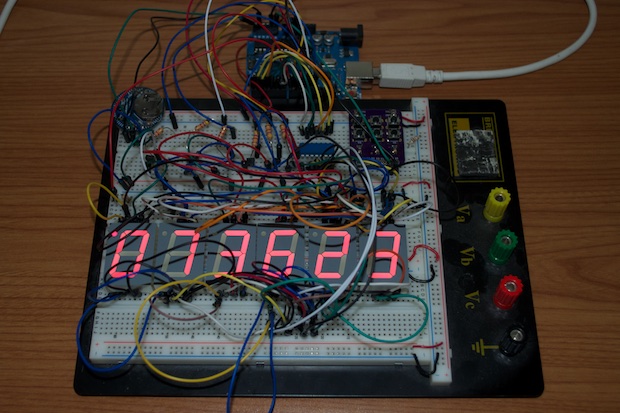
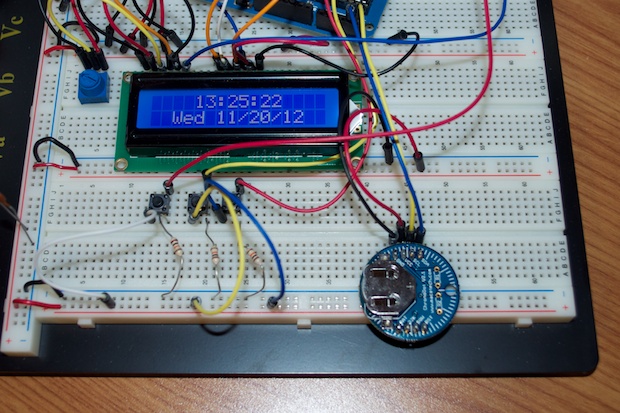
My first project is going to be a clock. So I’m going to get my feet wet with a simple LCD project using the Arduino.
Read More... Oct 21, 2012
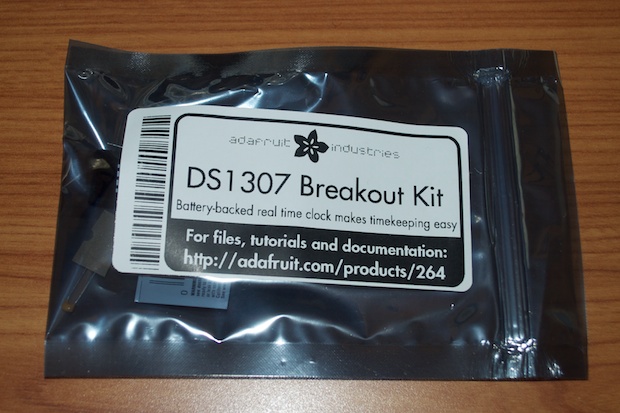
As I said on my last post, I plan on building a digital clock using an LCD and an Atmel328. For now, I just plan on getting my feet wet with a simple LCD project. Sooner or later I’m going to need a pretty reliable RTC to store the time and date. Ideally, I’d like to build a clock that grabs the time from a GPS satellite, but I’m not there yet. Adafruit and Sparkfun both sell cheap $9 RTCs as a DIY kit. Since I was ordering my Arduino board from Adafruit, I figured I’d add the DS1307 Breakout Kit to my cart too.
Read More... Oct 21, 2012
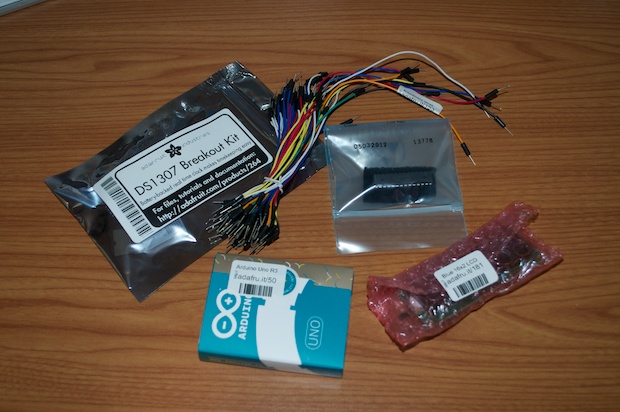
I’ve been meaning to pick up an Arduino board for years. I’ve always been amazed by the fact you can write a program and write it to a chip and have it “do something”. I’ve always wanted to make a clock out of a microcontroller instead of old school 7490 TTL chips. Counting clock pulses with 60Hz seems so “archaic” by comparison. There has to be a better way! After all, every clock you buy nowadays runs off a single chip. How do they do it?
Read More... 
